
 |
|
|||||||
| Home | Rules & Guidelines | Register | Member Rides | FAQ | Members List | Social Groups | Calendar | Mark Forums Read |
| Builds (and builds only) Got a build thread? It goes here, build threads anywhere else on the forum will be locked and never moved. |
 |
|
|
Thread Tools | Display Modes |
|
|
#1 |
|
Zilvia FREAK!
 |
Just a Simple Rebuil...Oh My God What Have I Done.
So since Photobucket decided to murder my old thread I've been left with 2 options,
1) Go through my old thread meticulously and tediously change all of the pictures and keep the half assed writing and rambling. Or 2) Make a bad ass new thread that I actually put some effort into!.. for about 2 weeks or however long it takes me to forget that I did this. Well I think it's apparent that I went with option 2 by this threads existence, for those of you who don't know who I am my name is Hanz and I do car stuff. Professionally speaking I'm a parts salesman and a media producer but that's boring 8-5 stuff. In my free time I'm often working on this pile of rage inducing Japanese sheet metal that I call my car.  I got my S13 my junior year of high school after a pretty rough break up. The car was actually my neighbors and I had been asking to buy it out of his yard for about a year, I ended up with the car after helping him tear down the SR that he blew up in it and finding the car on Craigslist (he did't want to sell it to someone close enough that he'd have to see it everyday lol) so after some hard convincing and an exchange of too much money I had a shit box, but it was my shit box <3 Over the summer I rebuilt the SR and refreshed the car including putting all the interior back in, wiring the car, and painting it. 30 minutes into the first drive of the car the engine spun another bearing which was quite the kick to the nuts because it meant I didn't have a car to start my Senior year. Fortunately though I had the car back together for my birthday in September so I only had to go a few months carless. Now we get to the part of why I haven't dumped this waste of money onto some other idiot. After going to about 11 or so different schools in my educational career I hadn't exactly ever had friends, I had never been to a party, and I was really missing out on the "teenage experience". Ironically all this time the secret to being popular was posting a picture of your shitty Nissan on Instagram, before I knew it I was being invited to parties, football games, making friends and just having a good time. I was genuinely happy and actually living life. I skipped school, I stayed out late, and I had fun, something that had lacked from my life and I wouldn't trade those memories for anything.  To a large extent my car was an extension of myself. It was different, it was loud, it didn't fit in and that's why I love it. My car was my pride and joy and I daily drove it till the day it died which was the day before my prom... Nice! Me, a teenage scumbag, was on my way home with my rental tux in my passenger seat pulled up next to a new SS Camaro and decided to play, some highway pulls ensued and fun was had, until I snapped a rod in half and shot it through my block at about 100. Achievement Get: Ultimate Jackass. As I sat in the Florida sun for about 4 hours waiting on a tow truck all I could think was "wow paying for this with my Steak & Shake paycheck is going to take quite a while." The car got towed home and I started to plan the rebuild out. for the next couple of months about all of my money went towards buying parts, but my minimum wage job wasn't paying enough and I was pretty depressed in general. I didn't have any plans after graduation due to being kicked out of school making it next to impossible to get any decent scholarships despite receiving my diploma on time so college wasn't an option, I didn't really have any career path in mind, and I was just going through the motions. Around this time I decided to say fuck it and move to New Orleans, this meant breaking things off with a girl I really liked which added to that who depression thing and just being alone for a while. No friends, no girlfriend, no cars, just work and time with myself. Looking back I don't know if any of that was the right or wrong decision, I can't really see how staying would've gone, I really just needed to get out and breath a little. So I lived in New Orleans for a bit but ultimately missed being around people I knew so I came home. I got a job in the restaurant industry as a chef at Ruth's Chris, I made decent money, well decent enough to be able to justify spending money on car parts at least. I worked at Ruth's for about 6 months in that time I met my current day girlfriend Andie and started to realize wow the restaurant industry sucks if you want to have any kind of quality of life. At this point I was desperately looking for a new job. So since I was a chef I was doing my usual get home at about 2am and go to bed at 8am but right before I fell asleep I saw a post on Instagram that'd change my life. Mazworx had posted a hiring ad and I exhaustidly typed up a new resume and sent it in. So new paragraph, I felt like that last one was kinda getting long. I was super anxious to get the job, to the point that I was going crazy. after not hearing back for a few days I finally just started showing up and after some annoyance I ultimately got the job. I was hired as a sales assistant, making less than I had in the past couple of years, and had easily the most uncomfortable office chair I've ever sat in, but I was happy. Around this time I started to assemble the short block for my car. I ended up going with the following, ACL Bearings Manley H Beam Rods Wiseco Pistons Stock Block Bored . 020" over This was my 3rd SR so it wasn't anything too hard. I knocked the short block out in about an hour including blueprinting, balancing, and actual assembly time. The most time consuming part is getting those stupid aftermarket wrist pin clips in.     And I think I'm going to end the first part of the build thread redo right there for now. The car currently is all together so I have plenty of content I'm just really hungry and want to go get lunch haha. |
|
|

|
| Sponsored Links |
|
|
#3 |
|
Zilvia FREAK!
 |
Seeing how that particular event was about 4-5 years ago I'm well aware of that. That bit of the story is still relevant though, if it weren't for getting cheated on I wouldn't have spent hours being a sulking teenager on the internet and found out about S-chassis.
Also it's easy to look into the past and minimize events, saying they weren't serious because it was high school. But it's important to remember that in that moment that was my life, that was the biggest stress inducing event, that was something that changed who I was forever forward. People's life problems are unique, proportional, time sensitive, and context heavy things so they're quite hard to look at and judge don't you think? |
|
|

|
|
|
#4 |
|
Zilvia FREAK!
 |
Well while I'm here I might as well update this.
So we left off at getting the short block assembled which was relatively uneventful mainly because it's probably one of the cheaper parts of the engine. I spent far more time and money on the cylinder head which really slowed things down due to having a 40 hour a week job for the first time in my life and also not making the best money. The build out on the head I ended up going with was relatively simple, - Port & Polish w/ 87mm Combustion Chamber - BC Single Springs & Retainers - Tomei 270 Hydraulic Camshafts - Dual Rocker Guides - Stock Valves - Multi Angle Valve Job Now, remember that part about me not making great money at this point in my life? Well that's evident in the cylinder head work. All of the porting and combustion chamber work is hand done by myself at home, the valve job was done on my valve machine from the 1940's, and the dual guides were done by hand on my bench grinder. If I would've had the money I absolutely would've chosen to pay to have all of this done because it really is worth it. I know that this head won't perform as well as it could and I wish I could go back and change that but life is life.  While I was waiting on myself to make enough money to finish the long block the short block got the timing components bolted on and the head some other little odds and ends trying to keep busy and not let the project sit.  Around this time is when Andie start staying at my house so trying to explain to your relatively new girlfriend why you keep an engine in your bed room is hard. None the less she finally kinda got used to it and we're still together so I guess it doesn't bother her too much, she even let's me occasionally use her for my portfolio work so that's a plus!  Well time for lunch again, next update will be on long block assembly and my various turbo set ups that I was trying to decide between. |
|
|

|
|
|
#6 |
|
Zilvia FREAK!
 |
No but a guy can dream I suppose /:
|
|
|

|
|
|
#7 |
|
Zilvia FREAK!
 |
Well it's Monday and I'm bored at work again so update time!
So we left off having just assembled the short block and almost completed the head. Now it's time to slap those two chunks of overpriced nonsense together and call it an engine. Assembling the long block was quite uneventful, this was the first time I actually had a second set of hands to help with everything. The most time consuming part was cleaning all of the used parts from my old block. Since everything survived a brutal engine failure I made sure to bust down all the parts like the oil pump and oil filter housing and clean them thoroughly, the last thing I wanted was for my new engine to spin a bearing on start up from me being a cheap and lazy idiot. So with the help of my girlfriend I got the head set on the block and I started to assemble the valvetrain. *Fun Fact: on the exhaust side of the SR20det head by cylinder number 4 there is a cavity in the casting that goes about 2-3 inches straight down, and if you drop a guide in there you will spend the next 4-6 hours getting that out since you cant get a magnet down there, you may spend less time doing this if you notice this happened BEFORE you torqued your head down. After that escapade I decided to throw my T3 top mount set-up on the block for mock up and I found that I just wasn't a fan of any of it and I ultimately sold the set-up.   After I sold the T3 set-up I bought myself a stock manifold GT28 set-up with an external gate because I saw it as a much more reliable option that would also be more cost and time effective because it meant I could use a lot of off the shelf parts. In hindsight I wish I would've tack'd the housing nuts while the engine was out of the car. It's not leaking yet but I don't have much faith that'll hold on, turbos never seem to and it was a problem that I fought regularly with my old top mount set-up. It seemed like every other week or so I was buying new nuts for that.   So I believe in the next update I'll go over the chassis modifications then after that I'll post about dropping the engine in the car. |
|
|

|
|
|
#8 |
|
Zilvia Junkie
 Join Date: Jan 2013
Location: Indianapolis, IN
Age: 26
Posts: 475
Trader Rating: (7)
           Feedback Score: 7 reviews
|
Like the story since I can kind of relate. I missed out on the "teenage experience too". I ate by myself at lunch for the first 3 years of highschool, didn't party or go to school games and no love life what so ever lol. Just stayed at home mostly. Got my 240 my senior year and it changed my life honestly. Driving that thing threw my depression out the window and I met a decent amount of friends that also liked cars from the 240.
A bit jealous though. How did you learn how to build the engine so young? I am still lacking in this category and want to rebuild a rb25 in a couple more years. Good build thread so far. |
|
|

|
|
|
#9 | |
|
Zilvia FREAK!
 |
Quote:
Once you get "engine theory 101" down every engine is basically the same. Some common sense and a service manual will get you through most. |
|
|
|

|
|
|
#10 |
|
Guest
Posts: n/a
|
--Deleted--
Last edited by Tucker240; 03-17-2019 at 11:38 PM.. |

|
|
|
#12 |
|
Zilvia FREAK!
 |
I wouldn't know, I haven't ever ran power steering.
|
|
|

|
|
|
#13 |
|
Leaky Injector
|
Will be following this thread!
Are you planning to go VE on the head? You should take advantage of all the discounts while your still at mazworx haha
__________________
Instagram: willssilvia |
|
|

|
|
|
#14 |
|
Zilvia FREAK!
 |
Haha, no discounts aren't as deep as everyone thinks they are and I couldn't justify ever spending the amount it'd take to build a good VVL setup. If the SR pops the car will have a used NASCAR engine dropped in with a 4 speed and I'll call it a day.
|
|
|

|
|
|
#15 |
|
Zilvia FREAK!
 |
So where to start with the chassis? I guess we'll start with the original plan. The idea was to leave everything stock but we all know that stock isn't fast so plans changed. The interior got gutted, a roll bar was fabbed up and welded in, a custom chassis harness was made, the floor got cut out so my seat could sit a little lower, and some other little tid bits like the dash getting flocked was done. Also around this time I decided to go full race car and run a standalone and a racepak setup for optimum street cred.
Here's a photo of dealing with the sound deadening. I used a combination of dry ice, xylene, a wire wheel, and some fire. Dry ice is easily the fastest, but you'll be high as a kite if you use xylene so the choice is yours.  Once I got the interior stripped I went ahead and started mocking up seats to see how tall they'd be. Unfortunately I have a bottom mount bucket and no access to a plasma table and press break to make side mount adapters so the seat still doesn't fit exactly how I'd like it, I plan to redo it. I cut the old hump out and put some new metal in, with some massaging it fit, again not the best but it's welded in now so I suppose it's good haha.   Now that I had the floor cut and the chassis clean I went about installing the jungle gym. I really only installed the roll bar and fixed bucket seat because I ripped the automatic seat belts out of the car and just don't believe in harness bars, so fitting it super close to the chassis wasn't that important, I knew I wanted interior back in the car when it was all said and done so I actually cut my main hoop a bit shorter than you should on a competition car, regardless it'd still pass any tech, it's just not what I'd call "race spec". I started with one of our pre bent roll bar kits from work and welded it up myself, this was my first large TIG project and I was really excited to do it, the only hard part was welding the down bars to the main hoop because I kept catching the headliner on fire #streetcarlife.   Here's an up close shot of a couple of welds, like I said this was one of my first TIG projects and I hadn't gotten a good feel for starting and stopping or turning my wrist while welding so there's some widening of the puddle in places where I hesitated and got things hot, overall though I'm happy with how everything came together. Specs for anyone who cares, 120 amps 1 PPS, I don't remember my pulse settings 1/16 ER70s2 filler 3/32 electrode with a sharp point Big ole gas lens  Here's a pic of the roll bar all welded in place, I ended up building boxes to raise everything up where I wanted, the diagonal bar didn't let me cut the hoop short enough to put the hoop up on the back seat shelf. remember what I said about burning the headliner welding the rear down bars? Well I could've avoided that by making some holes in my boxes allowing me to drop my hoop down for final welding, you live and you learn.  *The seat isn't in its final position in this photo I did get it lower Here's a look of the paint I put on the cage, I used Rustoleum hammer finish black. I also used the brush on type with a sponge brush and this makes a huge difference, the paint goes on super thick and makes an awesome powder coat like texture. 10/10 recommend.  And here's a photo of the seat bolted to the bracket I made, the top belt angles still aren't ideal, I really want to convert the seat to a side mount set up and tilt it back about 10* and it'd make the belt angle "legal".  Now lastly I also did some interior mods after I got the roll bar situated including flocking the dash and making some custom aluminum panels. I also wired the car but I'll make a separate post for that.    Street Faction is a awesome comapany that makes awesome products but as someone who owns fab tools, a welder, and has access to buying material I can't justify their cost. This heel plate cost me 2 hours and $20 for example.    Okay so next post we can probably go over engine install and stuff like exhaust fab then get into wiring, sound like a plan? Cool well that's all for now! |
|
|

|
|
|
#16 |
|
Zilvia FREAK!
 |
Oh boy, I haven't touched this in a hot minute. I suppose that means it's time for an update! According to past me the next post is supposed to be about engine install so let's go ahead and do that.
I seemed to have glanced over the whole bay shave in my previous posts. This car had a factory engine bay with factory beat to hell paint that I always hated. It was cluttered, ugly, and annoying to work in and I set out to fix all of that. 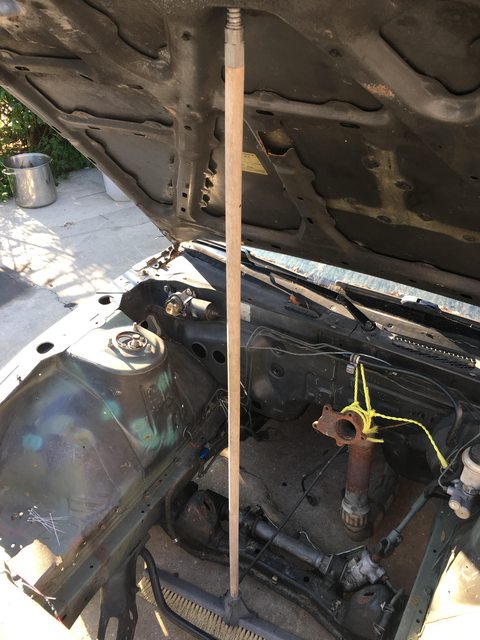 The first thing I did was weld all of the holes shut and grind them smooth. 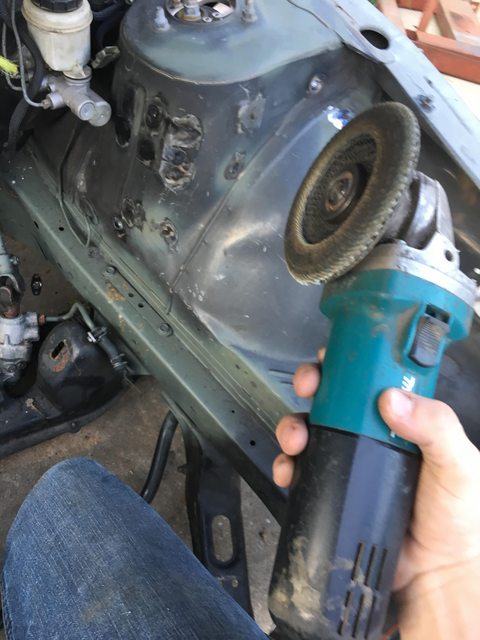 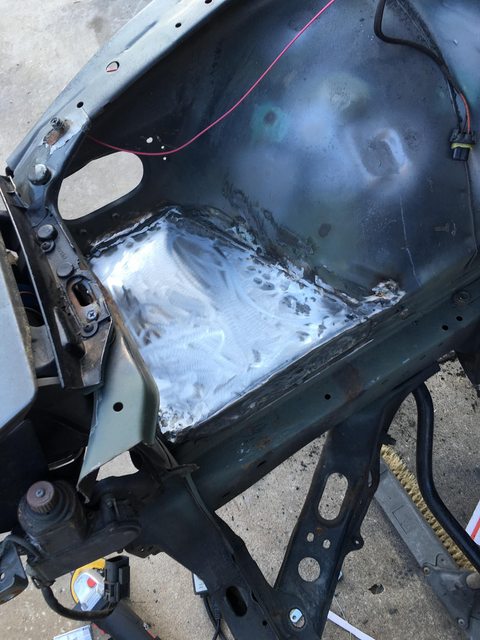 After that it was time for filler, primer, sand, and repeat. I used short strand filler since it's a lot more resilient than standard bondo. 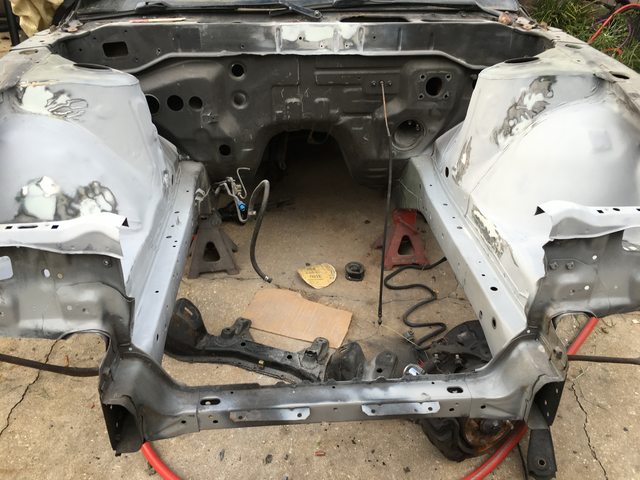 As you can see I also decided to cut the factory core support out in favor of being able to service the engine easier. All in all I can pull the entire drivetrain by myself in about 30 minutes. Moving forward It was time to shoot the bay in one of many coats of high build primer to help smooth out all of the imperfections left behind after sanding. 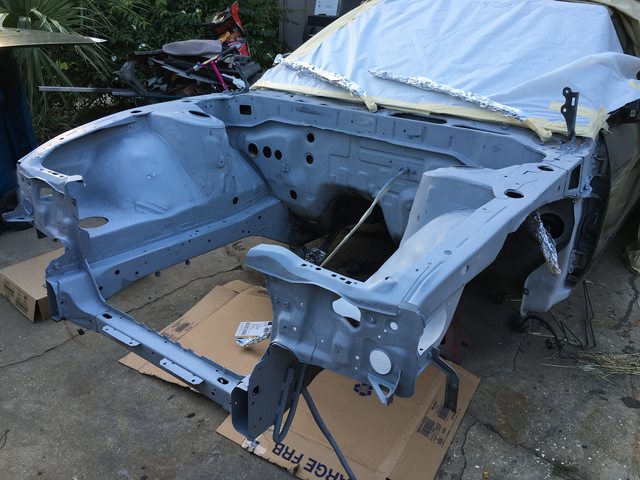 After several more coats and more sanding it was time to start thinking about engine bay paint colors. Personally I'm a huge fan of low key cars with super over the top "hot boi" accents so I decided to keep the car relatively plain grey with a intense purple bay. I ended up settling on Tanzanite purple. 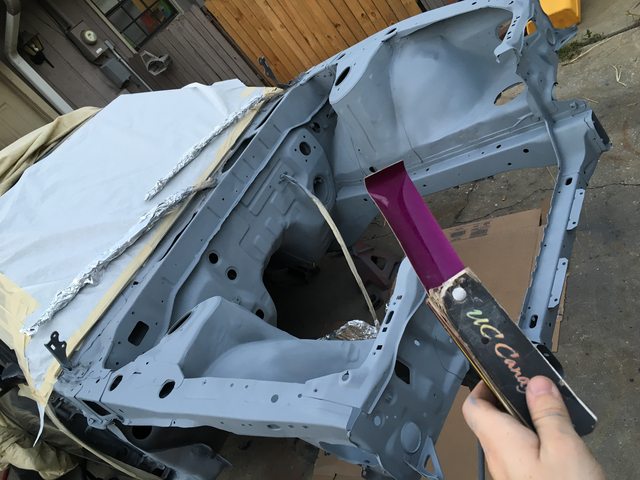 Here's the fun part, if you're an observant viewer you'd notice the car is outside. I sprayed the base coat on a day that had a 0% chance of rain and guess what, it fucking poured. So after spraying I had to sand it all back down. P.S. when water lands on clear coat it pretty much leaves tons of small craters like the surface of the moon, which is a total pain in the ass to sand. 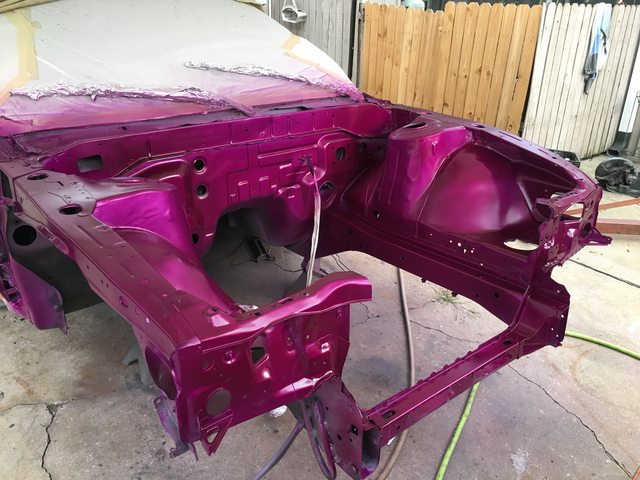 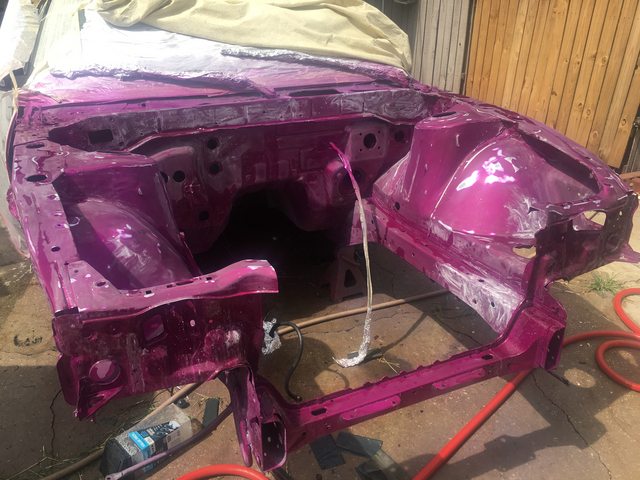 As per paint attempt #2, it was done in my garage. I went ahead and laid down the silver base, followed by the purple layer and then buried it in clear.  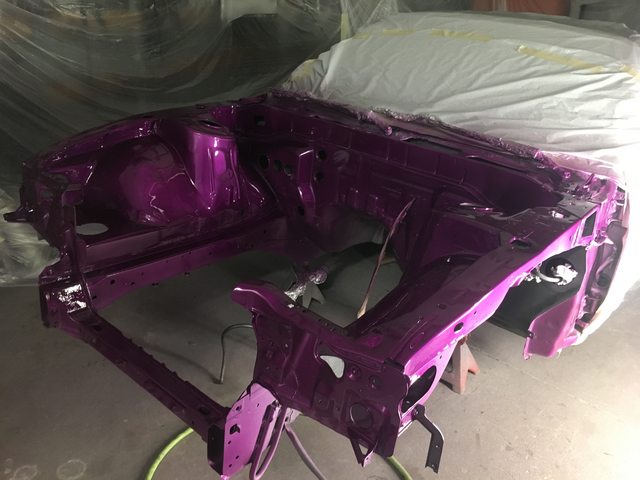 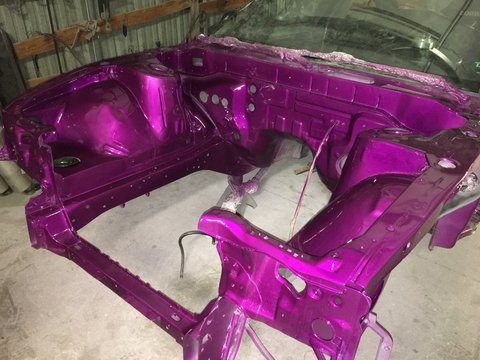 After the bay dired for a few days it was time to put everything back together! I started by bolting in accessories and mocking up the radiator and building the removable core support for it which would also hold the intercooler. 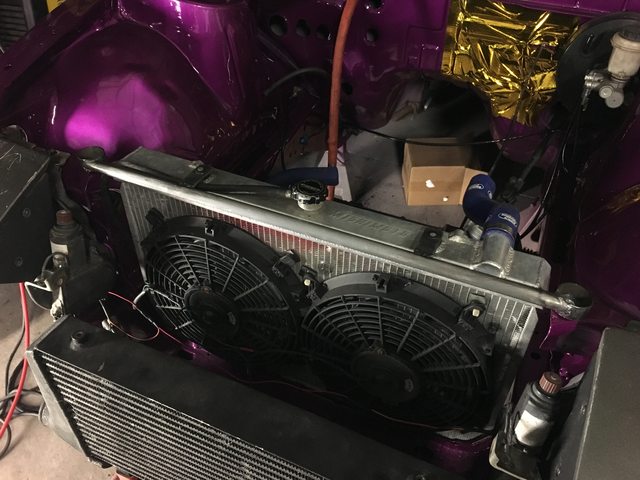 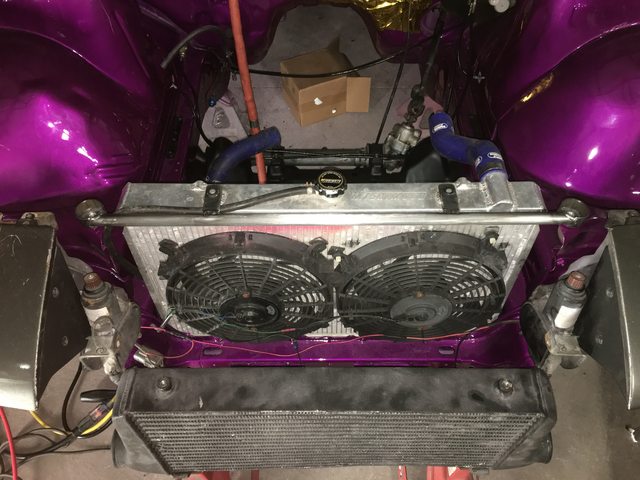 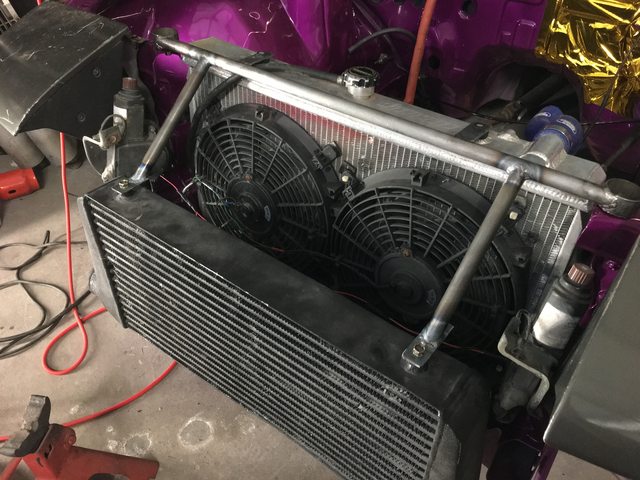 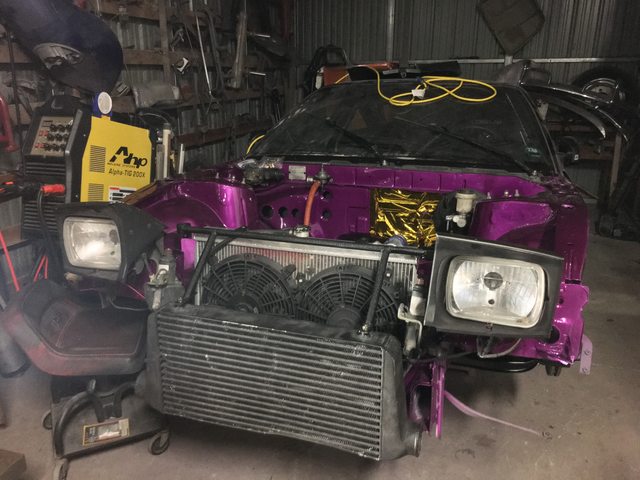 After that was done, I unbolted everything and slide the engine in. 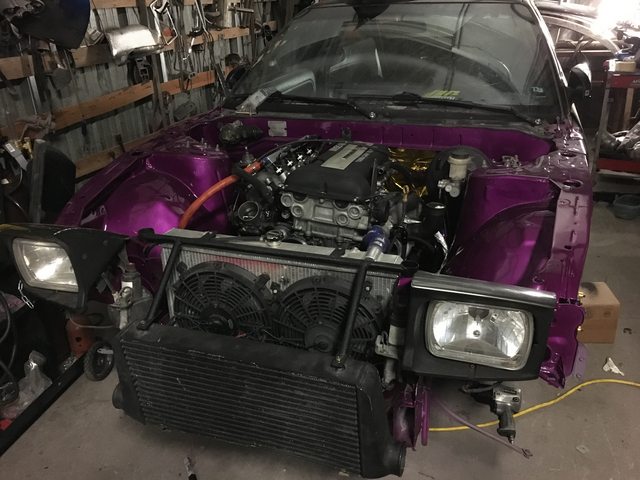 Once the engine was in it was time to start fabbing little things like a wastegate dump, catch can, etc. 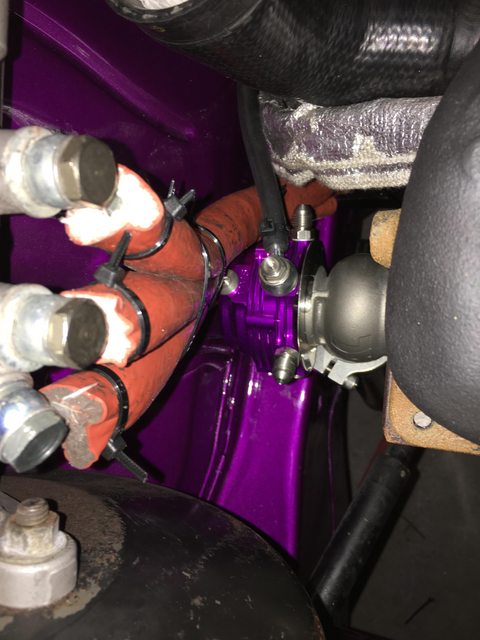 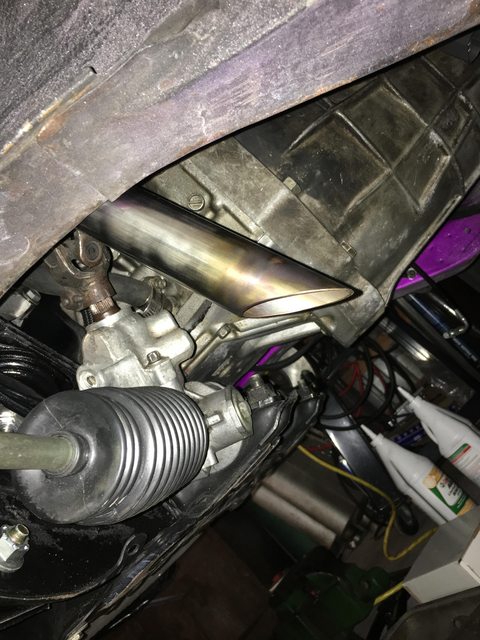 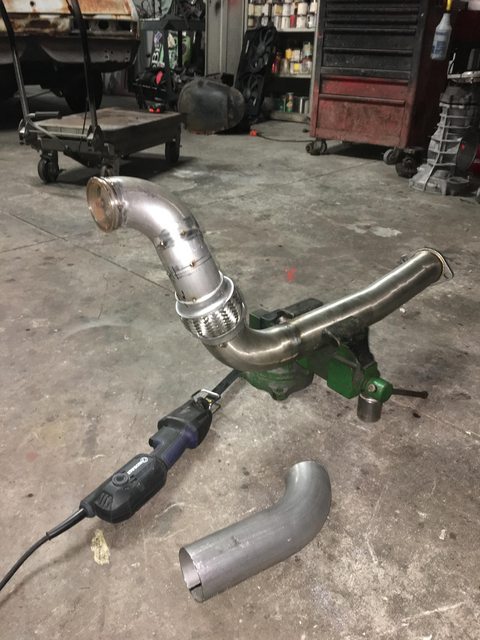 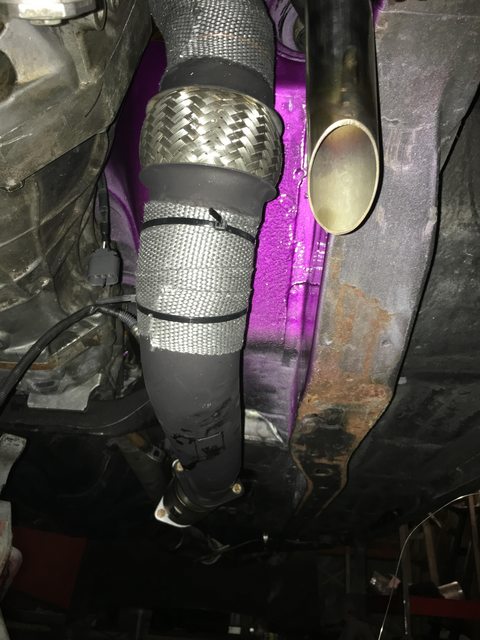 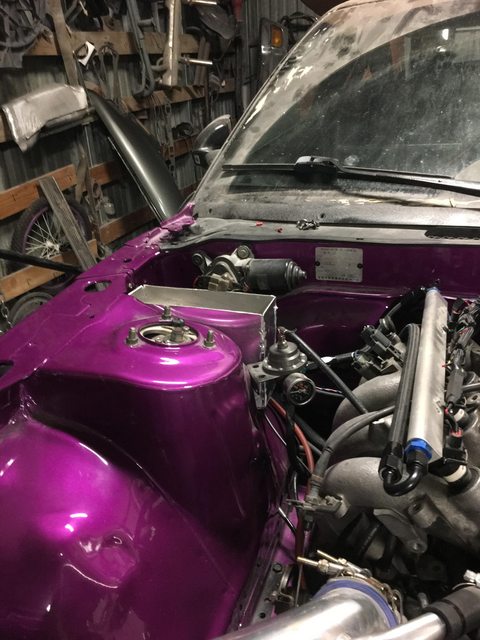 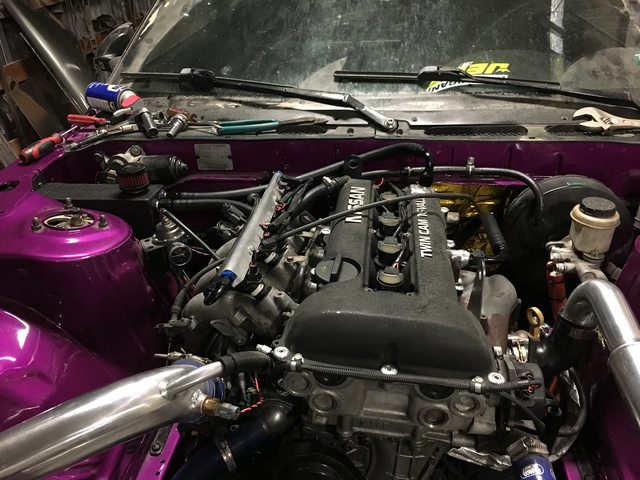 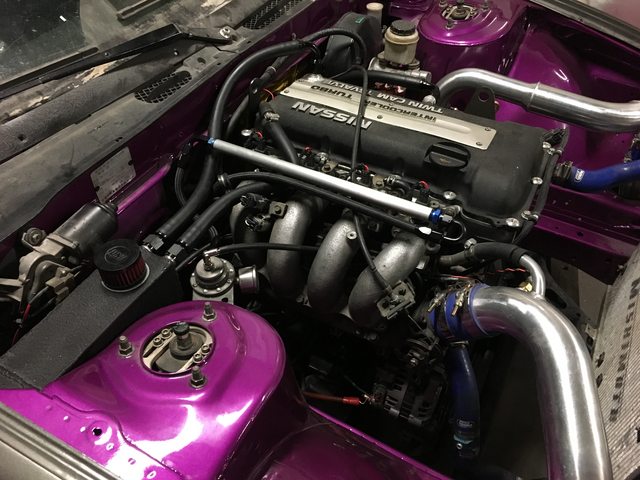 Once all of that was done and a few more parts were ordered the drivetrain was finally in the car. This was a major milestone, it was the first time the car looked like a car in years and it made it finally worth it. Well, I'm ready to get lunch now so I'm gonna end this update here. |
|
|

|
|
|
#18 | |
|
Zilvia FREAK!
 |
Quote:
Basically Mazworx and Real Street have always done a lot of business together so I was always here and had friends who also worked here. Given the opportunity for a pay raise amongst other benefits I took a job here in July of 2017. |
|
|
|

|
|
|
#19 |
|
Post Whore!
 |
|
|
|

|
|
|
#22 | |
|
Premium Member
 Join Date: Mar 2009
Location: Maricopa, AZ
Age: 30
Posts: 7,679
Trader Rating: (10)
           Feedback Score: 10 reviews
|
Quote:
Oh I didn't even notice the new email in your signature lol, congrats at the job at RealStreet! I was honestly just curious haha, not being that guy :P |
|
|
|

|
|
|
#24 |
|
Premium Member
 Join Date: Mar 2009
Location: Maricopa, AZ
Age: 30
Posts: 7,679
Trader Rating: (10)
           Feedback Score: 10 reviews
|
It's really not that close, and unless doing like extended highway pulls through 5th gear probably won't get hot enough to do anything. Could always heat wrap it.
Hanz put some stainless cable ties on your downpipe wrap haha. |
|
|

|
|
|
#25 |
|
Zilvia FREAK!
 |
It hasn’t affected it, I’ve got a few track days and a lot of hours on this setup and the dump tube placement hasn’t caused any issues and the wastegate also hasn’t caused any issues with the brake lines.
|
|
|

|
|
|
#26 |
|
Zilvia FREAK!
 |
Lol, I meant to but I melted those off on the first drive a while ago.
|
|
|

|
|
|
#27 |
|
Zilvia FREAK!
 |
|
|
|

|
|
|
#28 |
|
Zilvia FREAK!
 |
Haha thanks! I currently have an LS in my room. I’ve had an engine inside of my bedroom for almost every day since I was 17, it’s becoming a hard habit to break.
|
|
|

|
|
|
#29 |
|
Nissanaholic!
 Join Date: Jun 2008
Location: NoVA
Age: 35
Posts: 1,710
Trader Rating: (23)
           Feedback Score: 23 reviews
|
Did you create your brake hardline delete yourself? I'm planning on getting the Chase Bays for convenience but wasn't sure if there were significant savings to be had for via DIY.
Also, what gauge/type of metal did you use for the battery tray area you replaced/welded in place? |
|
|

|
|
|
#30 | |
|
Zilvia FREAK!
 |
Quote:
All in all high pressure PTFE lines are insanely hard to do right without the correct tools, it’s worth buying the chase bays kit in my opinion. As per the battery tray I believe 12 or 14 gauge, it’s relativley thick. I honestly do not know though, I get all of my material from a local surplus store that sells by the pound. I just buy what feels right for a given job. |
|
|
|

|
 |
| Bookmarks |
| Thread Tools | |
| Display Modes | |
|
|