|
|||||||
| Home | Rules & Guidelines | Register | Member Rides | FAQ | Members List | Social Groups | Calendar | Mark Forums Read |
| Tech Talk Technical Discussion About The Nissan 240SX and Nissan Z Cars |
 |
|
|
Thread Tools | Display Modes |
 02-13-2011, 08:17 PM
|
#91 |
|
Leaky Injector
 Join Date: Oct 2008
Location: san antonio
Age: 35
Posts: 146
Trader Rating: (1)
 Feedback Score: 1 reviews
|
any update on this i just bid on this for my zenki s14 Zenki JDM 200sx 240sx Head Up Display Cluster HUD - eBay (item 150561142922 end time Feb-19-11 15:50:56 PST) and im hoping to get it working
|

|

|
| Sponsored Links |
|
02-13-2011, 08:53 PM
|
#92 | |
|
Post Whore!
 
Join Date: Sep 2004
Location: Simi Valley, CA
Age: 40
Posts: 6,879
Trader Rating: (15)
 Feedback Score: 15 reviews
|
Quote:
__________________
Wayne |
|
|
|
|
|
02-18-2011, 03:39 AM
|
#95 | |
|
Leaky Injector
Join Date: May 2007
Location: Charleston, SC
Age: 37
Posts: 121
Trader Rating: (4)
Feedback Score: 4 reviews
|
Quote:
Anyways.. no real update yet other than I found an 95' Altima HUD in the junkyard to make refrences to, but the weather is starting to get a bit warmer up here so I plan on tackling this soon.
__________________
|
|
|
|
|
|
03-16-2011, 03:41 PM
|
#96 | |
|
Quote:
|
||
|
|
|
|
07-25-2011, 10:05 AM
|
#97 |
|
Leaky Injector
Join Date: May 2007
Location: Charleston, SC
Age: 37
Posts: 121
Trader Rating: (4)
Feedback Score: 4 reviews
|
Classes are out for Summer so its time to finish this once and for all.
I started pulling apart the JDM Kouki dash harness and after comparing it with the zenki harness I have decided to pull the wires out of the JDM harness and splice them into the zenki. The main reason for this was because the zenki harness has cruise control, illumination dimmer, and OBD port built into it, while the JDM harness has none of these. I will also be taking the Digital climate control, triple-din gauge, and defrost mirrors portion of the harness out so it's going to take some time. Since I'll be splicing the Kouki harness into the Zenki one I made an Excel sheet showing the pin diagram for the JDM Kouki cluster, the USDM Zenki cluster, and what gets spliced together. 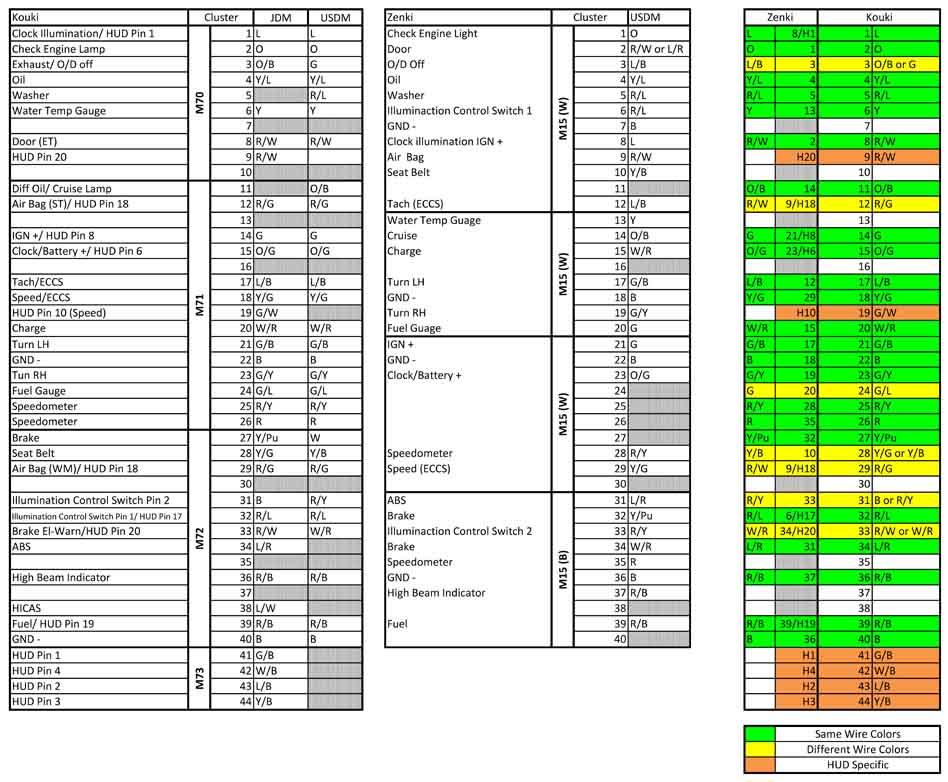 If anyone else is out there and wants to put the Kouki HUD in their Zenki all you need is the Kouki HUD cluster with Plugs and the HUD unit with it's plug. There are probably other Nissan cars that use the same plugs in case you can't find them. And the fun begins!
__________________
Last edited by wbarrett48473; 12-18-2020 at 08:50 AM.. |
|
|
|
|
07-25-2011, 02:26 PM
|
#98 |
|
Leaky Injector
Join Date: May 2007
Location: Charleston, SC
Age: 37
Posts: 121
Trader Rating: (4)
Feedback Score: 4 reviews
|
Was hoping that I could just de-pin the kouki plugs and add in the zenki wires but unfortunately they didn't match. So, I tried to de-pin the side mount harnesses but those pins were different sizes as well.
Looks like this is going to take longer than I thought 
__________________
|
|
|
|
|
07-29-2011, 05:31 PM
|
#99 |
|
Leaky Injector
Join Date: May 2007
Location: Charleston, SC
Age: 37
Posts: 121
Trader Rating: (4)
Feedback Score: 4 reviews
|
Small update I still haven't given up on this project! The HUD is wired in, as well as the Digital Climate Control, and triple-din gauge. Also have the old harness out of the car and just finishing up the alarm/remote start and side view mirror defrost.
Hopefully in the next few days it works. If not I think I may  Got Wires?
__________________
|
|
|
|
|
08-02-2011, 03:26 PM
|
#100 |
|
Leaky Injector
Join Date: May 2007
Location: Charleston, SC
Age: 37
Posts: 121
Trader Rating: (4)
Feedback Score: 4 reviews
|
Almost 100% done. I still need to cut open the dash to install the bezel and put it in. Also, I need to find out why the check engine light is now on considering it wasn't on before the swap.
Oh well... here is a little sneak peak, be aware the car is being prepped for paint so it looks rough and the interior is completely torn apart right now, but at least it shows the HUD.
__________________
|
|
|
|
|
08-08-2011, 07:51 PM
|
#102 |
|
Leaky Injector
Join Date: May 2007
Location: Charleston, SC
Age: 37
Posts: 121
Trader Rating: (4)
Feedback Score: 4 reviews
|
Now that everything is wired up and seems to be working properly I decided it was time to fit the HUD to the dash.
Now is when I'm glad I saved my old ugly blue/green dash to play around with. While fitting it into the dash I noticed a few problems. The first problem is the location of the vent. Here it is when the vent is removed, I figured I could just get some flexible pipe to get around this, but this is what it looks like with the Kouki HUD sitting in there. If anyone installs the Zenki HUD they shouldn't have as much of a problem. The next problem is on the top of the dash. AS you can see the VIN plate gets in the way, also the HUD trim will need to be formed to match the contours of the LHD dash. Here is the best pic I could find of the location for the HUD. It's from someone in New Zealand ( I also tried to ask for permission for the pics but you had to be from NZ to join the forum  ) )He must be driving an Automatic since mine doesn't light up that portion. ...getting there 
__________________
|
|
|
|
|
08-11-2011, 06:52 PM
|
#103 |
|
Zilvia FREAK!
 Join Date: Sep 2005
Location: 50 miles west of chicago
Posts: 1,186
Trader Rating: (9)
  Feedback Score: 9 reviews
|
so whats the cost going to be for me to send you my stuff and have to wire it up?
 i dont think i can tackle something like that. i have everything but the dcc plug needed to connect to the cluster. i dont think i can tackle something like that. i have everything but the dcc plug needed to connect to the cluster. gotta find one somewhere. |
|
|
|
|
08-11-2011, 07:12 PM
|
#104 |
|
Leaky Injector
Join Date: May 2007
Location: Charleston, SC
Age: 37
Posts: 121
Trader Rating: (4)
Feedback Score: 4 reviews
|
Wiring it up is actually really easy, but in my case I was also rewiring the digital climate control, triple-din gauge, defrost mirrors, alarm w/remote start, HUD, and Power seats w/ heat all at the same time. Also, instead of just cutting everything and splicing I de-pinned as much of the harness as possible and added fuses to the fuse panel and wires to the side mount junction box just to keep the harness tidy.
Because of this it took much more time, but for the HUD it's just a few simple splices to wires that already run to the cluster so it's not that big of a deal. If your doing the Kouki HUD and cluster there is already a simple splicing diagram for you and the Zenki version that DFWZenki wrote should help. Another word of advice the wire colors from the HUD pretty much splice into the same wire colors from the cluster, minus one of the blacks which is actually for the dimming function. Also if your looking for the DCC plug head to the junk yard and you will find many Maxima, Alitima, J30, Q45s, etc.. that will have it. I cant remember off the top of my head which car had it but I'm thinking it was an older Q45. I still need to fit the HUD trim to my dash but got caught up replacing a friends Alternator (x3) the last few days (F.U. Autozone!) but plan to tackle this tomorrow!
__________________
|
|
|
|
|
08-12-2011, 05:29 PM
|
#105 |
|
Leaky Injector
Join Date: May 2007
Location: Charleston, SC
Age: 37
Posts: 121
Trader Rating: (4)
Feedback Score: 4 reviews
|
Another small update...
Well it was time to get this trim working with the LHD dash, nobody wants an dash with a big hole cut in it and a HUD sticking out, and I'm no exception. First step I did was place the trim on a piece of copy paper and trace it out as best as possible and then marked where the "legs" were. After I was done I taped it to my old dash and cut the pad portion off with a box cutter and some hobby knives. Here it is with just the trim sitting in there.. Doesn't look to bad. But, since it was made for a RHD car it wouldn't sit flush as shown below. The only solution I could think up was using a heat gun to soften up the plastic and form it to the dash. (There is probably a better way but I'm I dunno) Done! Doesn't look bad at all to me - ..Now I need to do a little more trimming to make the HUD unit fit correctly I think its about time to throw this into the car and make sure everything looks right.
__________________
Last edited by wbarrett48473; 08-12-2011 at 06:36 PM.. |
|
|
|
|
08-12-2011, 08:01 PM
|
#106 |
|
Leaky Injector
Join Date: May 2007
Location: Charleston, SC
Age: 37
Posts: 121
Trader Rating: (4)
Feedback Score: 4 reviews
|
Looks pretty good to me so I should be ready to fit it to my black dash.
Does look like I need to get some window tint to keep it from having double vision. Also, these were cellphone pics so it actually looks much better in real life.
__________________
|
|
|
|
|
10-17-2011, 06:42 PM
|
#107 |
|
Leaky Injector
Join Date: May 2007
Location: Charleston, SC
Age: 37
Posts: 121
Trader Rating: (4)
Feedback Score: 4 reviews
|
Now that the Kouki version has been up and running good in my car I decided to start playing around with the Zenki version tonight.
Although I'm not actually hooking this up into my car I have been attempting to bench test it to see if I can get it to work. 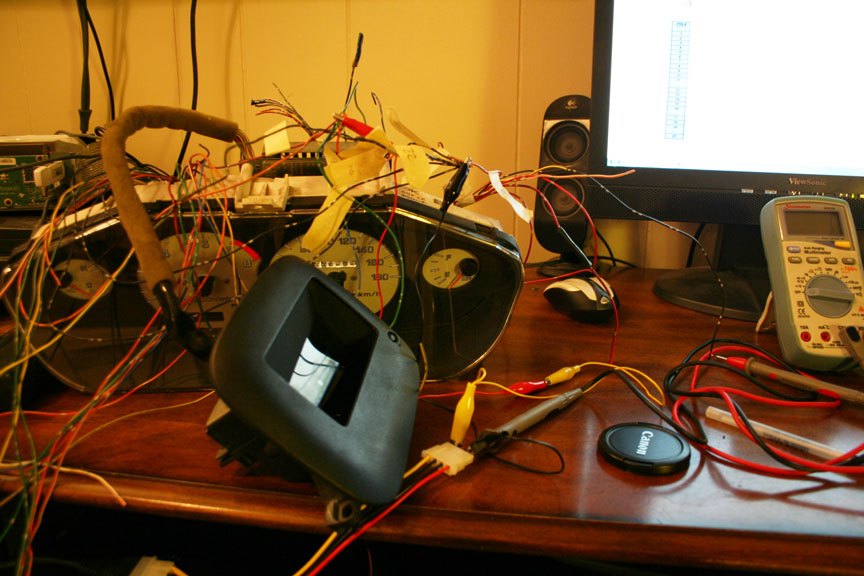 ...I need a better work space  After going over DFWZenki pin diagram I hooked up all of the grounds and power wires to a 12v computer power supply and all I noticed was 2 very small bits of light coming off of the HUD display and nothing else. That is, until I unplugged the power I noticed the display flash on for a split second. 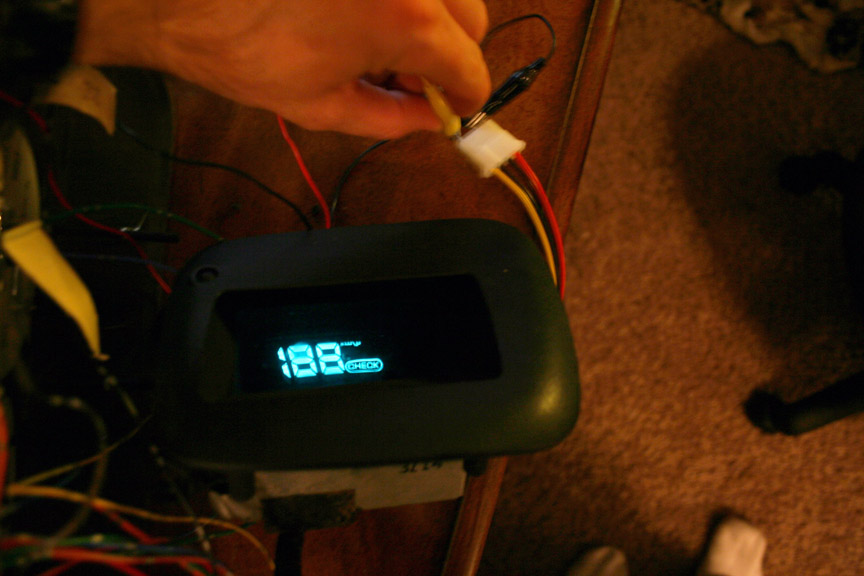 Does anyone know what might be causing this? Do I have to have it hooked up completely with the various speed/tach/etc sensors and computer, or could it be just a simple ground/power wire misplaced. I know its not the HUD unit itself, I tried 2 different clusters and 2 different HUD units.
__________________
Last edited by wbarrett48473; 12-18-2020 at 08:55 AM.. |
|
|
|
|
| Bookmarks |
| Tags |
| guage cluster, heads up display, hud, s14 hud |
| Thread Tools | |
| Display Modes | |
|
|


 Linear Mode

