
 |
|
|||||||
| Home | Rules & Guidelines | Register | Member Rides | FAQ | Members List | Social Groups | Calendar | Mark Forums Read |
| Builds (and builds only) Got a build thread? It goes here, build threads anywhere else on the forum will be locked and never moved. |
 |
|
|
Thread Tools | Display Modes |
|
|
#1 |
|
The Architect.
 Join Date: May 2006
Location: Los Angeles, CA
Posts: 11,580
Trader Rating: (392)
           Feedback Score: 392 reviews
|
Red S14 Kouki build. KA-T, JDM Aero, + goodies galore.
Starting a build thread for my younger brother to help keep track of the progress on this particular Kouki.
Long story short, I did a shitty thing and had originally promised him my blue Kouki well before we even started that build. After crunching the numbers and seeing how much I had actually put into the car, I decided it wasn't the wisest of decisions considering his intentions were to use it on a very regular/day to day basis. The car was simply going to be too clean and far too detailed for it to be beat on daily. That's where this red Kouki comes into play. I stumbled upon this deal from a seller in Northern California. Worked out the deal, secured the car with a deposit, then drove up to pick it up within the next few days. Factory SE (with sunroof unfortunately), low mileage chassis, and fairly stock aside from the blown S14 SR in the engine bay. The car had resprayed panels and I've never been one to like seeing cars with only exterior resprays. You see the door jambs with the old color. Just drives me nuts. Paint also had some significantly weathered spots due to it sitting outdoors for several years after the motor went. After a nice 13 hour round trip drive, we brought it home. Decided to get to work on the car and pulled off all of the suspension and ripped out the old S14 SR. I was originally going to stick with a KA-T in my blue Kouki running an AEM EMS V2 and a slightly upgraded Greddy turbo kit (larger injectors, full standalone, etc), but I managed to get a fully built S14 SR for that car. As per tradition with younger brothers, he got the hand-me-down. I gave him my entire KA-T swap. Here it was mocked up in the blue Kouki before paint. Ripping it apart after verifying compression and leakdown was solid. Gave him the task of replacing seals and installing several new parts including a new front cover with oil pump. Now he's tackling deleting all of the emissions related components from the intake manifold for a really clean engine bay. I had also worked out a deal with a painter for a full exterior and engine bay respray. Commence the tear down. For anyone doing something similar (removing glass for a respray), I strongly recommend an oscillating tool with a 3" sealant cutter blade. It made removing all of the glass a breeze. Here's the car after removing wiring from the engine bay, all hardware, clips, trim, etc. Loaded up and on our way to the body shop. Stopped at Bun Street in West Covina on our way. Didn't expect such good burgers from this spot. Didn't take pictures like a dumbass, but oh well. Unloaded and now at its new home for the next month or so. I'll keep the color a secret for now similar to the blue Kouki build. Mods wise, it's a very similar list to the other Kouki. The usual full adjustable suspension links, big brakes all around, cage, upgraded seats, full OEM aero, upgraded drivetrain, nice wheels, etc. I managed to hoard quite a bit of parts over the years and was literally able to give him everything he needed to build up this car. Our goals really aren't to build something different (over the top aero, obnoxious hide your daughters decals, you know the BS). What I personally focus on is restoring these cars to their former glory while upgrading aspects of it along the way. Hopefully, we can get this one wrapped up alongside the blue Kouki and have them back on the road by fall. Thanks for reading.  |
|
|

|
| Sponsored Links |
|
|
#2 |
|
The Architect.
 Join Date: May 2006
Location: Los Angeles, CA
Posts: 11,580
Trader Rating: (392)
           Feedback Score: 392 reviews
|
Saved for future updates.
|
|
|

|
|
|
#3 |
|
The Architect.
 Join Date: May 2006
Location: Los Angeles, CA
Posts: 11,580
Trader Rating: (392)
           Feedback Score: 392 reviews
|
Saved for future updates.
|
|
|

|
|
|
#5 |
|
Zilvia Addict
 |
Top notch as per usual. In for updates!
__________________
|
|
|

|
|
|
#7 |
|
Leaky Injector
Join Date: Apr 2012
Location: Wichita Falls Tx
Age: 28
Posts: 77
Trader Rating: (0)
 Feedback Score: 0 reviews
|
Knew the previous owner of this car a while back when he was first starting his company. Pretty cool dude. Glad to see this car is getting a full rebuild and went to great hands. Subbed for updates!
|
|
|

|
|
|
#9 |
|
The Architect.
 Join Date: May 2006
Location: Los Angeles, CA
Posts: 11,580
Trader Rating: (392)
           Feedback Score: 392 reviews
|
No big updates as of yet.
Just minor body work. Should be getting primed and blocked pretty soon. Also waiting on the final aero piece to complete the exterior. In the meantime, I'll be focusing on restoring the brakes and suspension items that will be going onto this car as soon as it returns. |
|
|

|
|
|
#11 | |
|
The Architect.
 Join Date: May 2006
Location: Los Angeles, CA
Posts: 11,580
Trader Rating: (392)
           Feedback Score: 392 reviews
|
Quote:
It's either someone puts them to use or they'll just collect dust. |
|
|
|

|
|
|
#13 |
|
Zilvia Addict
 Join Date: Nov 2015
Location: Where the bad guys are
Posts: 887
Trader Rating: (6)
  Feedback Score: 6 reviews
|
Excited for this build too! Pretty cool to see the car go from being fully loaded on a trailer to fully shelled back on the trailer
__________________
Skurr  Skurr Skurr
|
|
|

|
|
|
#15 | |
|
The Architect.
 Join Date: May 2006
Location: Los Angeles, CA
Posts: 11,580
Trader Rating: (392)
           Feedback Score: 392 reviews
|
Quote:
Now, as far as an update goes... We were expecting the car back from the body shop within a 2 month timeframe. Well, 2 months turned into 13 months. It does still need to be fully cut and buffed, but we'll be dealing with that later. I just wanted the car home at this point because it was holding me back quite a bit with other plans I have for my garage remodel. Part of being a "collector" (cough...hoarder) is being indecisive. I had all three OEM grills painted and will be switching them out regularly to change up the look. This picture also shows just how much the color pops in the sun. You can somewhat see the difference between these two pictures. One was in the evening and one was earlier this afternoon. Stocked up on 3M undercoating and lots of sound deadening material. Giving the paint about a week to cure before cutting/buffing and finally installing the exterior panels with new hardware. In the meantime, it'll be going on stands while we pull all of the suspension stuff off for powdercoating. |
|
|
|

|
|
|
#19 |
|
The Architect.
 Join Date: May 2006
Location: Los Angeles, CA
Posts: 11,580
Trader Rating: (392)
           Feedback Score: 392 reviews
|
Suspension is all off. Now just have to remove the fuel tank and the brake/fuel lines before we pressure wash the underside and get it all ready for undercoating.
Quick glimpse at the engine bay. Kept it fairly stock aside from removing the battery tray and shaving that section. Fortunately, the underbody isn't too dirty. Most of it will come off with some simple green and my pressure washer. Just a few pieces that'll be refinished. I have other adjustable suspension arms along with swaybars, nismo brace, and a cage that'll all be powdercoated this month. |
|
|

|
|
|
#21 |
|
The Architect.
 Join Date: May 2006
Location: Los Angeles, CA
Posts: 11,580
Trader Rating: (392)
           Feedback Score: 392 reviews
|
Pressure washed. I personally hate working on dirty/oily parts and cars. One of the first things I always do is pressure wash just about everything I can reach. Also want to make it easier when it comes to powder coating.
Removed the factory bushings. Front two were already busted. Ordering the GKTech subframe reinforcement plates and having those welded on before everything goes to Bulletproof Powder Coating. |
|
|

|
|
|
#22 |
|
The Architect.
 Join Date: May 2006
Location: Los Angeles, CA
Posts: 11,580
Trader Rating: (392)
           Feedback Score: 392 reviews
|
Last few bits just came back from the body shop.
Had him color match a valve cover to run with the Greddy KA-T kit. I'm still anti-sunroof at heart. I also had him color match the Kognition carbon fiber sunroof delete for a more subtle look. Should look decent once it's installed properly. Weather kind of sucks right now, but we'll make progress any chance we get. |
|
|

|
|
|
#23 |
|
Post Whore!
 |
Crimson, car looks great. What color is that if I may ask?
__________________
My SR20VET |
|
|

|
|
|
#26 |
|
Zilvia Addict
 Join Date: Nov 2015
Location: Where the bad guys are
Posts: 887
Trader Rating: (6)
  Feedback Score: 6 reviews
|
since youre not shaving the engine bay and filling in all the OEM holes, what are you going to be doing to plug up all the small holes in the engine bay? Drop a part # if you can, Id love to grab me some too
__________________
Skurr  Skurr Skurr
|
|
|

|
|
|
#27 |
|
The Architect.
 Join Date: May 2006
Location: Los Angeles, CA
Posts: 11,580
Trader Rating: (392)
           Feedback Score: 392 reviews
|
I apologize for the delay in updates. Got a bit backed up with house projects and now that those are mostly over, my brother and I got back to the Kouki.
We mocked up the brand new OEM Kouki headlights and Autech grill. Considering we have three OEM grills, this one will be switched out regularly since my blue Kouki has the same grill. 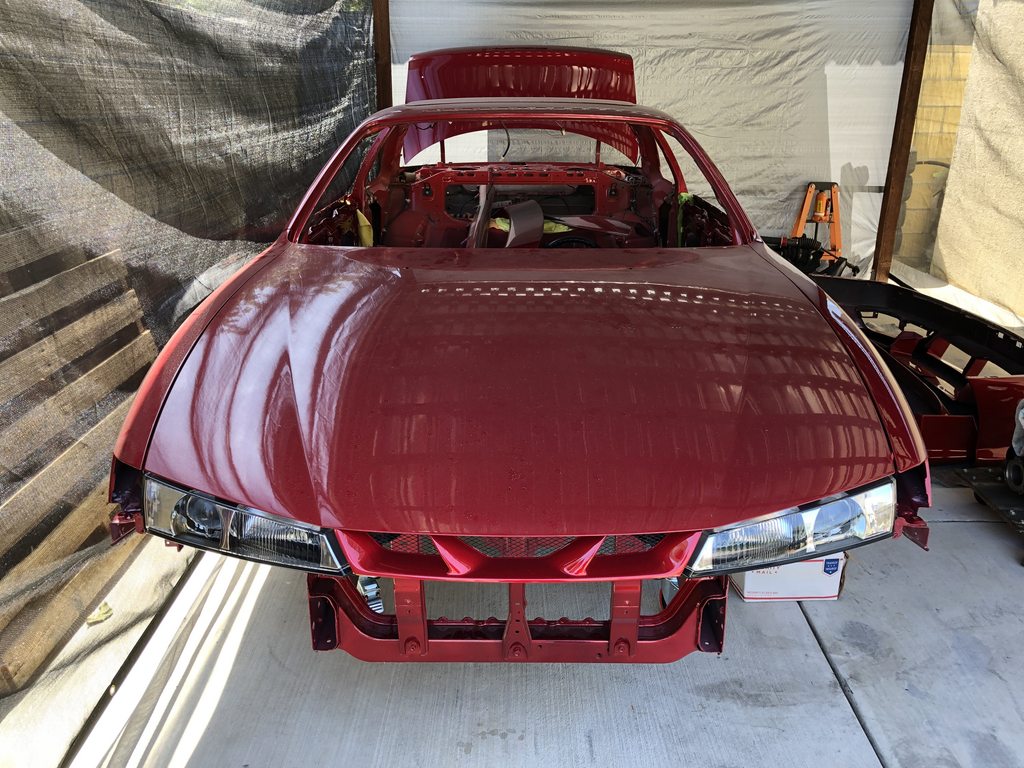 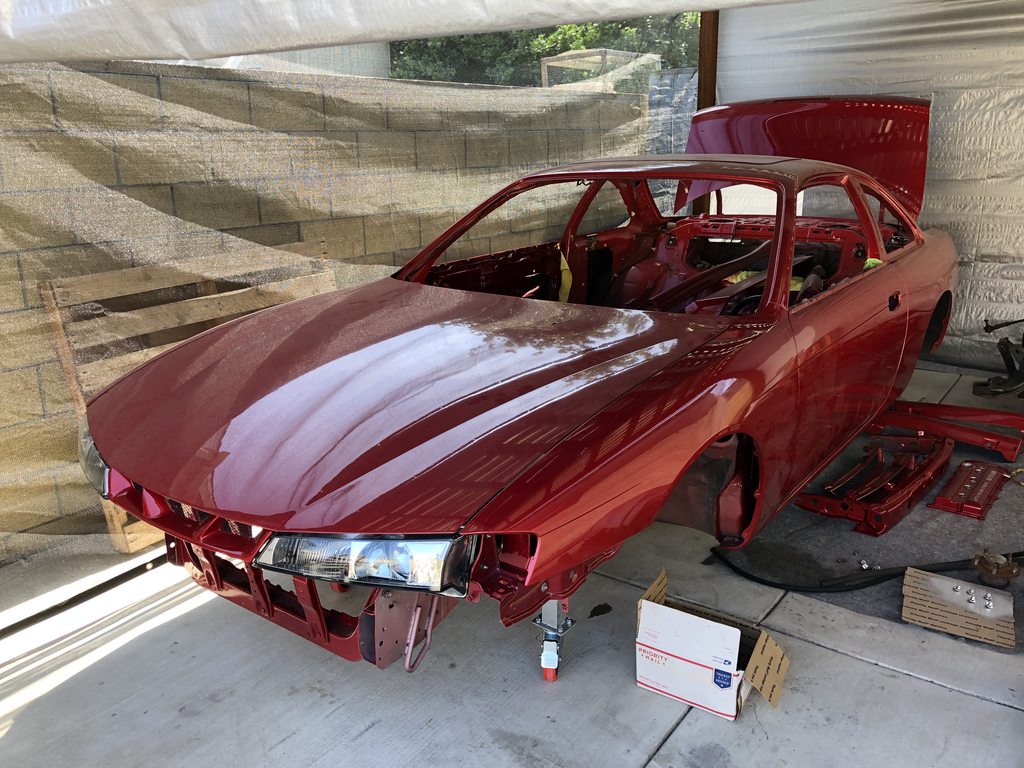 Similar to the blue Kouki, we decided to undercoat the chassis while all of the suspension was off. This meant pulling down the fuel tank and removing all small bolts/brackets from the underbody with the exception of the fuel lines. I like using Simple Green when it comes to degreasing car parts. It's easy to wash off and doesn't stain plastics like some of the other degreasers I've used over the years. We sprayed down the entire underside and used stiff brushes to remove any dirt/grime and finished it up with my pressure washer. 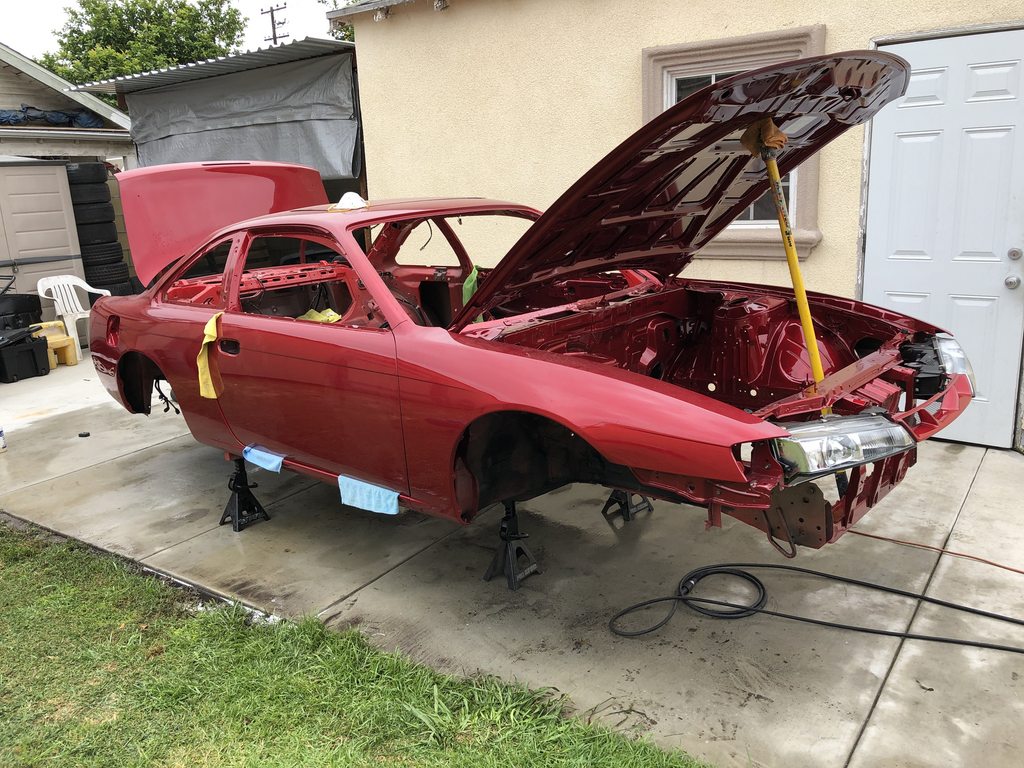 We set up a drop cloth and sprayed the entire underbody using 3M professional grade rubberized undercoating. I absolutely loved how it came out on the blue Kouki and I felt the extra effort would be worth the trouble on this car. 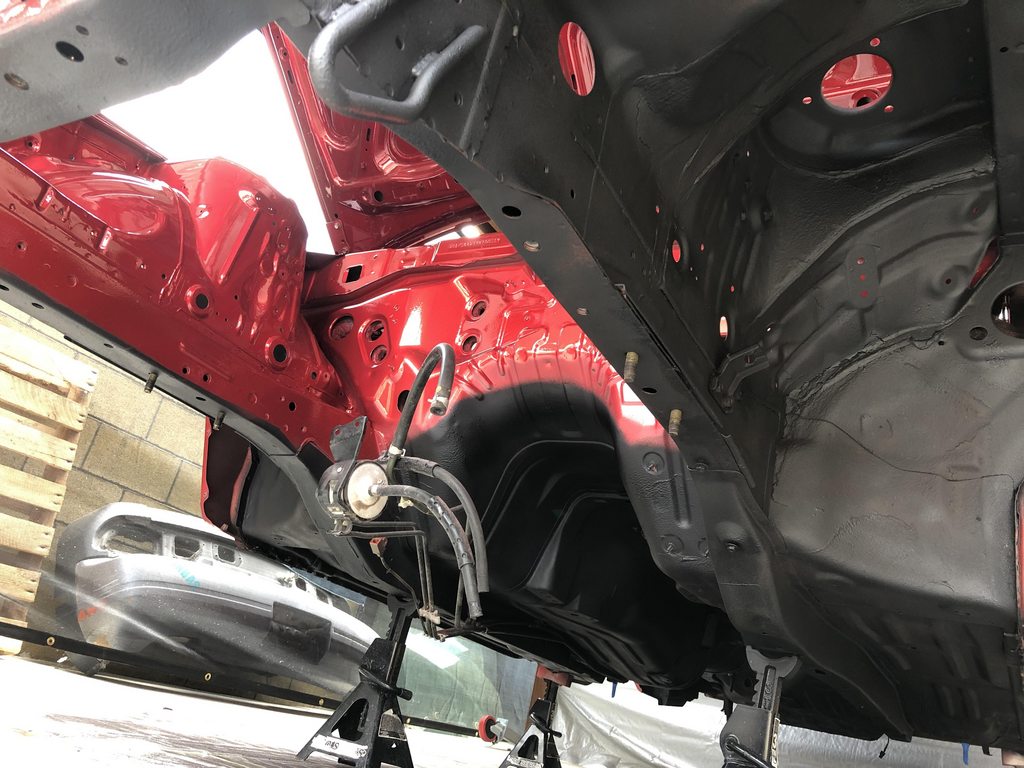 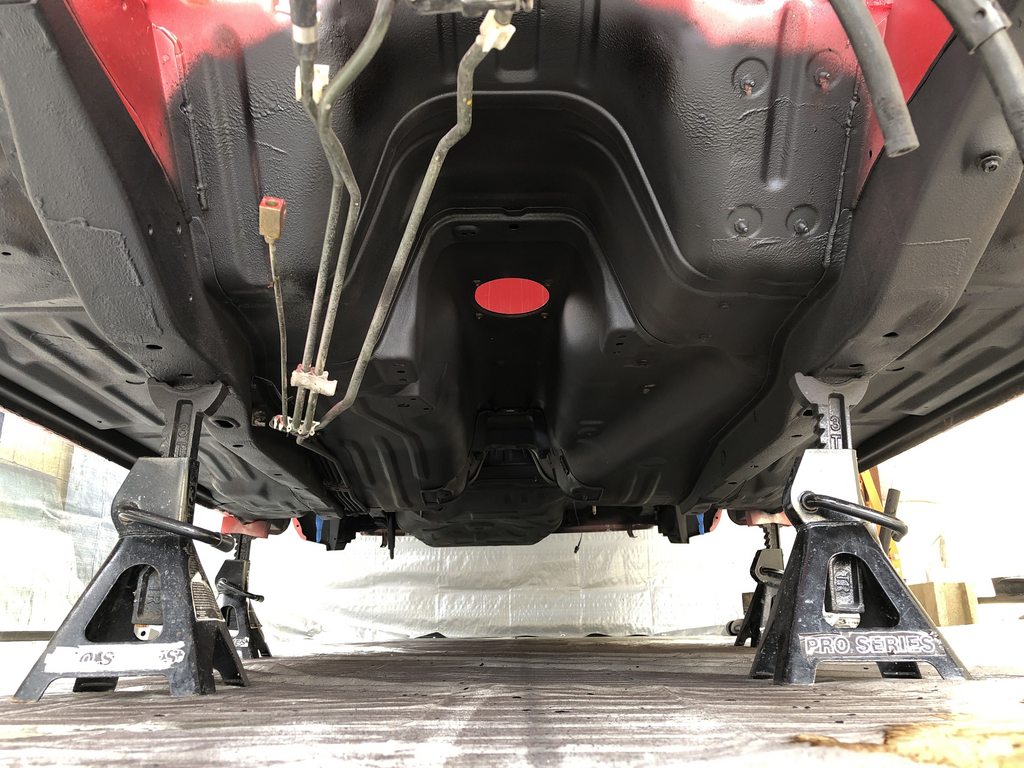 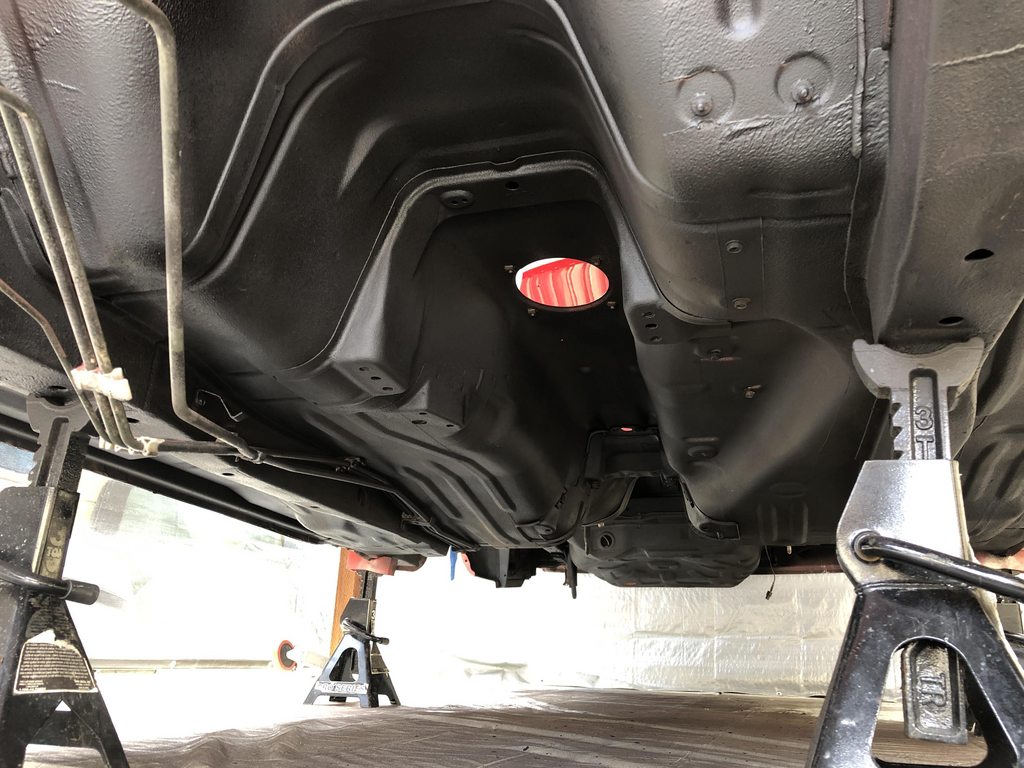 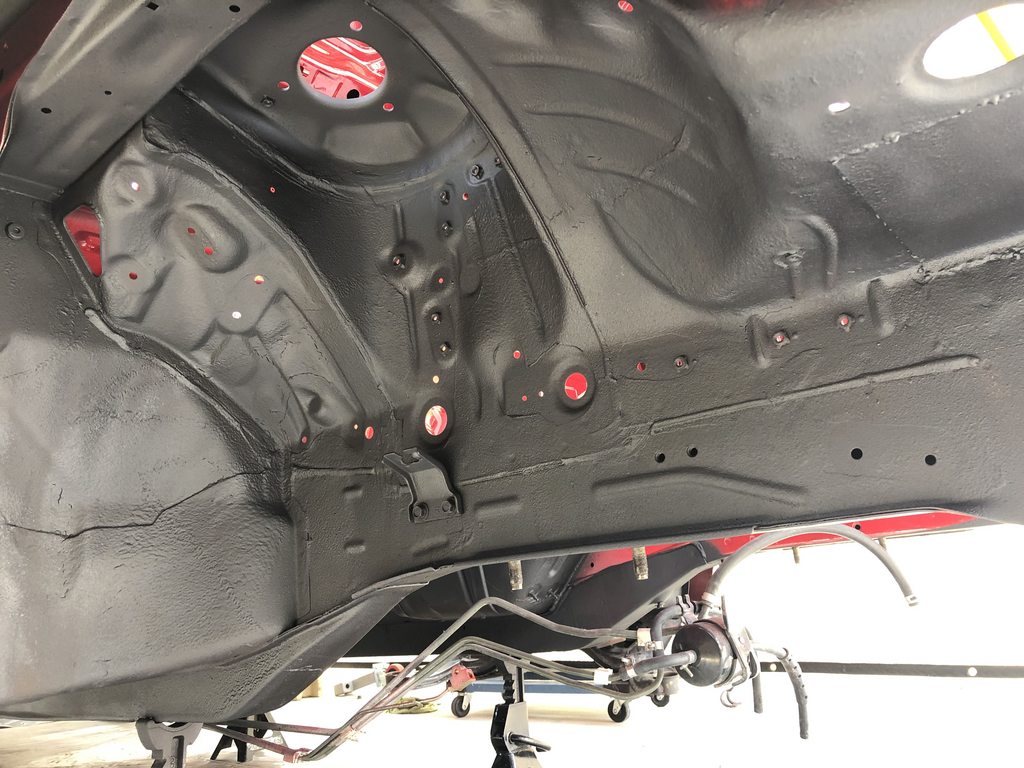 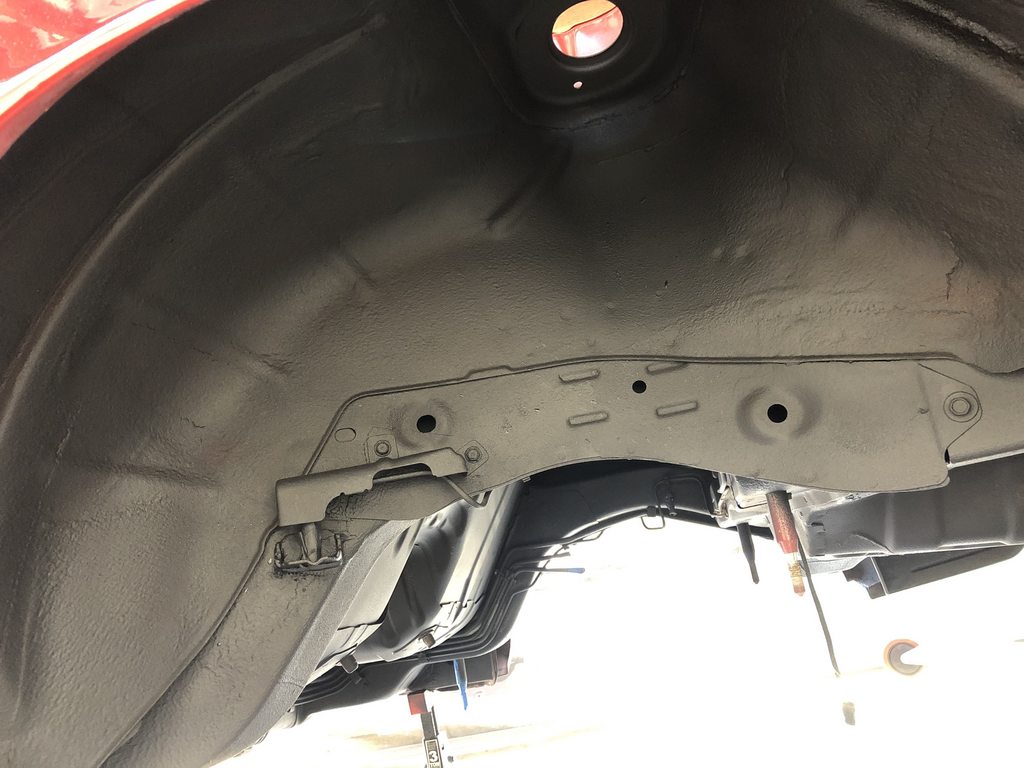 Tomorrow, we'll be installing all of the sound deadening in the chassis and putting back together both doors. 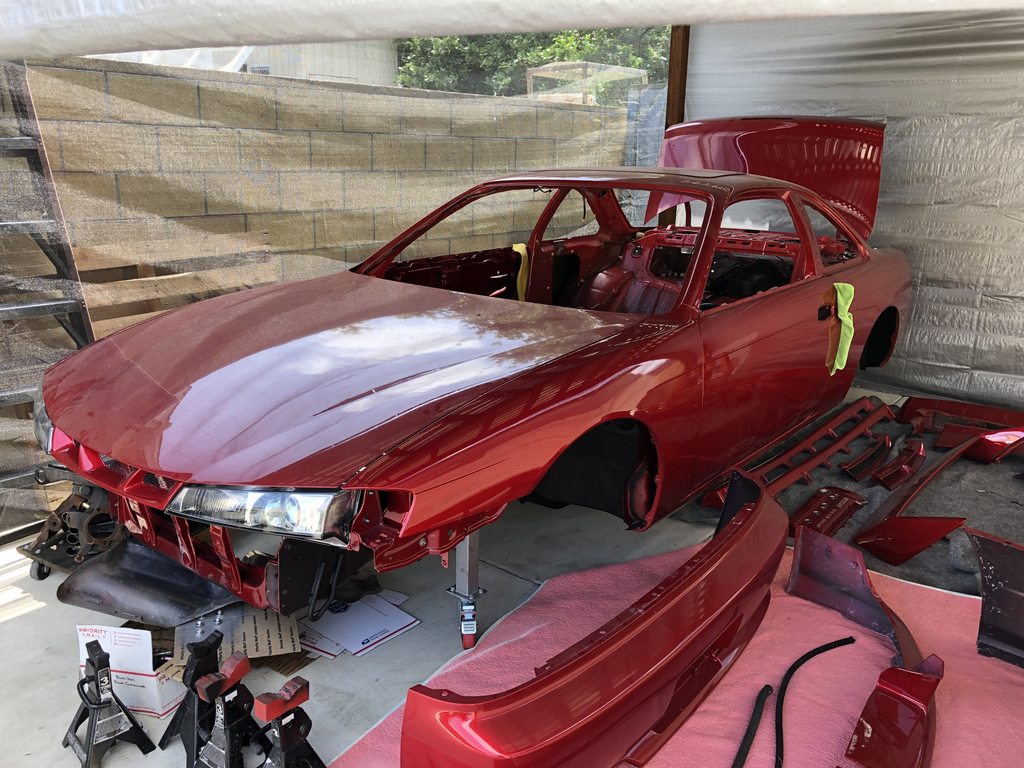 Radiant Red Metallic from Lexus. Hah, thanks. Reusing all of the factory plugs. They were in decent shape and other than giving them a quick wash, they'll be going right back on. This isn't a show car by any means and it will be driven quite a bit. |
|
|

|
 |
| Bookmarks |
| Thread Tools | |
| Display Modes | |
|
|