
 |
|
|||||||
| Home | Rules & Guidelines | Register | Member Rides | FAQ | Members List | Social Groups | Calendar | Mark Forums Read |
| Builds (and builds only) Got a build thread? It goes here, build threads anywhere else on the forum will be locked and never moved. |
 |
|
|
Thread Tools | Display Modes |
|
|
#91 | |
|
Zilvia Junkie
 Join Date: Sep 2012
Location: va beach
Age: 28
Posts: 318
Trader Rating: (3)
       Feedback Score: 3 reviews
|
Quote:
There honestly Isn't much to update her other then I have been having issues keeping up to temp here anytime the weather is to cold for shorts. covering the 10 row oil cooler which has a thermostat brought oil temps (8 quarts in total) from ~120F to 200F. But coolant will only get to ~175F cruising unless let it fully warm up before hitting highway speeds or i get up above 80MPH. plus the heater core is pretty weak or at least i forget what an s13 puts out for heat. i think i just need to cover half the radiator like i did with my KA in the winter. With the retune i do feel like the top end is a little stronger but its marginal. In the coming weeks I want to finish tuning EBC so i can go back to the dyno. delete the first resonator so there is actually some grumble coming out the exhaust. when the vband for the catback feel off it was so sweet hearing all the straight pipe noises like the decel popping. I also need to get around getting a CNC version of my ALT and PS relocation done. The current one has the PS to close to water pump and with a slight misalignment is starting to eat the belt after about 1000miles. |
|
|
|

|
| Sponsored Links |
|
|
#92 |
|
Zilvia Junkie
 Join Date: Sep 2012
Location: va beach
Age: 28
Posts: 318
Trader Rating: (3)
       Feedback Score: 3 reviews
|
After a serp belt failure I took sometime this week to work on the car. The prototype ALT Ps relocation bracket I made with 2 pieces allow the alternator to lean back and toast the belt. I do have a new one piece design drawn up in inventor but I have yet to talk to a shop to get it made.
 But for now I've made some tweaks to it keep going for now. After twisting it back into place I've DC tigd the bracket just to lock the 2 pieces. Also I've changed the idler puller to something cheap and has a single piece bearing. The old VH41DE pully had two bearings and my setup crushed it, forcing me to make a funny bolt to make it work. The new pulley is composite which is much lighter and has a single bearing. Ignoring the bolt not looking tight I got a bolt afterwords that didnt have a step behind the head.   Also while I was here I reworked the exhaust some. First I redid the front exhaust mount. It's no longer a hard mount to the bottom of the transmission but goes to a exhuast mount of a 90s highlander. Hopefully this cures some of the vibrations I get above 3500rpm as now the bellows in the down pipe can now move properly. While I was working with the exhaust I also remover the first glass pack to hopefully give the engine some kinda tone other then just turbo spool then twin wastegate dump. 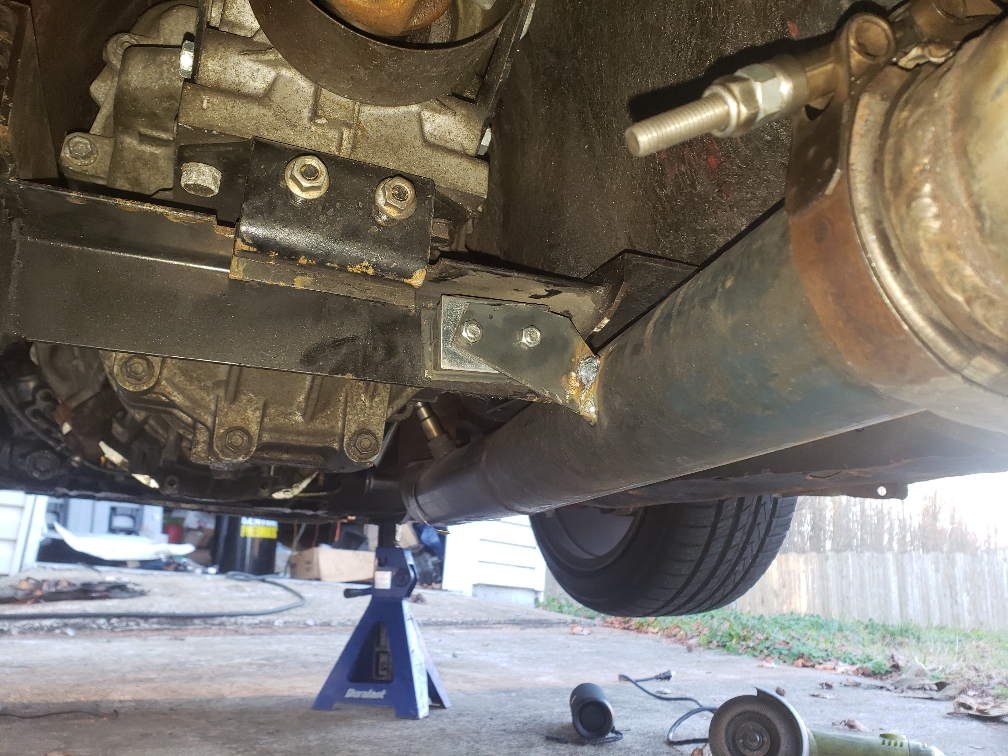 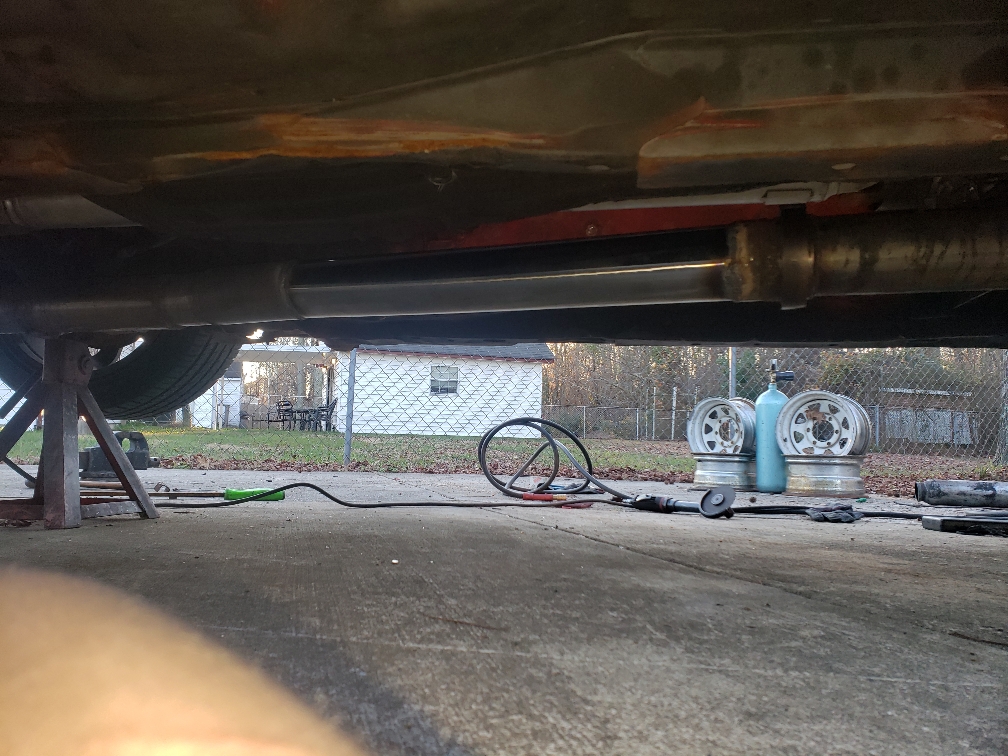 Sent from my SM-G960U using Tapatalk |
|
|

|
|
|
#93 | |
|
Zilvia Junkie
 Join Date: Sep 2012
Location: va beach
Age: 28
Posts: 318
Trader Rating: (3)
       Feedback Score: 3 reviews
|
Quote:
https://youtu.be/V-UnBRvFsnk Here is the new belt on it basically maxed with how tight the tensioner can go but I ordered a few more chunks of AL stock to make a more compact setup bringing the alternator closer to the waterpump while lowering the power steering pump. wont get any progress on this tho for a while as tomorrow i start leave in Hawaii.  Anyways the modifications to the exhaust did exactly what i planned. there is no longer an insane vibration after 3800 rpm as I'm actually allowing controlled flex of the bellows in the downpipe its now more mild, likely just the poly leaf spring bushings I'm using as motor mounts. I should put it in the video but I didn't feel like cruising over 80mph during the holidays. I'm only running 9.5-10psi on pump right now so ~280tq ~315whp. Still need to finish retuning as it struggles to stay warm on a normal winter days. The exhaust note is no longer solely turbo spool then wastegate dump, now there is engine noise almost equal to the wastegate but doesn't drown out the turbo spooling and if listen close you can hear VTEC activate as the exhaust deepens mid turbo spool at 3200rpm. Yet it still idles quietly and drone is no worse with just a single 3" glasspack (21" long IIRC) other wise its straight pipe. |
|
|
|

|
|
|
#95 |
|
Zilvia Junkie
 Join Date: Sep 2012
Location: va beach
Age: 28
Posts: 318
Trader Rating: (3)
       Feedback Score: 3 reviews
|
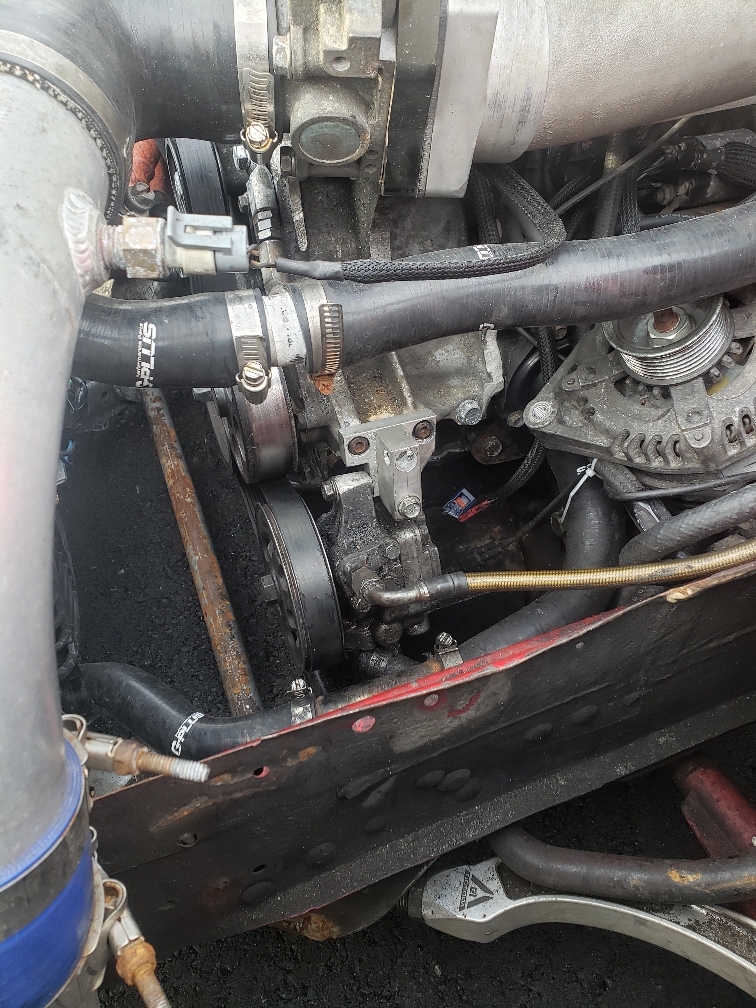
Been tryn to keep my self busy and outa the winter blues sense I got back from Hawaii. First off I made a new ALT/PS bracket as the design would get loose tip the alternator a eat belts after a while. The new design is still 2 piece but I corrected the locations and went for a stronger bolt configuration. I'm ready to make a billet piece but it's hard to justify for just my self at machining costs. if was funny getting the new shorter belt for this setup, i always just go in and ask the blet by part number the teenager behins the counter was like you got a pretty big truck. Knowing the belt only comes on the Freightliner I told him "nah its going on a Honda" and he was very confused.
 While on vacation I found a common way to get 3.692 R&P for the 350z style r200. Which is the shortest ratio without ripping a R&P out of a nismo edition Z or 4 cylinder frontier. I do still have aquire one piece to make this diff work tho, as my Armada diff has a bigger driveshaft flange with a reversed concentric lip then the Z/G chassis and my my diff will be coming from an AWD car with the 6 bolt driveshaft flange. I will still be using the Armada diff for mock up and using its 2 bolt cover for the final install. I cant work on this right now as I dont have a jig to hold the subframe mounts in place, I do have bolts on order to make a jig tho. Some 1 1/4 bolts and square tube will space out the front mounts next week. Today I took sometime to clean up the garage only to mess it up prepping a future front subframe. After doing an initial degreasing I cut off the front lip and welded the seam back together. Then carefully knocked off the motor mount towers. The plan here is plate the top and side of the subframe where the towers were to bring strength back then slot the top plate for factory style mounts. 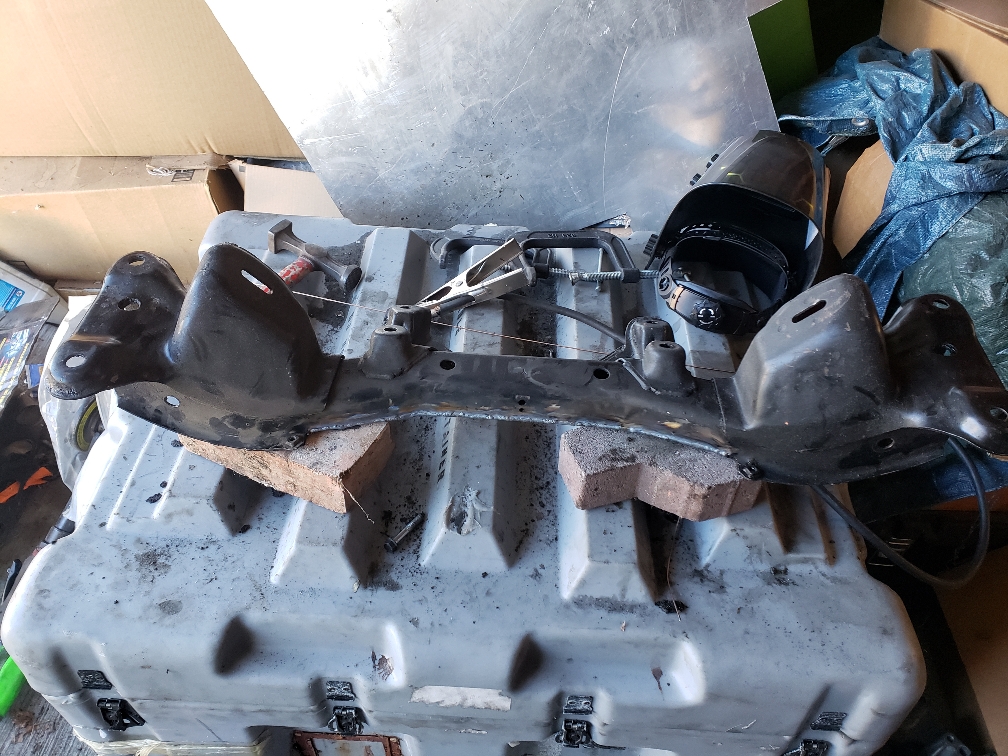 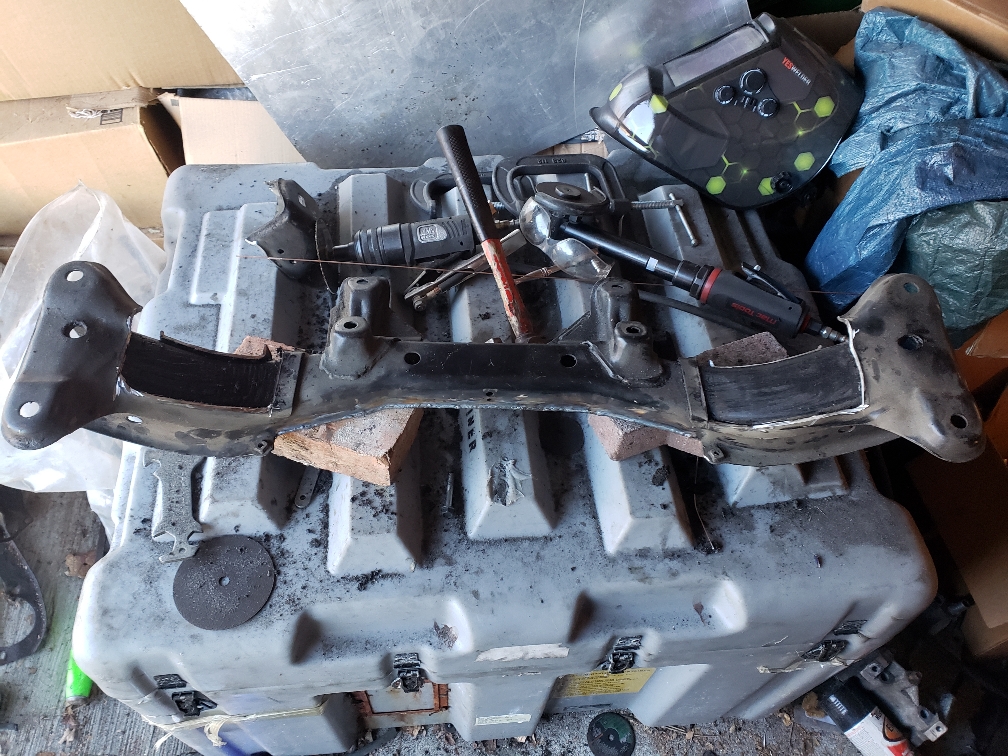 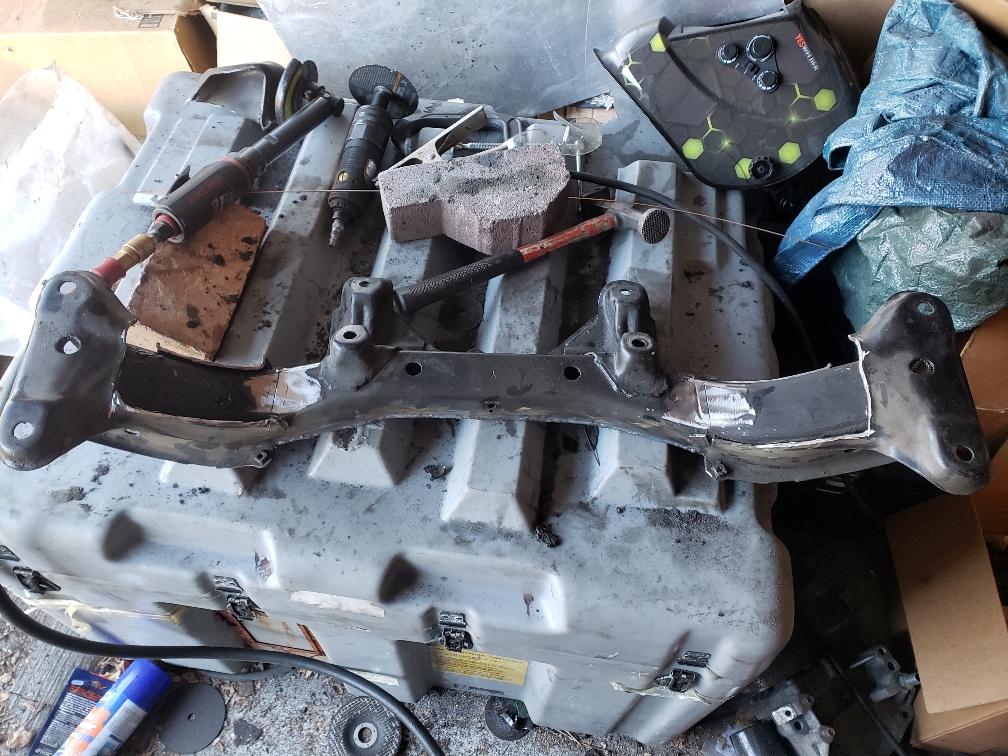 Sent from my SM-G960U using Tapatalk |
|
|

|
|
|
#96 |
|
Zilvia Junkie
 Join Date: Sep 2012
Location: va beach
Age: 28
Posts: 318
Trader Rating: (3)
       Feedback Score: 3 reviews
|
350z diff is now fully mounted. Later in the week will be gktech reinforcements, lock outs, a 3.692 diff (pictured is a 3.133) and paint before mounting it up. Hopefully the g35 axles fit with out needing a dual caliper bracket to space out the hub.
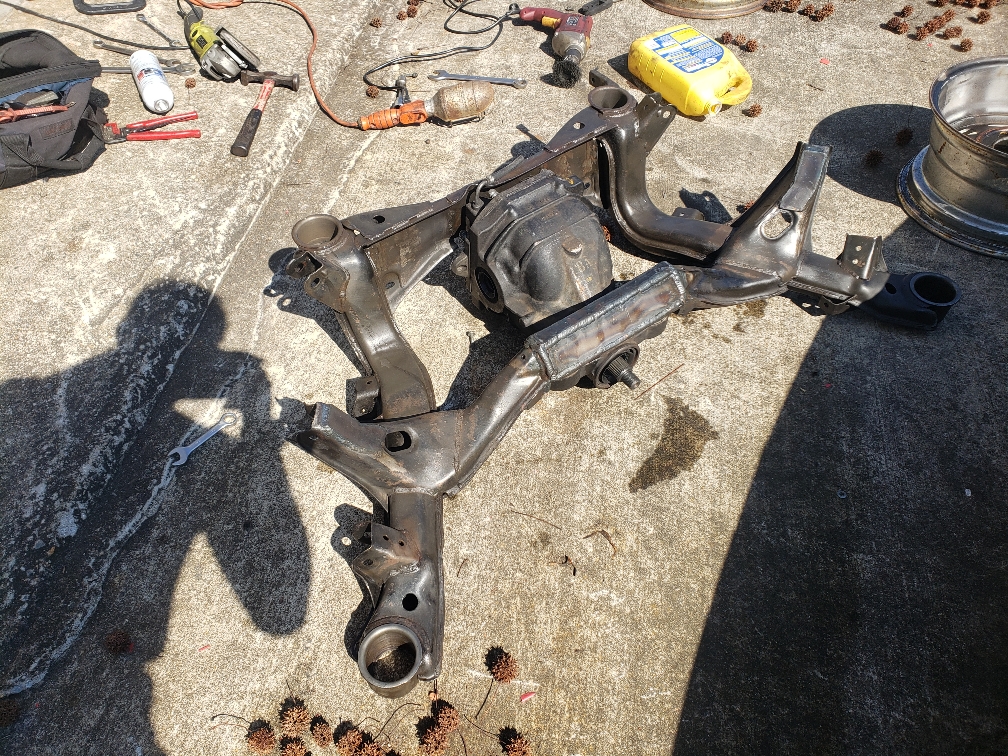 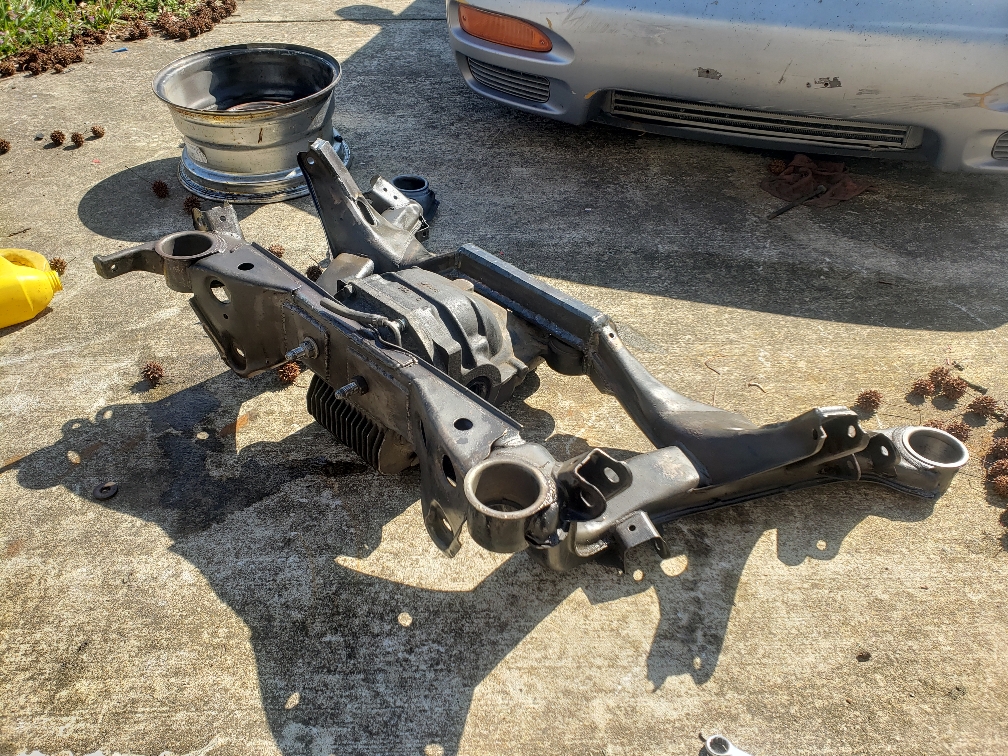 And heres the jig a made with massive 1 1/4 bolts lol 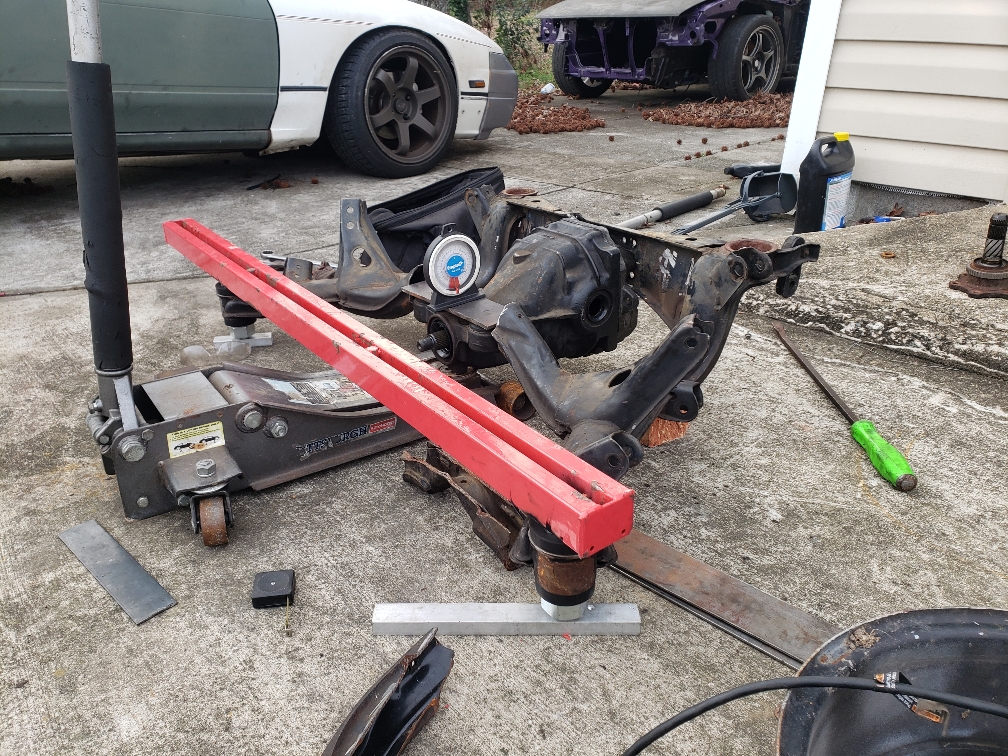 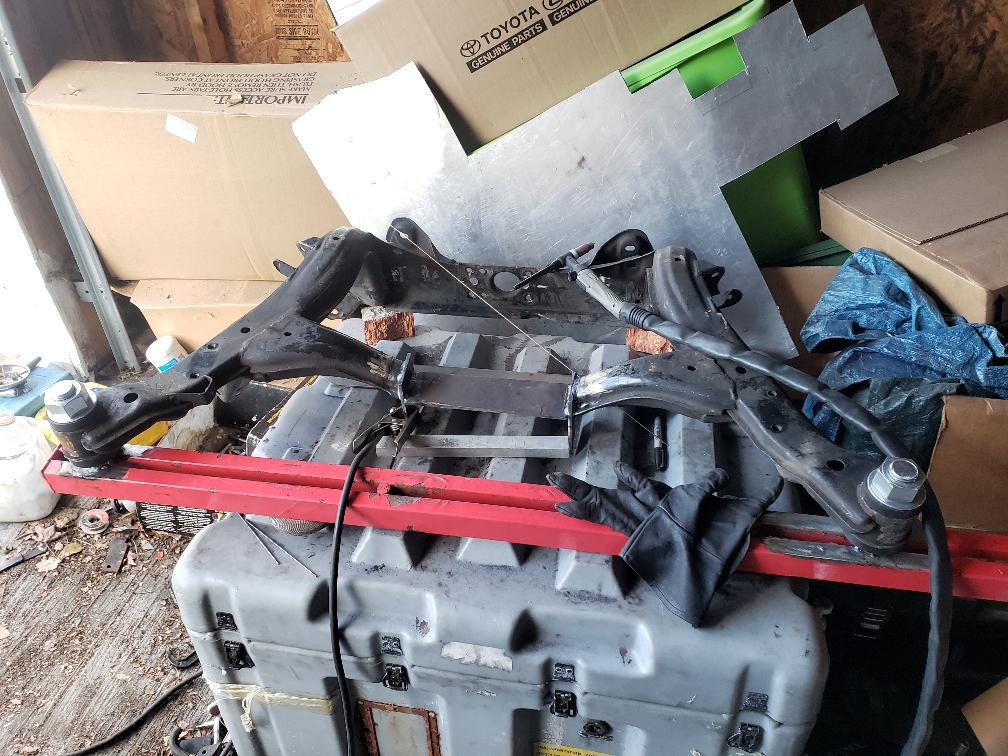 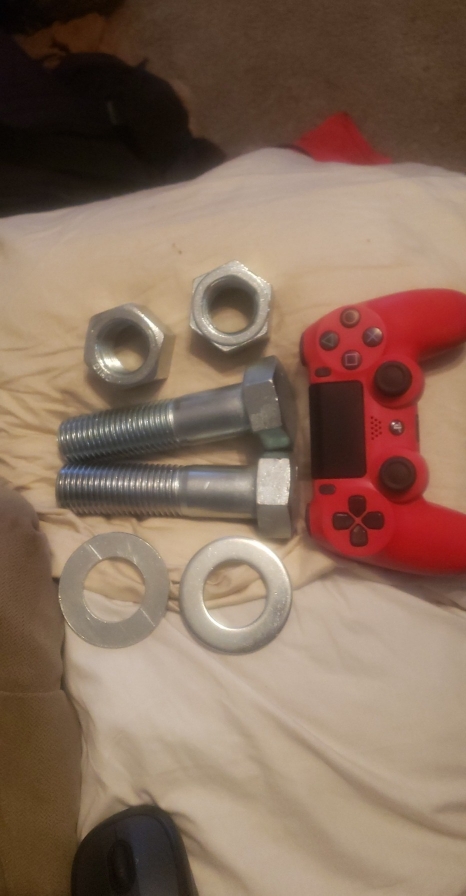 |
|
|

|
|
|
#97 |
|
Zilvia Junkie
 Join Date: Sep 2012
Location: va beach
Age: 28
Posts: 318
Trader Rating: (3)
       Feedback Score: 3 reviews
|
Progress and budget has stalled a bit when the transmission on the super duty broke forcing me to replace the 3/4 shift fork. Any one think this beast will fit in a 240?
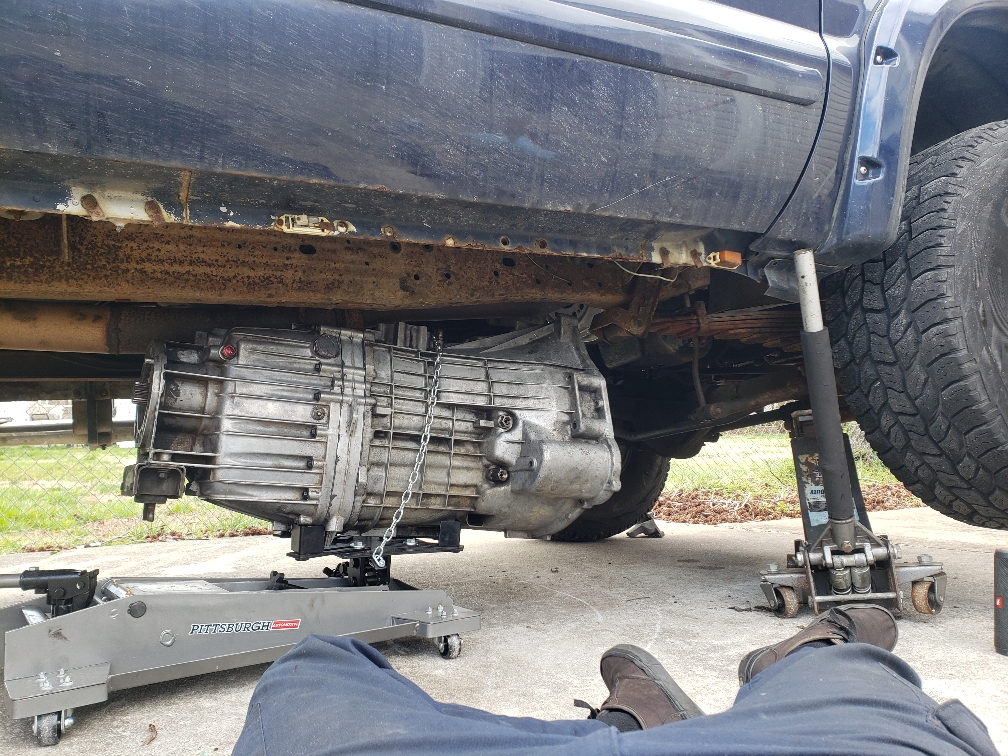 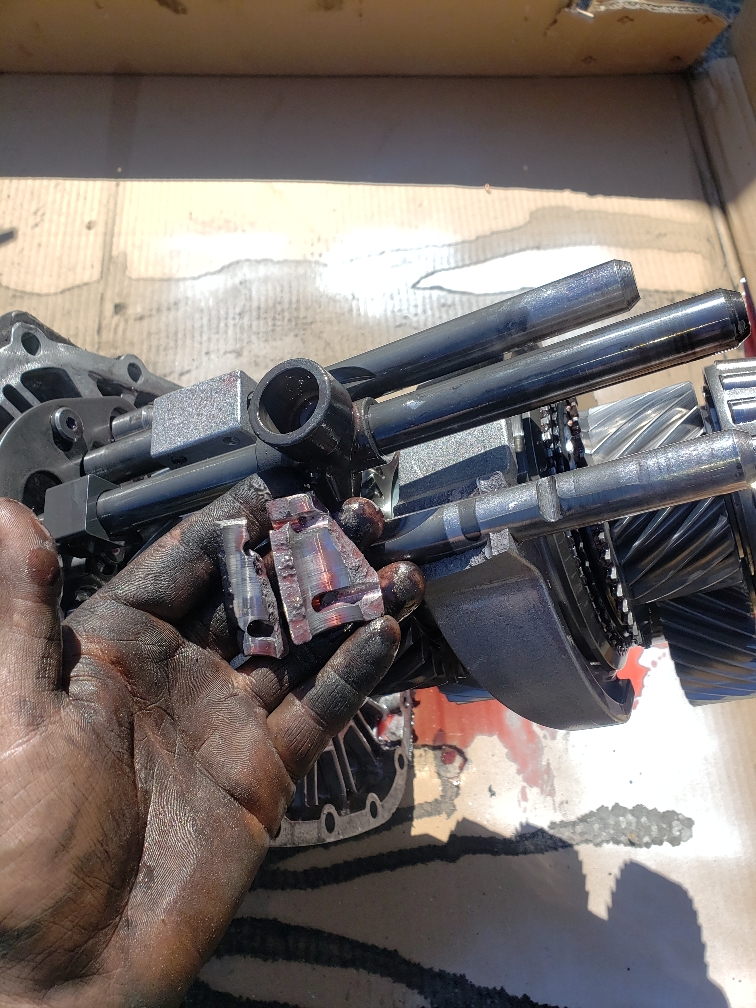 Still making some progress tho, subframe braces are welded and painted now. Still have to weld the 3.692 diff and source the correct flange from the junkyard. 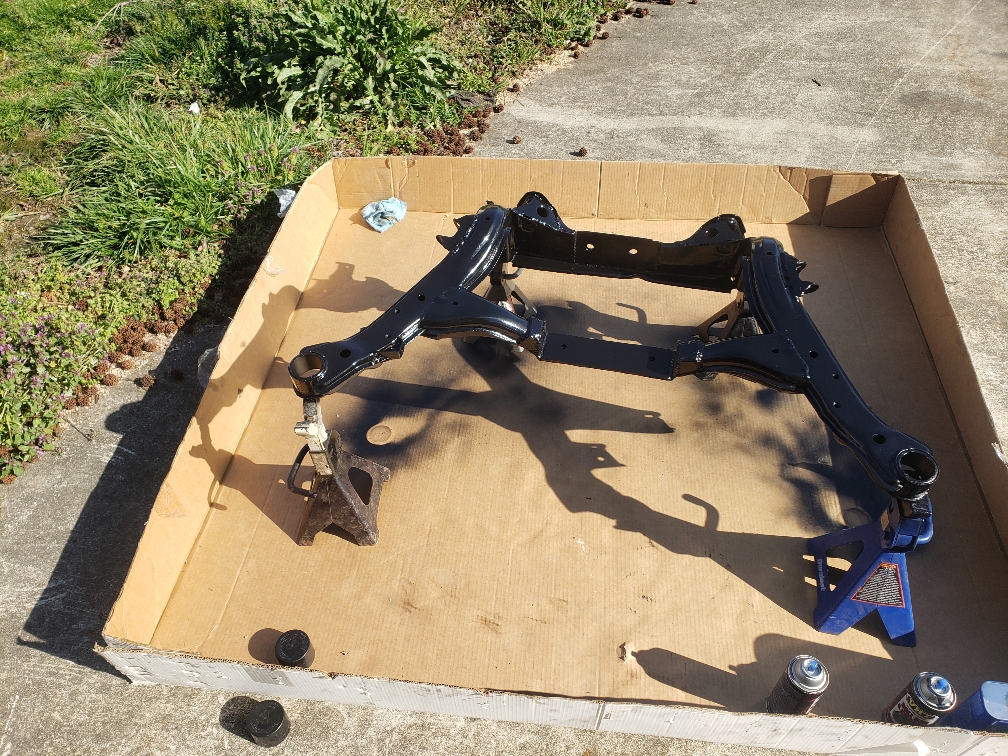 Sent from my SM-G960U using Tapatalk |
|
|

|
|
|
#98 |
|
Zilvia.net Advertiser
 Join Date: Nov 2005
Location: Michigan
Age: 33
Posts: 5,430
Trader Rating: (16)
           Feedback Score: 16 reviews
|
Looking good man. That truck trans is massive!
__________________
Build: http://zilvia.net/f/showthread.php?t=643065 Friends don't let friends buy knock-offs. |
|
|

|
|
|
#100 | |
|
Zilvia Junkie
 Join Date: Sep 2012
Location: va beach
Age: 28
Posts: 318
Trader Rating: (3)
       Feedback Score: 3 reviews
|
Quote:
...another speed bump. The turbo on the truck started burning oil 2 days after popping a new clutch in along with the the repaired tranny so another delay on the subframe. after pulling this turbo is trashed to the point of not being rebuildable without a compressor housing and the upgraded compressor wheel is trashed.  No clue how miles sense the upgraded wheel and if it has ever being rebuilt so I have new one on the way so I can get the 240 down for upgrades and repair. If it was worked on like my transmission was previously it was done with shotty work. No clue how miles sense the upgraded wheel and if it has ever being rebuilt so I have new one on the way so I can get the 240 down for upgrades and repair. If it was worked on like my transmission was previously it was done with shotty work.  |
|
|
|

|
|
|
#101 |
|
Zilvia Junkie
 Join Date: Sep 2012
Location: va beach
Age: 28
Posts: 318
Trader Rating: (3)
       Feedback Score: 3 reviews
|
I've had the truck up in running for a few days now and thanks to the corona virus this Navy boy only comes into work 2 or 3 times a week giving me a lot of time to get caught up on things. Time to start knocking out cheap things as I'm still feeling the punch of 1000$ in parts coming out to the fix the truck. The subframe, rear diff, and axle upgrade will have to wait as it still requires ether extended LCAs or dual caliper adapters (to space out the hubs) to be acquired. The diff is almost finished as I welded it up and installed the poly bushes last week but, I still have to get a Z/G manual diff flange.
  So far I've finished repairing my turbo manifold where the front wastegate branch had cracked and feel off. It held its self up in the engine bay by only a coolant hardline for 100miles before I could do emergency welding a tig weld it in car about 45 degrees to stablize and quite it down before, the turbo came in 3 days later for the truck. Which was after I had the banjo fitting on the rear wastegate snapped causing me to overheat the engine on the way to work, which I looped till I found and installed my AN4 caps today. After pulling off the manifold it looks like my limited power from the 70's garage wiring didnt make strong enough welds for the when I welded the wastegate branch and cracked as I was limited to about 100amp spurts, this time I hammered it at 135amps still on 115v. While I was at I modified the down pipe to relieve stress on the exhaust and make it possible to install from the top. Prior to this it had to be installed from the bottom and it was aggravating as hell to get the vbands to line up. maybe just maybe this will be the last piece of the puzzle for my exhaust vibrations before actully changing my motor mounts.    Next up is to patch the hole from the exhaust hanger that fell off and remount it, figure out how to remedy my 2 stripped transmission cross member holes, more work on the revised front subframe, and I'm also considering a lobster cut intake pipe from left over 3" stainless exhaust pipe. |
|
|

|
|
|
#102 |
|
Zilvia Junkie
 Join Date: Sep 2012
Location: va beach
Age: 28
Posts: 318
Trader Rating: (3)
       Feedback Score: 3 reviews
|
The relief cut on the turbo elbow seems to have done the trick I can actually cruise between 3.5k-4k (cruising at 73-80mph) without feeling like I'm riding an air hammer. Got bad news and good news tho...
Good news is I finally sold the Cusco MZ that brought back from japan and with the money from that I'm doing things right by ordering a set of GKTech rear LCAs. Bad news is once I get my subframe upgrade done I probably wont get much more do on this for a while as my buddy wants his back garage back. |
|
|

|
|
|
#103 |
|
Zilvia Junkie
 Join Date: Sep 2012
Location: va beach
Age: 28
Posts: 318
Trader Rating: (3)
       Feedback Score: 3 reviews
|
Started the subframe swap the other day, tare down went smoothly even though the subframe is the only part I've never removed from this car. But as soon as I got it out I found a few reasons why I was struggling for traction even on medium boost. I already knew my subframe bushings were going as it didn't take much to move the subframe with a pry bar even with energy suspension inserts, from 6 years ago, but once it was off, I could move each bushing with my finger. Too my surprise though the left rear traction rod had broke, only been on the car for maybe 8,000 miles, where it connects to the knuckle it split in two explaining why it would kinda snap out when first sliding, then snap back in on grip. Also why i couldn't see it or feel by hand.
   When it came to assembly of the new subframe things got a bit tricky. First I had to set the length on the new GKTech LCAs and see what the minimum length was to keep the axles from bottoming out. Started with +5mm, and I couldn't even get the knuckle to look vertical. Next +10mm which I was getting mixed results on the ground till I put it on the car and realized both toe and camber were way out. After jacking the suspension to about where it normally sits and getting as close to 0 camber 0 toe as I could get in the air, the axle seemed a happy. When testing plunge through the range as the rim (17"s) approached the fender it gained a good bit of camber bottoming out the axle about 3/8" from tucking rim. I don't run super low just barely tucking the tread in the rear, this still gives me almost 2" of compression and about an inch of droop. I'm hoping it just needs more adjustment as I haven't been able to put it on the ground yet still waiting on a new set of traction rods, among other things .  Noticed after installing the diff the ABS sensor have to go in first.  Every heim joint got a very light coat of anti-seize on the threads to make future alignments easier.  +5mm knuckle refused to show any sign of 0 camber. Small tip, apply a tiny bit of anti-seize to axle spline to help check plunge, forgot to at this point so the axle wouldn't move   First set of eyeballing, doesn't really work off the car I was way off like -3 camber, and a degree or 2 of toe.  It was a PITA to get the subframe on as my jig didn't hold it the subframe perfect but the mounts were still close with the front mounts only being maybe 1/16" wider then factory. But here's the drivers side done, axle has about 5mm of free play till it gets close to tucking rim and the axle bottoms out from camber. A lot of guess work getting the traction rod, camber and tow lengths close from scratch, still cant properly set the traction rods till it's actually aligned, but no crazy bump steer watching travel.  Redilling the differential flange took a ton of patience to do right as my drill press is small and lacks vertical motion with big drill bits. Had to actually cut down the 3/8th drill I used to center drill each hole. Then took many steps to get to right size, with the final size being drilled from both sizes with a uni-bit as I couldn't find the right size bit.     |
|
|

|
|
|
#104 |
|
Zilvia Junkie
 Join Date: Sep 2012
Location: va beach
Age: 28
Posts: 318
Trader Rating: (3)
       Feedback Score: 3 reviews
|
Been making some more progress on the 240. While it was in the air I decided to refresh the front end. Come to find out after 40,000 miles most of the hiems up front were ready to tag out with a little bit of slop. Ordered a new mono ball for my LCAs and m14 2x14 rod ends for my tierods. Trouble came when I went to dismantle the front as my modded Ebays LCAs didn't wana come apart. For those unaware you can take Ebay LCAs, use quality joints, 3/4 bolts and machine work to make a killer LCA setup.
Anyways the the 3/4 bolt did not want to leave its home after 5 years. I managed to separate the knuckle but the bolt, shims and control arms were locked together to the point i couldn't press them apart. Too save my self alot of work i orded a set of GKtech front LCAs, new s13 BJs and grabbed a spare set of knuckles. The replacemnt knlucles have the steering arms welded a bit shorter so potentailly quicker steering and more angle, I'm curious how this will feel. If you've never heard of this mod it looks kinda like this, and that 3/4 bolt is seized to the whole stack 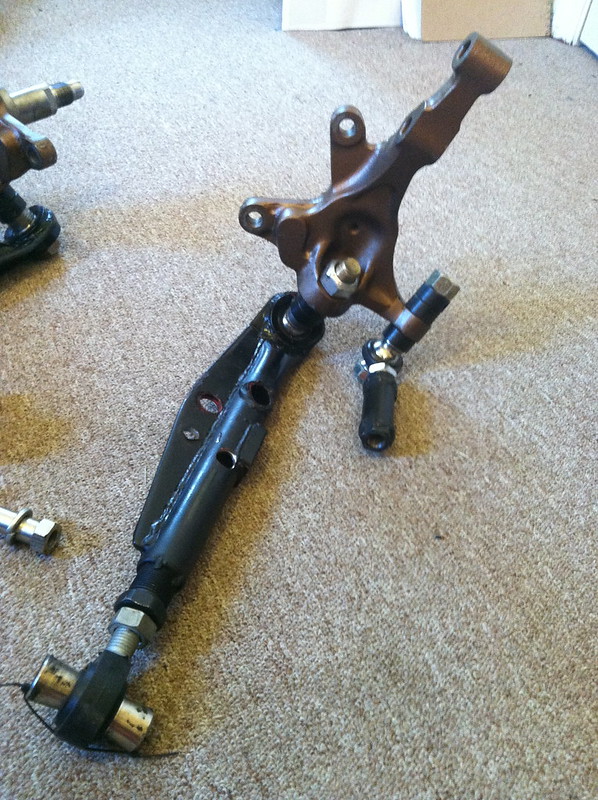  Didn't take any pictues of this but i stabilized my e-brake bracket setup as the brackets used to bend but welding a cross piece between the 2 90s. Then adding a pair of legs to bolt holes that were used by the auto seat belts. Now the ebrakes lock up with out first flexing the brackets. While I've waiting on the a lengthened drive shaft as the 350z diff is a good bit shorter then s13 VLSD. I got the rear eyeball aligned, made a 1/2" spacers for the sway bar to clear the diff flange, and lubed the polys bushes that are left in my suspension (just 3 in each knuckle) with some dielectric. re-lubing the bushes was easily done with just a Clamp, 27mm shallow, 1/4 drive socket and a hammer. As you can see after nearly 7 years and 65k miles these suckers were pretty dry. Btw dielectric grease is exactly what ES provides as lube and that little tube could of done 10 or 16 bushes.   |
|
|

|
|
|
#107 |
|
Zilvia Junkie
 Join Date: Sep 2012
Location: va beach
Age: 28
Posts: 318
Trader Rating: (3)
       Feedback Score: 3 reviews
|
Recently finish the intake with pie cuts never doing that again unless I get a better chop saw. Took it for a drive yesterday after getting my new drive shaft and no issues in the rear it seems. I didnt go far as one the front hub bearings start roaring after being swapped to a different knuckle.
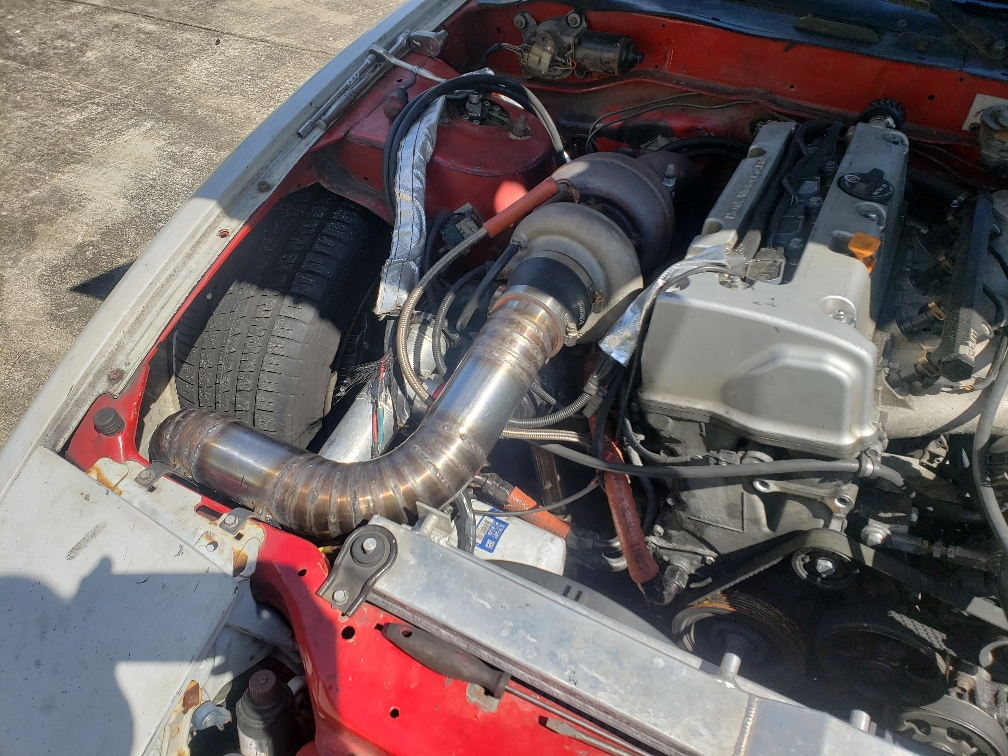 Sent from my SM-G960U using Tapatalk |
|
|

|
|
|
#108 |
|
Zilvia Junkie
 Join Date: Sep 2012
Location: va beach
Age: 28
Posts: 318
Trader Rating: (3)
       Feedback Score: 3 reviews
|
Seems like a long time for the progess I've made sense May while under lockdown.
 For a while I struggled to get a speed sensor setup on the 350z diff. Dakota digital says that you can use an ABS sensor as an input to drive the speedo. But I was unable to get a Z33 sensor work unlike the s13 rear sensor. So I mounted a hall effect sensor which now goes to the ecu directly for more accurate speed reading (higher resolution). 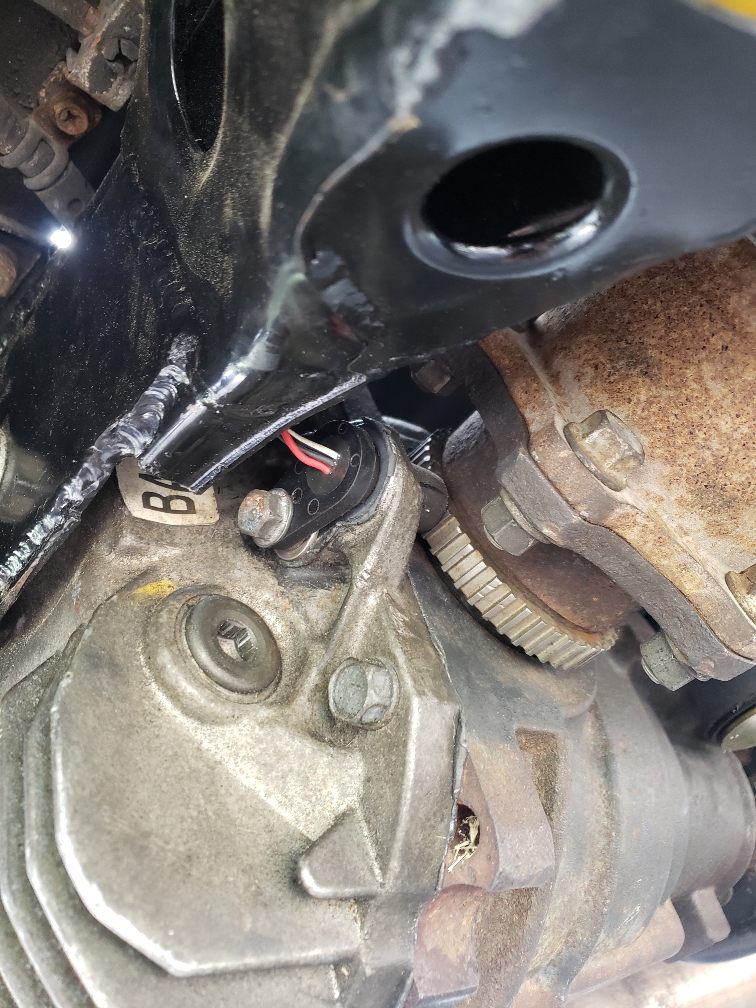 The ECU outputs a signal 4.6hz per mph, so 60mph is 277hz which currently drives the Dakota digital. Soon I will replace it with a simple capacitor and resistor setup that converts the haltechs DC output signal to AC which is then readable by the speedo. Below is 2 component circuit being tested at frequencies from 1hz-5khz or up to a little over 1000mph  . it only uses the small ceramic cap and resistor next to the red probe, the rest is a 555 freq gen and transistor to step up to 12v. The scope is hooked up exactly like the gauge cluster would be. . it only uses the small ceramic cap and resistor next to the red probe, the rest is a 555 freq gen and transistor to step up to 12v. The scope is hooked up exactly like the gauge cluster would be.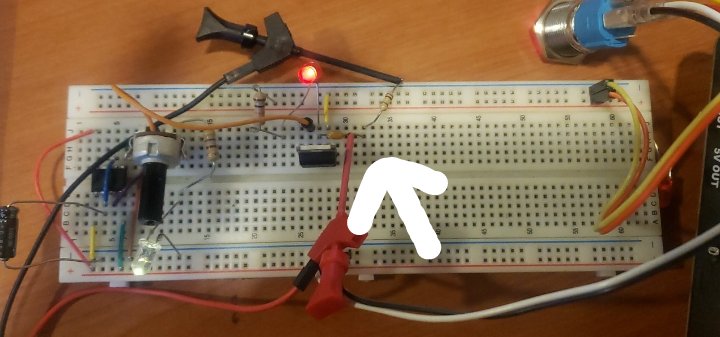 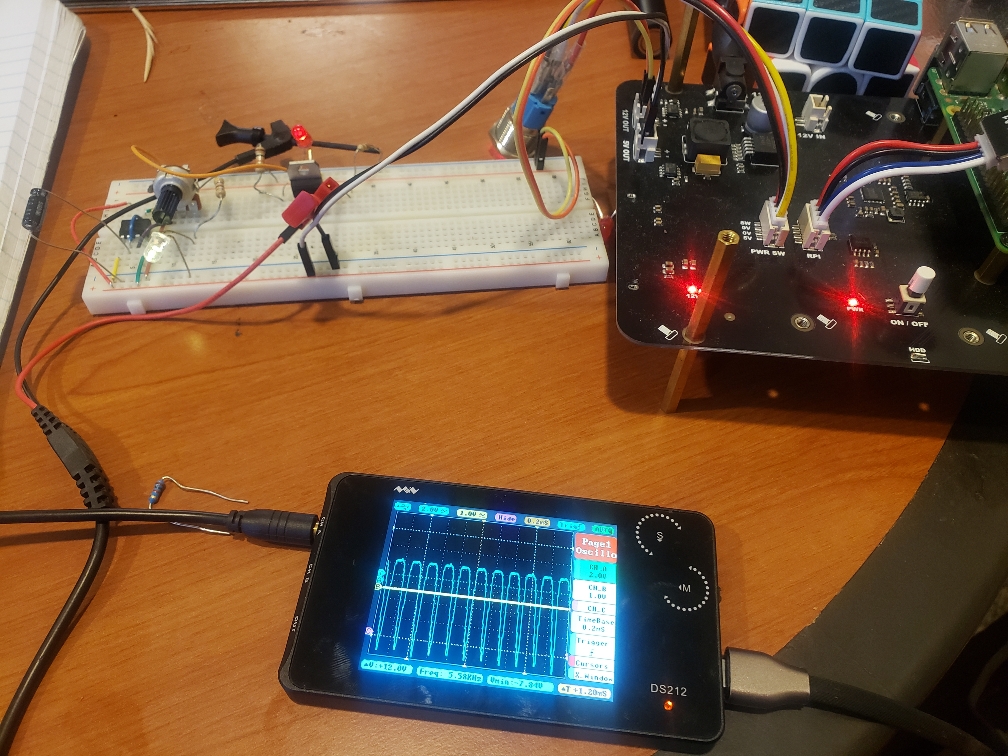 I did it this way as when I was tryn to get abs and hall effect sensor setup on the car the Ecu burned up. Would switch to on the ECU would blink then start buzzing. Mailed it to haltech they told me the main power trace was fried, I probably hooked up jumper cables backwards, and It had to be mailed to Australia for further diag and repair. After 3 weeks emailed em and got the response the microprocessor was damaged and wasnt cause effective to repair. Neded up buying another 1500 at a small discount. Before putting the ecu back in i wanted corrected something that had been bothering me, the angle of the rear ujoint or pinion angle. While installing the hall effect I noticed the ujoint at the diff had a few degrees movement to it while at the transmission there was almost none. After removing the drive shaft i mounted the angle finder and sure enough my pinion angle was 5 degrees off from the transmission. With a little math I found out I needed to raise the front of the diff ~3\4". After flipping my ploy bush (thick side is normally on top) and a little grinding to the subframe I got this, with less then .5 degrees difference. 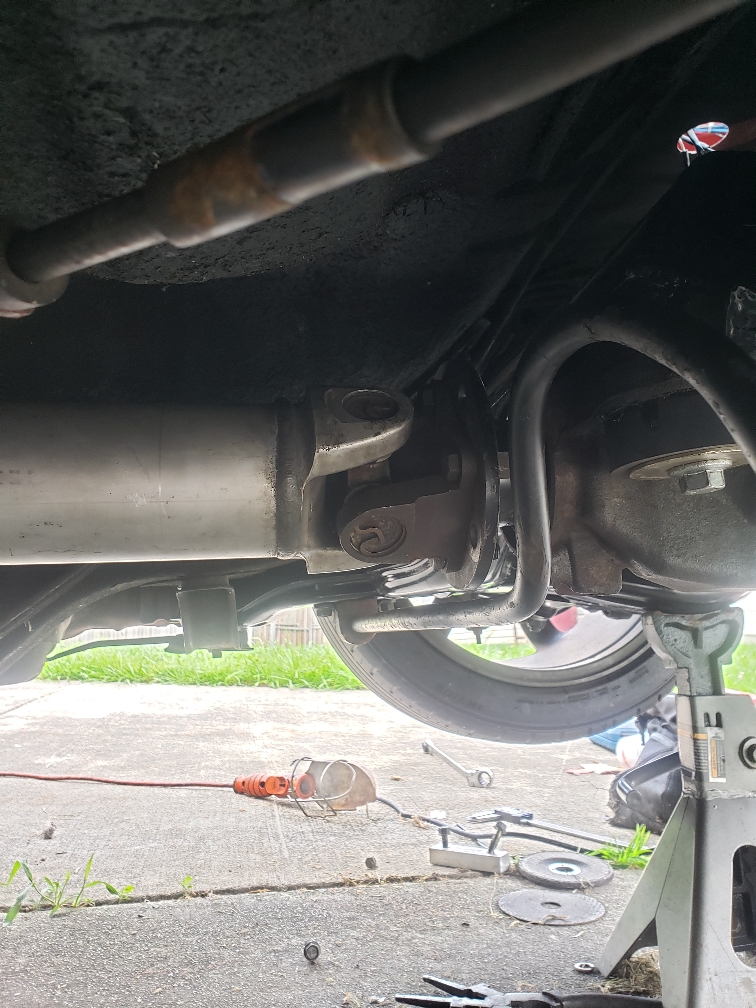 No clue where I messed up the first time around but good thing it was a simple fix. Plus now the diff is truly in the stock location and I can run the rear sway bar with out spacers. Sent from my SM-G960U using Tapatalk |
|
|

|
|
|
#112 |
|
Zilvia Junkie
 Join Date: Sep 2012
Location: va beach
Age: 28
Posts: 318
Trader Rating: (3)
       Feedback Score: 3 reviews
|
Haven't posted in while mainly cause I've been letting the car sit while I focused on getting house. I Just got back from my longest underway so far 24 days, came home to some bits I ordered while I was out. I plan to clean up the car on the inside this month.
 Finally, I have my own 2 Car garage. It seemed like a bidding war to get nice house with a 2 car garage during the current market. Eventually I bought a house that had been sitting for a minute cause it still had the OG asbestos siding. The VA made the seller remove it and it was deal. If I moved the washer/dryer and deaired the tires I could in theory get the big 'ol F250 in the right bay. So far I've managed to squeeze in a 2010 f150 super cab with a foot to spare in the left bay. 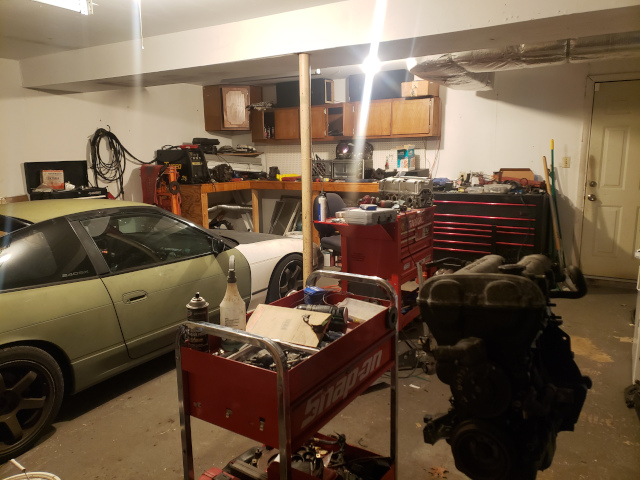 Another reason I haven't bothered is a week after moving in, back in January, I had the 240 in the yard while working on that F150 and a branch came down on the car. It broke into 3 pieces, one flew over my roommates car and the F250 hitting the garage door while I was in the garage, scared the crap outa me.  Last edited by foreverdeath; 05-02-2021 at 01:03 PM.. Reason: Zilvia dont like huge pics |
|
|

|
 |
| Bookmarks |
| Thread Tools | |
| Display Modes | |
|
|