 |
|
|||||||
| Home | Rules & Guidelines | Register | Member Rides | FAQ | Members List | Social Groups | Calendar | Mark Forums Read |
| Chat General Discussion About The Nissan 240SX and Nissan Z Cars |
 |
|
|
Thread Tools | Display Modes |
|
|
#1 |
|
Zilvia FREAK!
 Join Date: Oct 2009
Location: Near that guy you know
Posts: 1,561
Trader Rating: (11)
 Feedback Score: 11 reviews
|
Dapper Lighting projector Headlight install and review
Recently, I’ve been wanting to upgrade the light output of my S13. When I bought the car, it came with some less-than-impressive eBay “crystal” H4 conversion housings. Even after putting a set of $50 Sylvania super bulbs, I wasn’t happy with the light coverage at night.
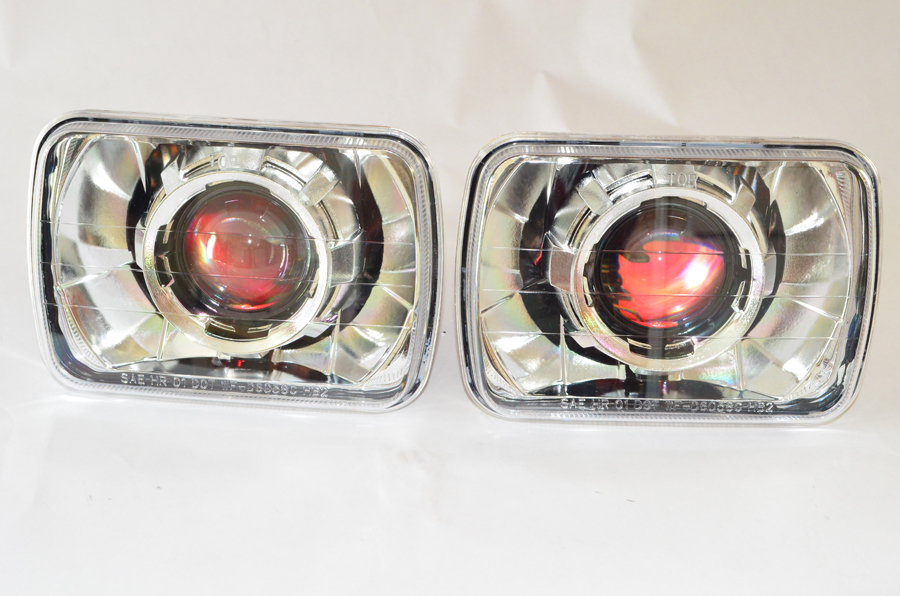
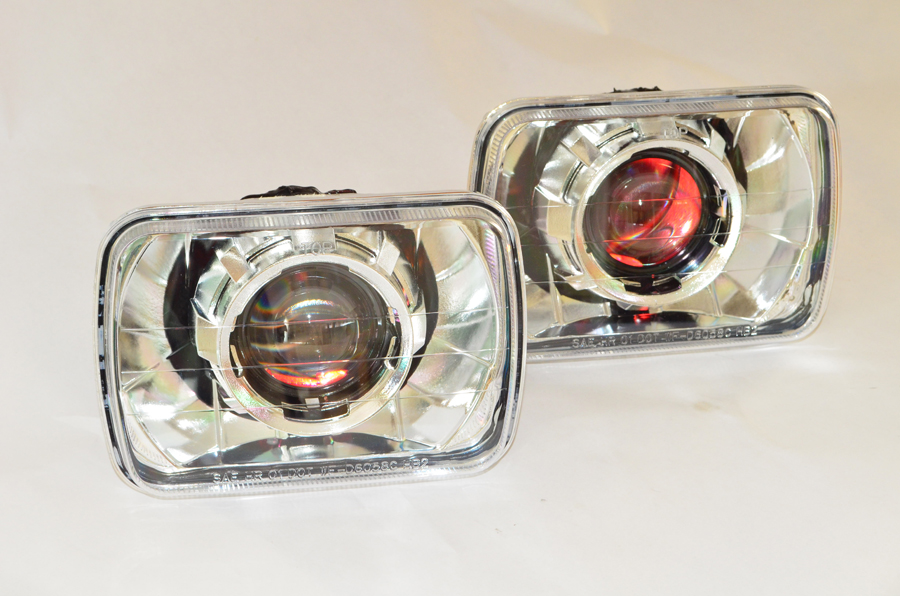
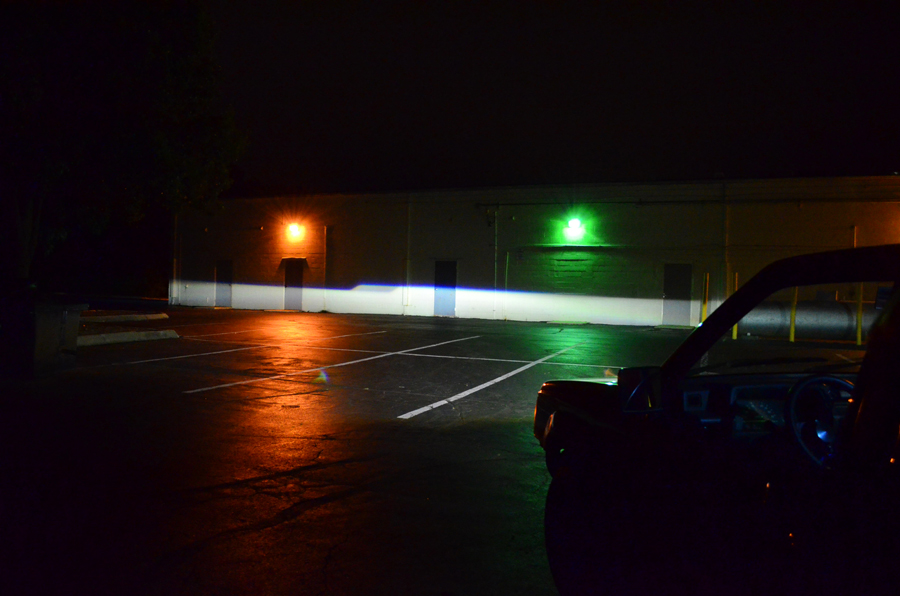
I knew you could get a projector headlamp housing in 6x7 but I didn’t want to end up with a broke China-boop eBay setup again so I started shopping around and found Dapper Lighting. They had several testimonials describing the quality of their product (and they have a fancy website). That China-boop So I picked up a set of the Dapper 6x7 projector housings with the black backing and the optional HID add-on kit. First impressions when I unboxed everything was “wow, there’s more wiring here than I thought there would be.” But after that initial shock, and glancing through the included instructions (with pictures!) I realized everything was pretty straight forward and the lamp housings are really good looking. After I got everything unboxed, I cleaned up a spot on my work bench and prepped the car and tools for the job. To do the swap, you’ll need basic hand tools: 10mm socket and wrench, phillips head screwdriver(s), plyers, provided double sided tape, and potentially a couple self-tapping sheetmetal screws. Step 1 is put your lights up, open the hood, and remove the negative battery terminal. I think everyone has removed a set of S13 headlights, and there’s plenty of write-ups online about that so I’ll breeze through this section Now that the “old and busted” is out, I prepped the new Dapper units for installation. The first thing I did was install the HID bulbs into the housings. *Note* Make sure the bulb is sitting flush to the housing or else you’re get a wonky light output when everything is installed. (details on that later). Then, I went ahead and connected all of the corresponding wiring to the ballasts, high beam relay, power source, etc. Pretty much everything only has one way it can be installed, so it’s pretty self-explanatory. The only thing that can be reversed is the diode for the high beam flipper majigger. It states clearly in the instructions to install that wire only partially, and test the high beams. But if you’re doing this on a S13 like me, just install the diode like this: Now, feed all the wiring through the back of the headlamp bucket and prepare to tie down the ballasts, relays and extra wiring. Pull the power and ground leads and temporarily attach them to the corresponding posts of the battery to test the lights and high beams out for correct function. Yeah, we’re starting to look good now. Lookin’ alright After you’ve checked that the high beams flip on and off as expected, go ahead and start mounting the peripherals and extra wiring in a safe and “mostly dry” area. I chose to use the included double sided tape to mount the ballasts to the front bumper support. I cleaned the area and stuck it on. Then I used a self-tapping screw to mount the relay next to the ballast. I ran the driver’s side headlamp wiring up under the radiator core support to meet up with the passenger’s side headlight wiring. Then I passed both sets of wires through a shielded pass-through that was already in the sheet metal. Run those wires to the battery and tuck them neatly. Finish up bolting the headlamps down for the last time and reinstall the headlamp shroud. Now I have to get the lamp beam correctly aimed as to not blind oncoming drivers. There is a procedure in Dapper’s instruction manual on how to do this. Luckily, its pretty easy to adjust the height of the headlamp beam on S13’s. Once I was finished, I took it for a drive and basked in my new, awesome light output and pattern! Overall, the lights are such an awesome improvement, I can’t believe I ever drove at night without them. They make the car have a much more modern look and a modern light output. Overall, money well spent. |
|
|

|
| Sponsored Links |
|
|
#2 |
|
Post Whore!
 Join Date: Apr 2006
Location: bangin on my chest Account: BANNED #fucksupreme
Age: 79
Posts: 5,923
Trader Rating: (3)
           Feedback Score: 3 reviews
|
I wouldnt run them, but glad you are happy with them.
They claim they are compliant running a 55w hid kit that uses rebased bulbs. Smells like bullshit. S13 owners are probably better off going with an LED headlight nowadays. |
|
|

|
|
|
#4 |
|
Nissanaholic!
 |
Please delete that excessive, mind numbing write up. Leave the review part and pictures.
__________________
MRP Manufacturing |
|
|

|
|
|
#6 |
|
BANNED
 |
With pop ups there not much that can be done, solid write up. And glad you got what you wanted from it.
Ixfxi just wants someone to spend 2500 on tail lamps, and turboshoebox just wants attention. Although noticing your join date I'm sure you've already gathered this... |
|
|

|
|
|
#8 |
|
Zilvia Junkie
 |
Thank you for your post and review. I just checked out the Dapper Lighting website for myself and I think your right. It looks like a solid product. I really like the fact that they not only have glass lenses but also the housings too. Plastic ones just don't stand the test of time. The way the made high and low beam output is pretty trick too. I also think their price point is reasonable for what they are offering and I really like the fact that they are ISO9001, E4, SAE Compliant. It means they took the time to get the certs they needed to sell quality lighting. Maybe I'll try them out in the future too on one of the projects.
|
|
|

|
|
|
#9 |
|
Nissanaholic!
 Join Date: Oct 2013
Location: Western Mass.
Posts: 2,254
Trader Rating: (3)
           Feedback Score: 3 reviews
|
I'd be interested in seeing more pctures of light output.
For $250 plus shipping thats pretty damn close to the price of the morimoto kit and doing a basic retrofit isn't all that hard. This is just convenient, and ugly. |
|
|

|
|
|
#11 |
|
Nissanaholic!
 Join Date: Oct 2013
Location: Western Mass.
Posts: 2,254
Trader Rating: (3)
           Feedback Score: 3 reviews
|
Doesn't mean the product is as good.
Also, its 250 with halogens, $350 for HID Personally i'd take the morimoto kit. Has a warranty, is $300 for the mini H1 and isn't overly hard to retrofit unless youre a complete potato. So, 90% of zilvia will buy these instead. |
|
|

|
|
|
#14 | |
|
Zilvia FREAK!
 Join Date: Oct 2009
Location: Near that guy you know
Posts: 1,561
Trader Rating: (11)
 Feedback Score: 11 reviews
|
Quote:
LOL this! That's what I had and it just wasn't cutting it. I drive a lot of brand new cars for work, and going back to my S13 was such a huge, negative difference. I had to do something. |
|
|
|

|
|
|
#15 |
|
Nissanaholic!
 Join Date: Jan 2009
Location: Definitely NOT FL....
Age: 29
Posts: 2,491
Trader Rating: (25)
          Feedback Score: 25 reviews
|
Eh, that black housing just looks terrible. Makes it look ricey to me. 1/10 would not drop $350 for that. Good write up and info though. Most would just post a pic and say "I like them" as a review. You went way more in depth which will really help others that may be considering the same kit.
__________________

|
|
|

|
|
|
#16 | |
|
Zilvia FREAK!
 Join Date: Oct 2009
Location: Near that guy you know
Posts: 1,561
Trader Rating: (11)
 Feedback Score: 11 reviews
|
Quote:
And yeah, I tried to get a little more in depth. I like the product a lot and I felt it deserved a thorough write-up. |
|
|
|

|
|
|
#17 |
|
Nissanaholic!
 |
I've built one set of sealed beam replacement lights. Pilot housings (removable lens), rx330 custom bixenon projectors, oem philips bulbs, oem nissan ballasts. Parts cost was less than the $350 and performance is obviously much better as well.
  
__________________
'98 240sx 5spd |
|
|

|
|
|
#18 | ||
|
Post Whore!
 Join Date: Apr 2006
Location: bangin on my chest Account: BANNED #fucksupreme
Age: 79
Posts: 5,923
Trader Rating: (3)
           Feedback Score: 3 reviews
|
Ah yes, life in Tennessee... where 2500 buys you a house.
Quote:
>crickets< Quote:
People should spend their money with you as opposed to spending money on bullshit. |
||
|
|

|
|
|
#19 | |
|
Zilvia FREAK!
 Join Date: Oct 2009
Location: Near that guy you know
Posts: 1,561
Trader Rating: (11)
 Feedback Score: 11 reviews
|
Quote:
And, I have zero interest in building my own light kit. This setup that I have performs well enough for me, and was easy to put together. |
|
|
|

|
|
|
#21 |
|
Hey guys! Thought we'd come in and clear up any confusion. The HID kits are NOT road legal as we tell all of our customers. We're about a balance of quality, ease, and fitment. Are these the sharpest, brightest, units available? Definitely not. Can you build a OEM quality unit for cheaper? Probably. But our stuff is a good balance of performance, quality, and fitment (most important since we mainly work with older cars). They come with a 5 year warranty and just as important, good tech/customer support. If we want to bash, we should bash the faux projector headlamps all over ebay
 Feel free to reach out with any questions, comments or suggestions. We're always open to making our products and service better! Thanks! Ben |
|
|
|

|
|
|
#24 |
|
Nissanaholic!
 |
I live in Florida, there are no laws.
__________________
MRP Manufacturing |
|
|

|
 |
| Bookmarks |
| Thread Tools | |
| Display Modes | |
|
|