 |
|
|||||||
| Home | Rules & Guidelines | Register | Member Rides | FAQ | Members List | Social Groups | Calendar | Mark Forums Read |
| Tech Talk Technical Discussion About The Nissan 240SX and Nissan Z Cars |
 |
|
|
Thread Tools | Display Modes |
|
|
#1 |
|
Has anyone tried ignition coils from the GM LTG 2.0t?
I saw a set on ebay with the harness, for $50. I've seen people getting good power on the LTG 2.0t without doing anything to the ignition. Stock, the motor is pushing 20 psi at a CR of 9.5 to 1.
The coils came today. This weekend I am going to see what sort of bracket I will need to make, but I was curious if anyone has used these? |
|
|
|

|
| Sponsored Links |
|
|
#2 |
|
I am not done with the install, but I did the test fit, and it worked out great so far. I ordered the supplies I needed to make a new coil pack harness, and will see if I can get it running this weekend.
Here is what the coils look like in the engine. No bracket is needed! Just a longer M6 bolt. The coils needed to be modified as shown.   Last edited by Nysil Via; 12-11-2018 at 01:18 PM.. Reason: images too big |
|
|
|

|
|
|
#3 |
|
Premium Member
 Join Date: Jun 2003
Location: torrance, ca
Age: 39
Posts: 12,407
Trader Rating: (129)
           Feedback Score: 129 reviews
|
that's a cool option, +rep!
|
|
|

|
|
|
#6 |
|
Nissanaholic!
 Join Date: Feb 2007
Location: Memphis
Age: 29
Posts: 1,907
Trader Rating: (6)
           Feedback Score: 6 reviews
|
Can you measure from the tip of the boot to where it meets the valve cover?
__________________
 Nagasaki Motors Nagasaki Motors Friends help you move. Real friends help you move bodies. |
|
|

|
|
|
#7 |
|
I'm not sure what measurement you want. I do know that there is a space between the bottom of the mounting flange and the valve cover. I am going to have a spacer there, but i don't know the exact height yet.
If you are asking about the boot that would cover the hole where the plugs are, then there is some space there, but I haven't though too much about how to fill it just yet. I am going to focus on securing the coils and making room for the wiring first. then I can think about what I can make use of to cover up the spark plug cavities. Edit: I have an update I'm trying to post but it's not letting me. But I have a nice write up if how to get them to work. Last edited by Nysil Via; 12-17-2018 at 10:05 PM.. |
|
|
|

|
|
|
#8 |
|
I made the new harness and tested it this weekend. It works.
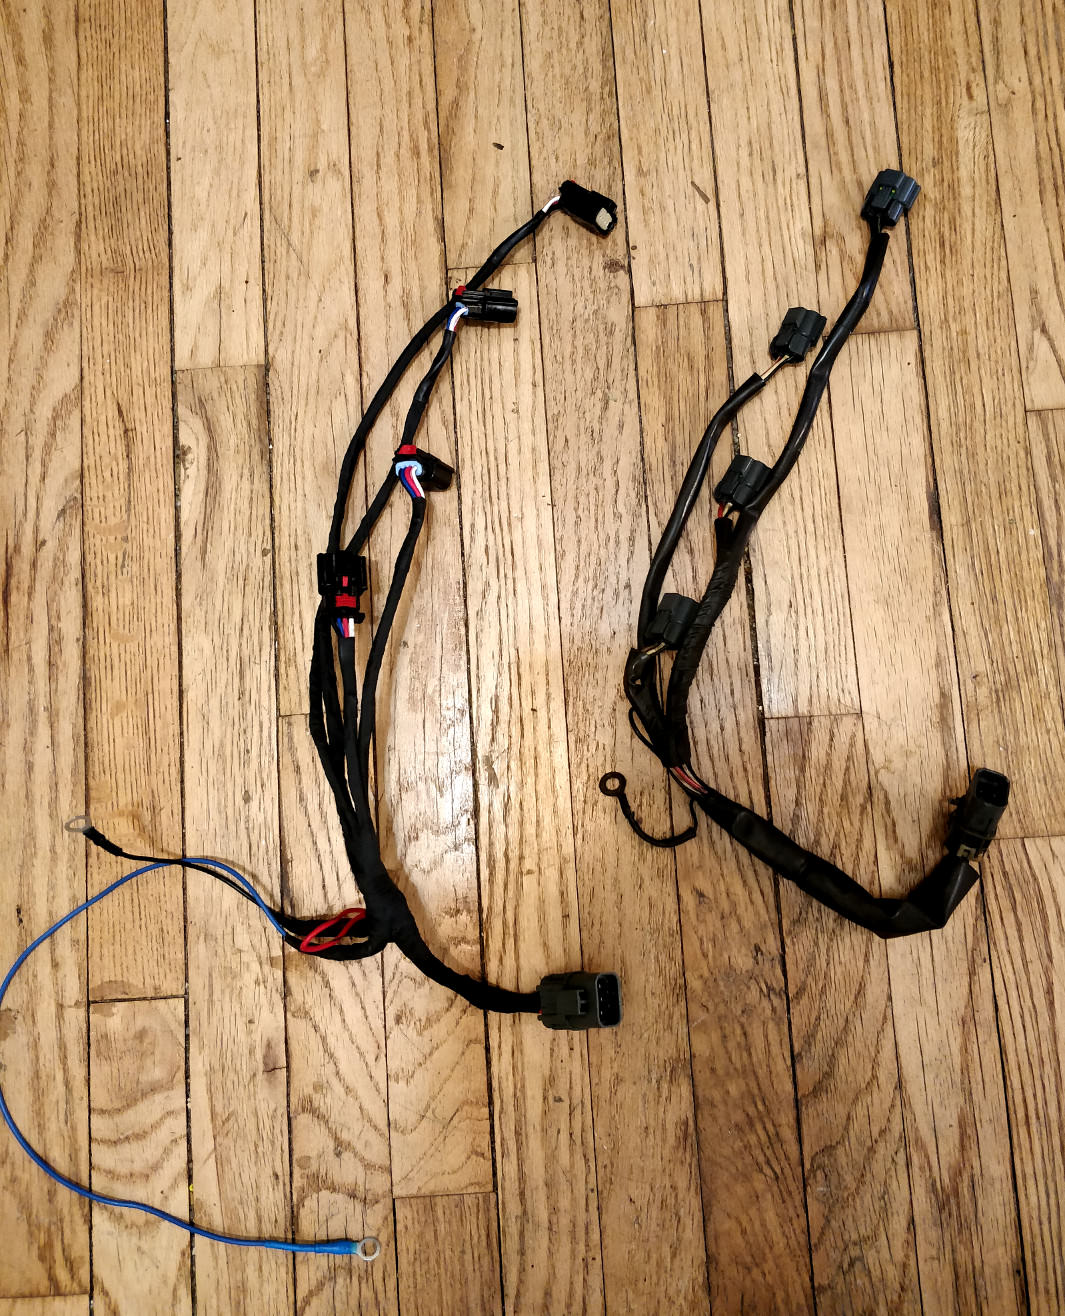
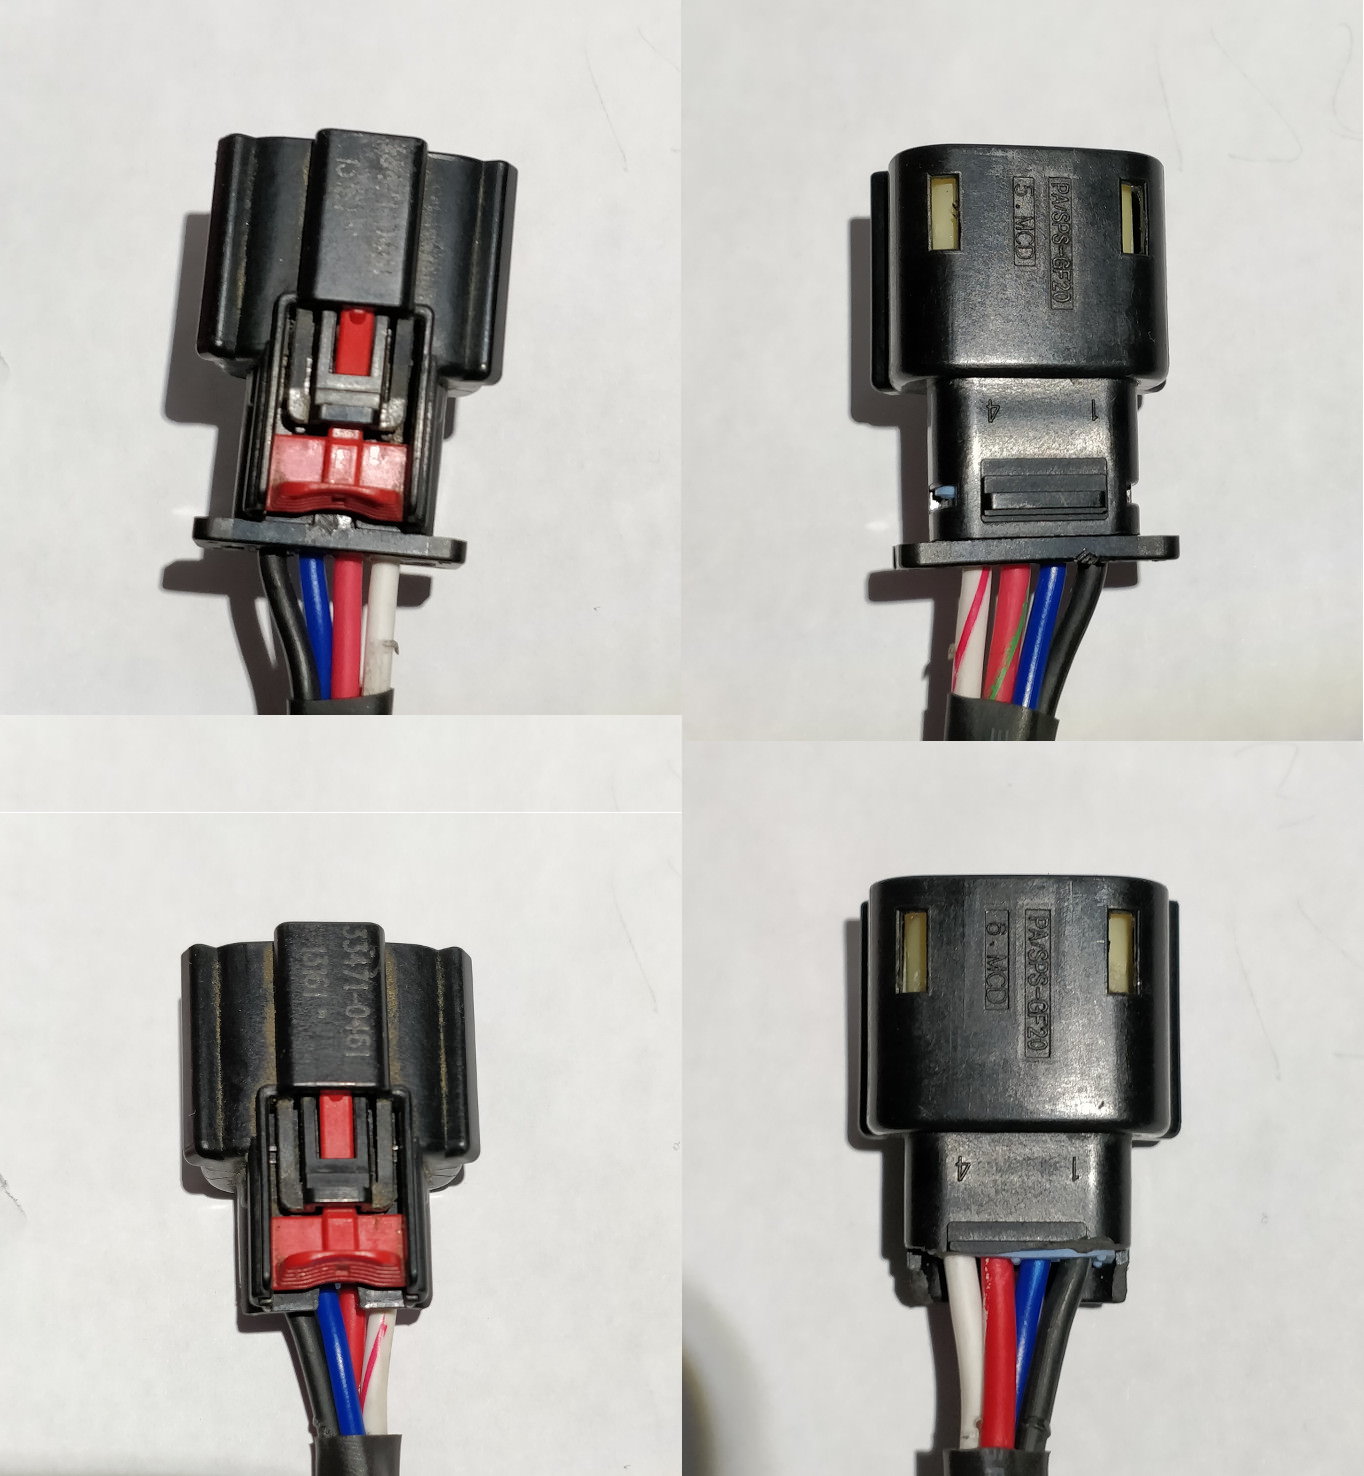
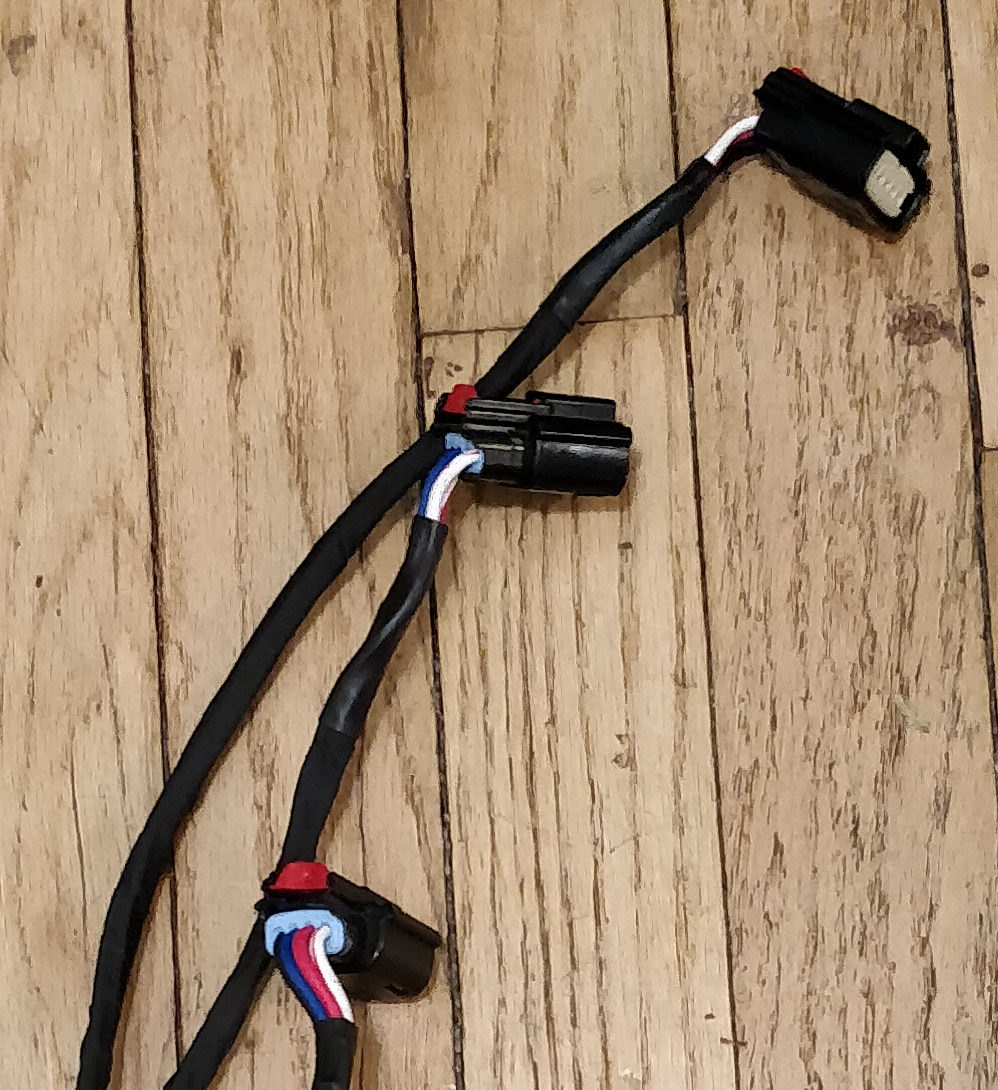
Here is the new harness compared to the old harness. I started with a wiring specialties replacement harness. The big problem with doing using the Wiring Specialties harness is that the loop for the timing light won't work. At least I don't think it will as it becomes a low voltage wire in the new harness. Below is how I modified the connectors to account for the space issue that was noted. the top row is the unmodified connector, and the bottom row is the modified version. Obviously the modification should take place while the connector is depinned. and here is the first pic with a crop zoom so you can get an idea of the space it creates As for the wiring, The stock system has one wire from the main harness and split to the four coils that provides 12-14V. This wire is white on cylinders 2-4 and Black with a yellow stripe for cylinder 1. Each cylinder also has a Black ground that is spliced together to the eyelet connector that gets bolted to the head. And finally there are three red wires with colored stripes for cylinders 2-4 and one black wire for cylinder 1. these last four wires individually go to the connector that connects to the main harness, and brings those four wires to the ignitor chip. The ignitor chip is a device that takes in a low voltage signal from the ECU and completes the ground connection on the 12V circuit to that coil. What you will need is an ignitor chip bypass that will send the ECU signal all the way up to the new GM coils. Then you need to wire in a second ground wire into the harness. if you look at my picture that shows the connector mod, you can see on the bottom side of the connector, ther eare the numbers 1 and 4. these are pin labels. Pin 1 - Head Ground. This is the same head ground wire on the stock harness. Black wires in my picture Pin 2 - Chassis ground. These are the wires that need to be added. Blue wires in my picture Pin 3 - ECU signal. there are the wires that have to get pinned to the right location on the harness connector because they go to the ignitor chip bypass. these become the signal wires. Red in my picture Pin 4 - 12V-14V supply from the main harness, these get spliced to one wire and that one wire has to be pinned to the right location in the harness connector. White in my picture. Additional information. I was fortunate to be able to find the cois with the harness and the needed connectors. but if you need to source the connectors on your own, they are Molex 33471-0461. The pins are Molex 33012-something depending on the wire gauge you are using. Last edited by Nysil Via; 01-29-2019 at 10:03 AM.. Reason: duplicate |
|
|
|

|
|
|
#9 |
|
I made the new harness and tested it this weekend. It works.
Here is the new harness compared to the old harness. I started with a wiring specialties replacement harness. The big problem with doing using the Wiring Specialties harness is that the loop for the timing light won't work. At least I don't think it will as it becomes a low voltage wire in the new harness. Below is how I modified the connectors to account for the space issue that was noted. the top row is the unmodified connector, and the bottom row is the modified version. Obviously the modification should take place while the connector is depinned. and here is the first pic with a crop zoom so you can get an idea of the space it creates As for the wiring, The stock system has one wire from the main harness and split to the four coils that provides 12-14V. This wire is white on cylinders 2-4 and Black with a yellow stripe for cylinder 1. Each cylinder also has a Black ground that is spliced together to the eyelet connector that gets bolted to the head. And finally there are three red wires with colored stripes for cylinders 2-4 and one black wire for cylinder 1. these last four wires individually go to the connector that connects to the main harness, and brings those four wires to the ignitor chip. The ignitor chip is a device that takes in a low voltage signal from the ECU and completes the ground connection on the 12V circuit to that coil. What you will need is an ignitor chip bypass that will send the ECU signal all the way up to the new GM coils. Then you need to wire in a second ground wire into the harness. if you look at my picture that shows the connector mod, you can see on the bottom side of the connector, ther eare the numbers 1 and 4. these are pin labels. Pin 1 - Head Ground. This is the same head ground wire on the stock harness. Black wires in my picture Pin 2 - Chassis ground. These are the wires that need to be added. Blue wires in my picture Pin 3 - ECU signal. there are the wires that have to get pinned to the right location on the harness connector because they go to the ignitor chip bypass. these become the signal wires. Red in my picture Pin 4 - 12V-14V supply from the main harness, these get spliced to one wire and that one wire has to be pinned to the right location in the harness connector. White in my picture. Additional information. I was fortunate to be able to find the cois with the harness and the needed connectors. but if you need to source the connectors on your own, they are Molex 33471-0461. The pins are Molex 33012-something depending on the wire gauge you are using. Last edited by Nysil Via; 01-29-2019 at 10:04 AM.. Reason: duiplicate |
|
|
|

|
|
|
#10 |
|
I made the new harness and tested it this weekend. It works.
Here is the new harness compared to the old harness. I started with a wiring specialties replacement harness. The big problem with doing using the Wiring Specialties harness is that the loop for the timing light won't work. At least I don't think it will as it becomes a low voltage wire in the new harness. Below is how I modified the connectors to account for the space issue that was noted. the top row is the unmodified connector, and the bottom row is the modified version. Obviously the modification should take place while the connector is depinned. and here is the first pic with a crop zoom so you can get an idea of the space it creates As for the wiring, The stock system has one wire from the main harness and split to the four coils that provides 12-14V. This wire is white on cylinders 2-4 and Black with a yellow stripe for cylinder 1. Each cylinder also has a Black ground that is spliced together to the eyelet connector that gets bolted to the head. And finally there are three red wires with colored stripes for cylinders 2-4 and one black wire for cylinder 1. these last four wires individually go to the connector that connects to the main harness, and brings those four wires to the ignitor chip. The ignitor chip is a device that takes in a low voltage signal from the ECU and completes the ground connection on the 12V circuit to that coil. What you will need is an ignitor chip bypass that will send the ECU signal all the way up to the new GM coils. Then you need to wire in a second ground wire into the harness. if you look at my picture that shows the connector mod, you can see on the bottom side of the connector, ther eare the numbers 1 and 4. these are pin labels. Pin 1 - Head Ground. This is the same head ground wire on the stock harness. Black wires in my picture Pin 2 - Chassis ground. These are the wires that need to be added. Blue wires in my picture Pin 3 - ECU signal. there are the wires that have to get pinned to the right location on the harness connector because they go to the ignitor chip bypass. these become the signal wires. Red in my picture Pin 4 - 12V-14V supply from the main harness, these get spliced to one wire and that one wire has to be pinned to the right location in the harness connector. White in my picture. Additional information. I was fortunate to be able to find the cois with the harness and the needed connectors. but if you need to source the connectors on your own, they are Molex 33471-0461. The pins are Molex 33012-something depending on the wire gauge you are using. Last edited by Nysil Via; 01-29-2019 at 10:05 AM.. Reason: duplicate |
|
|
|

|
|
|
#11 |
|
I made the new harness and tested it this weekend. It works.
Here is the new harness compared to the old harness. I started with a wiring specialties replacement harness. The problem with doing using the Wiring Specialties harness is that the loop for the timing light won't work and there isn't enough wire to make a loop on the wire to the correct pin.  Below is how I modified the connectors to account for the space issue that was noted. The top row is the unmodified connector, and the bottom row is the modified version. Obviously the modification to teh connectorsshould take place while the connector is depinned.  and here is the first pic with a crop zoom so you can get an idea of the space it creates  As for the wiring, If you look at my picture that shows the connector mod, you can see on the bottom side of the connector, there are the numbers 1 and 4. These are pin labels. Pin 1 - Head Ground. This is the same head ground wire on the stock harness. Black wires in my picture Pin 2 - Chassis ground. These are the wires that need to be added. Blue wires in my picture Pin 3 - ECU signal. there are the wires that have to get pinned to the right location on the harness connector because they go to the ignitor chip bypass. these become the signal wires. Red in my picture Pin 4 - 12V-14V supply from the main harness, these get spliced to one wire and that one wire has to be pinned to the right location in the harness connector. White in my picture. Additional information. I was fortunate to be able to find the cois with the harness and the needed connectors. but if you need to source the connectors on your own, they are Molex 33471-0461. I belive the -0401 is similar and will find out soon enough in case the -0461 can't be sourced. Mouser has the =-0401. The pins are Molex 33012-something depending on the wire gauge you are using. The space between the coil flange and the head is about 3/8" myabe a little more. I used 3/8" spacer i bought from Amazon. I think I may glue them to the coils to avoid any issues. You will also need longer bolts. the size needed it M6x1.0 and 40mm long. |
|
|
|

|
|
|
#13 |
|
I used what came with the wiring specialties harness. which was 14 AWG for the three wires it came with. I added a 18 AWG wire for the chassis ground Pin 2. Pin 3 Signal could also be 18 AWG, because its low voltage/ low current.
The gauges of the wires I got with the cut harness that came with the coils were 16 AWG for the 12V and head Ground and 20 AWG for the signal and chassis ground. EDIT: The black head ground might actually be 16 AWG from the looks of the picture. |
|
|
|

|
|
|
#15 |
|
Both, and also some curiosity. I haven't tried a larger gap on my plugs. I was running a .031" gap. The information I found about the LTG 2.0t is that they use a 9mm or .035 gap. So I may try that when I change my plugs and see if I get any blowout.
oh, the ignitor bypass. I no longer need it. The wires from the ecu harness go right to each coil. The GM coils have their own "ignitor" meaning that when the ECU signal reaches the coil, a built-in relay is activated that completes the 12V circuit to that coil. The way the stock SR20DET coils work, if you are curious, is that the ecu signal goes to the ignitor chip and that flips a relay that grounds the 12V circuit from that coil. IOW, all the coils are fed from one 12V source, but then each coil has its own ground wire that runs down to the ignitor chip. The ground wires from each coil will only be grounded when the ECU signal tells the ignitor chip to complete the circuit. Last edited by Nysil Via; 01-29-2019 at 01:09 PM.. Reason: forgot to add something |
|
|
|

|
 |
| Bookmarks |
| Thread Tools | |
| Display Modes | |
|
|