
 |
|
|||||||
| Home | Rules & Guidelines | Register | Member Rides | FAQ | Members List | Social Groups | Calendar | Mark Forums Read |
| Tech Talk Technical Discussion About The Nissan 240SX and Nissan Z Cars |
 |
|
|
Thread Tools | Display Modes |
|
|
#1 |
|
Zilvia Junkie
 |
This guide details a 1JZ-GTE VVTI swap into a 1993 Nissan 240SX (S13). I hope this thread inspires Zilvia members to do something similar and enjoy the experience. I chose 1JZ over 2JZ because they’re generally cheaper. I chose VVTI because I plan on keeping it relatively stock and the powerband is awesome. Full 280 ft-lb of torque at 2400RPM, half of which it takes for a non-VVTI. It also has higher compression, better cooling, factory single turbo, vtec yo, etc. If big power numbers are your goal, look at non-VVTI because they’re MAP based and will allow you to more easily add a larger single turbo on and make decent power even on stock tune.
Let’s also get price out of the way before we start. Average 1JZ VVTI + R154 costs around $3200 from what I’ve found, where most of the cost is from the R154. Without any discounts, deals, labor, fluids or shipping+tax, my whole swap cost around $7000 for a stock 1JZ VVTI with fresh gaskets, upgraded clutch/flywheel, prepared harness and quality parts. I cut very little corners in terms of quality parts so there’s definitely some room to cut it down but don’t expect this to cost what a basic SR swap does. At the bottom I’ll post my detailed parts list.  Table of Contents 1. General Parts List 2. Step-by-step Guide 3. Appendix + Common Issues 4. Full Parts List. Research: http://www.supramania.com/forums/sho...de-For-Dummies \\\\\\\\\\\\\\\\\\\\General Parts List//////////////////// 1JZ-GTE VVTI Common obstacles: fuel lines, shifter placement, heater lines, exhaust routing, cooling, sway bar interference and transmission choice. \\\\\\\\\\\\\\\\\\\\Step-by-Step Guide/////////////////// Step 1: Remove the factory KA engine.There are quite a few tutorials explaining this. I won’t go into horrendous details but start by de-pressurizing the fuel rail. Step 2: Pawn off your KA-T setup Craigslist, Zilvia, Facebook groups, friends you don’t like or suckers you want to set up for failure… kidding I did love my KA-T, just feeding into the KA hate so many swear by. Step 3: Clean the engine bay You can go as crazy or half-ass as you want here. At the very least, pull out a power washer, some Simple Green and spray all of the crusted twenty year old road grime. Why start a project with a dirty canvas? Step 4: Go to Jspec and buy a 1JZ-GTE VVTI Ask:How many miles are on it?You want a front-sump oil pan found in most Chaser 1J’s. Be aware of which variant 1J you are purchasing. From my research, there is two major VVTI variants: JZX100/JZZ30 and JZX110. You want an early model 1JZ VVTI because they aren’t drive by wire. Avoid the models with ETCS-I, DBW is fine but can have a delayed feel. Most seem to prefer the direct feel of a mechanical linkage. DBW is awesome though, no IACV and if standalone you can map different pedal maps. Further explanation in the Appendix. Step 5: Preventative Maintenance & Upgrades Now that you have an empty engine bay, it might be a good time to do some maintenance and upgrades that are otherwise difficult to do with an engine in there. For example, a wire tuck, relocating relays and fuses, changing out power steering rack, adding a power steering cooler, prepping intercooler pipes, shaving fenderwells, tubbed fenders, relocated battery, and whatever else there is. After all of that a quick spray of the engine bay might look nice. Step 6: Install Motor Mount Kit, Sway Bar and other components in preparation for the swap. I used the S13 Xcessive JZ swap kit. Replaces the Toyota JZ engine mount brackets so they work with your factory Nissan engine mounts and subframe. I also reinstalled everything I took out for paint. Step 7:Address the Fuel Lines and extend them to the other side of the engine bay. The fuel lines are simple but there are many ways of doing this. You can buy braided lines from a few manufacturers but I spent my time and did it with hard lines for a factory-style install. It’s pretty fun because you have a chance to choose your own routing. I would advise keeping the lines as far from the front of the vehicle or pinch spots as possible. In the event of a crash, you do not want your fuel lines to be compromised and have a leak. Step 8: 1JZ-GTE Powertrain Overhaul[INDENT]Valve cover gaskets, cam seals, VVTI cam gear seal, downpipe gasket, front and rear main seals, transmission seals, shifter seals, oil pan gasket, a new water pump, spark plugs, timing belt, timing belt tensioner, timing belt pulley, accessory belt, vacuum lines, etc. No sense in having a leaky ‘new’ engine so I recommend nipping it in the butt now. I didn’t bother with the head gasket. There’s quite a few tricks around all of these maintenance jobs such as using a 1988 Isuzu Trooper (4ZEL) 2.6L 4 cyl motor timing belt (Gates T147) off of RockAuto because it’s dirt cheap and the same belt Toyota supplies. There are also many USDM MKIV 2JZ-GTE parts that are the same part numbers or upgrades. Our friends at Club Lexus did a great job, check out the cross-reference list here: http://www.clublexus.com/forums/perf...ts-thread.html Basic maintenance guide: http://www.toymods.org.au/forums/tec...k-service.html I also upgraded the clutch and flywheel to a DriftMotion lightened flywheel, ARP flywheel bolts, new pressure plate bolts and a SPEC Stage 3 sprung six-puck. Something to note here is how to deal with a pull-type clutch (Nissan typically uses push-type where the throwout bearing rides on the pressure plate teeth. To install this type of clutch interface, it is recommended to fasten the flywheel and pilot bearing accordingly but then slides the release bearing, pressure plate, and clutch disk on the transmission spline. In other words do not bolt the pressure plate to the flywheel just yet. Then attach the R154 to the JZ engine and remove the inspection plates on the lower sides of the transmission. You will now be able to attach the pressure plate to the flywheel without potentially damaging the fork and release bearing. Note: release bearing assembly: 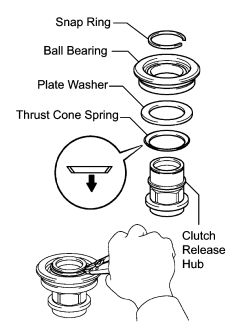 Further info: http://www.mk3supra.org/topic/596-gu...he-7mgte-r154/ While you're there attach your Future Fabrication turbo elbow for an easy off-the-shelf part to tackle the issue of exhaust routing. More info down in the appendix. Step 9 : Install the entire motor set Time to find out if all your hardwork has paid off. Test fit and make sure everything has room. I'll be honest the Xcessive mounts 100% work but required some extra work. I would spend some time and bang out the trans tunnel some before installing. Although it does all fit, the extended shifter runs into the trans tunnel a bit and needs the shifter hole opened up some more towards the rear of the car. 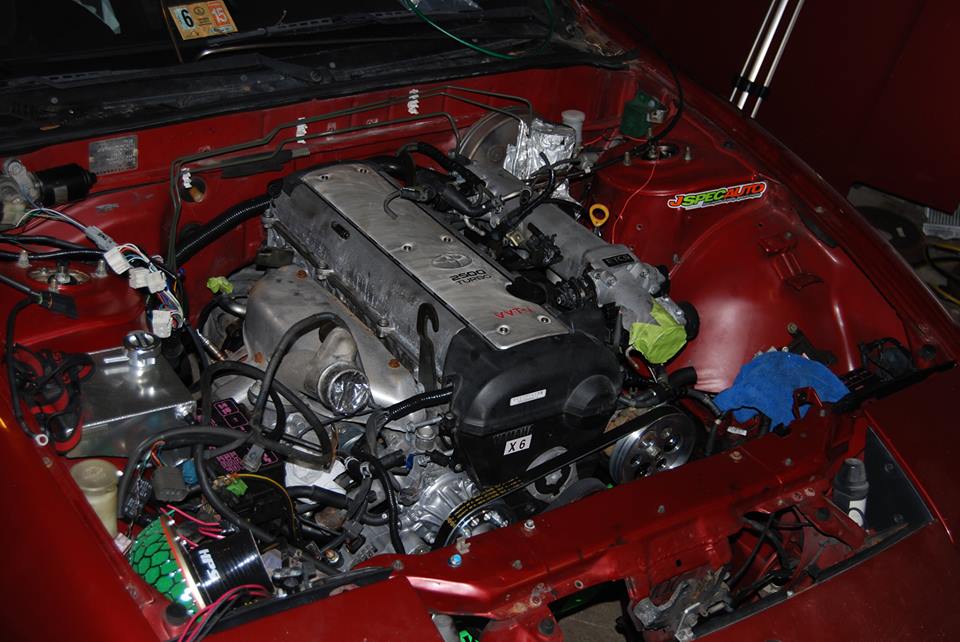 Step 10: Modify or install the one-piece driveshaft & Order Electric Fans My measurements: 46.5" Step 11: Mechanical Connections Connect the intercooler piping, radiator, cooling fans, radiator hoses, heater hoses, clutch line, and power steering. A/C not covered in this tutorial as I opted out of it, plenty of threads explaining their Frankenstein AC setups using Nissan and Toyota parts. Or just go to any hose supplier and they should be able to help you out with custom lines. Step 12: Electrical Connections Wiring harness job. I did not want to spend my limited wrenching time connecting the two harnesses and chose to pay someone to wire my harness. Panic Wire offers great prices and fairly quick turnaround, give them a shot. You’ll also have a hard time finding companies willing to wire the VVTI engine mostly because of the late model drive-by-wire. Step 13: Fluids Fresh coolant, oil, power steering and trans fluid. I’ve read that only red Toyota coolant should only be used in the JZ motors. I’m running Dexron III ATF for power steering fluid, Rotella T6 5W-40W synthetic oil, and Redline MT-40 trans fluid. Step 14: First Start-up Look over your engine bay and talk yourself through starting your engine. Do you have all your grounds, filled all your fluids, primed your oil and fuel lines, and connected all of your drivetrain? Cross your fingers and go for it. Some people disconnect their intercooler pipes from the intake for first start to blow any crap that might have collected in their while doing the swap...not bad idea. 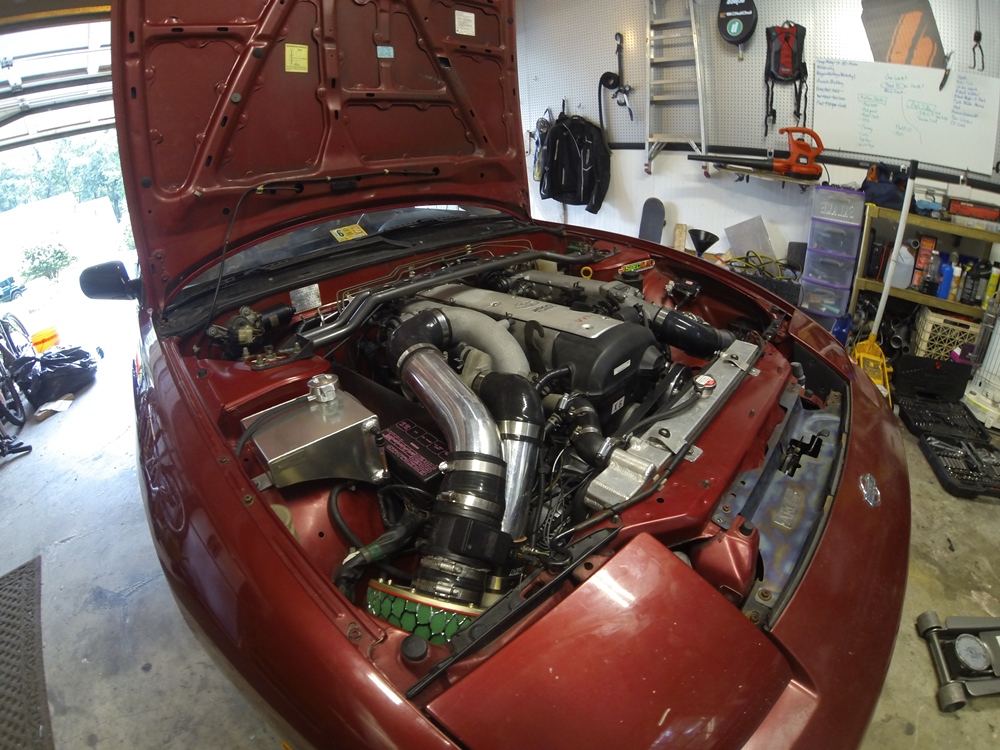 Exhaust work: Step 15: “Break-in” Procedure This isn’t a new motor but I would go easy and drive the car lightly around to make sure you’re not leaking like crazy, overheating, smoking, on fire, have good oil pressure and the AFR readings appear accurate. Break in a new clutch if you installed one. After that I wouldn’t wait too long before running the engine through its paces. If it’s going to break, it’s going to break and you might as well do it before you waste a day at the track. 04/06/2016: Appendix moved to Post #2. Added problems and troubleshooting section. Last edited by bmaddock; 11-30-2017 at 11:12 AM.. |
|
|

|
| Sponsored Links |
|
|
#2 | |||||
|
Zilvia Junkie
 |
\\\\\\\\\\\\\\\\\\\Appendix/////////////////// Motorset Mount Kit: There are many aftermarket solutions available. General premise is the same for most swap mount kits. Remove Toyota factory mounts+brackets and install conversion brackets. Most kits should then use the KA/SR engine mounts and factory subframe. The transmission is even more straightforward, but be aware that some mounts only use one of the R154 transmission mounts. For the Xcessive kit, I ordered Part #2410 from Rockauto for $4 and filled it with window-weld instead of paying $120 for their poly mount. Buy two tubes of the 3M window weld and do your mount mounts while you're at it too. Make sure to degrease and clean them first! Sway Bar Interference: Stock sway bar will likely interfere with the JZ oil pan. Three basic solutions: sway bar spacers, Sikky sway bar, or removing front sway bar. Option 1 will cause the sway bar to scrape frequently. Option 2 is a great upgrade. Option 3 is half-ass, don’t do it. I measured before installing the Sikky sway bar and the distance between the stock sway bar and the radiator support is ~10". When upgrading it looked to be cut to ~8.5" if my memory is correct. Heater Hoses: The upper one crosses just behind the head. I routed that one on the bottom, then my harness, and they sit tucked between the coilpack cover and seem of the firewall nicely.  Radiator Hose Routing: You can use your SR or KA upper radiator hose just fine. The lower hose you can use from a MKIV Supra. For an SR radiator, you will retain factory waterneck and just need to be able to reach the radiator port. I kept my KA radiator which requires a simple modification of the waterneck and cutting KA hose to length. Transmission Choices: I went for the factory extended shifter found on Soarer R154’s, but you can just as easily purchase a W58 (weaker trans) or normal R154 and have the shifter extended rearward to fit with our chassis. There are a few other options such as the Nissan Z33 transmission (CD009) or the all-powerful Getrag transmissions (V160), but both of these options typically cost a bit more. And regarding the shifter extension, you can purchase extended shifters from companies such as Freed Engineering. The CD009 requires some further purchases. Make sure to check out Maverick Motorsports for bellhousing and adapter options. I've also read you need a 2JZ starter for this setup. http://www.turbosupras.com/pages/pag...nical/R154.htm UPDATE: I've since read further into the subject and found out about the Saturn Sky transmission (AR-5) and the Colorado transmission. Some further research is required but may be a cheaper/more viable option than R154. Exhaust routing: The JZ engines have the exhaust side facing the passenger side of the 240SX. To resolve this issue, most people seem to use the standard 1JZ downpipe and any 240SX catback. A midpipe is then fabricated to connect the two but requires dealing with the three bolt Toyota flange. The best bang for buck upgrade and way to deal with this is through Future Fabrication's turbo elbow. This replaces stock elbow and provides a dyno-proven 26whp/22ftlb bump on a completely stock setup. It's also comes with a vband to make fabbing the rest of the exhaust an easy task. I got this image off of their site and will verify soon with a follow-up video with Thatdudeinblue. The one on the left is Torque, both stock elbow and FF elbow (stock is lower line, FF is upper line) you can really see the gains everywhere here. The right graph is Horsepower, you can see the peak added and the same power extends longer.  Fuel Line Modification or Re-route: A few choices here, similar to the exhaust routing we need to move the fuel lines to the other side of the car. Some go as far as running new lines down the right side of the car...but an easier solution is to extend the hardlines and go up and around the engine bay with the brake lines. To do so you can use an assortment of connections Fuel Damper: The stock JZ engines utilize a fuel damper to minimize pulses produced by the fuel pump and injectors while delivering variable amounts of fuel. How to deal with this part is a topic of hot debate on many Supra and Toyota forums and there seems to be a fairly even split on whether to keep it or not. The pros are obvious, it promotes steady and uniform fuel pressure at each injector and was clearly designed and implemented by Toyota for a reason. The cons are it’s another potential failure point and can be seen as a restriction to high-flowing, upgraded fuel systems. There are a lot of rumors and hearsay surrounding the Fuel Damper I suggest you look further into if you’re interested...but I’ll just jump to what I chose to do, keep it. My fuel system is a 255LPH fuel pump, Z32 fuel filter, stock rail/injectors/ECU and an Aeromotive adjustable FPR. I ditched the banjo bolt fitting and ran RUS-640803 M12x1.25 fittings from the damper and fuel rail return to go to the feed line and FPR, respectively. It's your choice to use AN lines or barbed fuel injection grade rubber hose like I did. MAF Differences: JZX100 MAF: TOYOTA 22250-50060 JZX110 MAF: TOYOTA 22204-46020 JZZ30 MAF same as JZX100 ..? http://www.clublexus.com/forums/perf...-vvti-maf.html Bad ECU Capacitors http://www.mk3supra.org/topic/9-guid...-on-a-1jz-ecu/ Drive-by-Wire Options You don't need a special pedal for the X110 drive by wire in the late model 1JZ VVTI's. Instead a mechanical cable like the early models have is attached to the throttle body but instead of turning the throttle body plate when actuated, it instead spins a potentiometer that tells the ECU what the input was, the ECU then accommodates and sends a signal over to the DBW gears to actuates the plate. So there is no fancy pedal involved, just electronics at work. There's a few options for remedying this. 1. Swap to earlier throttle body, harness, ECU and MAF (x110 uses a different MAF). OR 2. Drive by Wire 'delete' kit by Premium Japan http://global.rakuten.com/en/store/p.../item/kit-001/ Here's Toyota's ETCS-I explanation: Gearing 240SX diff should be fine for most setups using an R154 but please refer to the link below to verify the gearing and play around with setups. S13: 4.083 rear R154+stock S13 diff Final Drive: 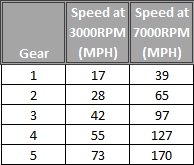 http://www.grimmjeeper.com/gears.html Throttle Cable 1986 TOYOTA TERCEL 1.5L L4 throttle cable can be bought off RockAuto for $15 shipped. Supposedly it fits perfect but I managed to use the stock DE cable for now. I've wrapped it around and tucked it near the intake manifold. I then put it in what I believe to be the cruise control slot but it fully opens and closes the TB just fine.  Traction Control ETCS or TRC. ETCS-i is drive by wire traction control. Butterfly removal http://mkiv.com/techarticles/trac_butterfly/index.html I found a good delete that doesn't require welding if you don't have the resources from Club Lexus: Quote:
Idle Air Control Valve (IACV / ICV) I chose to remove it and have a strong 750RPM idle that has never stalled. Simply remove the vacuum pipe and cover air port from the intake and iacv. I also unplugged the connection. Then bump your idle set screw to a desirable idle speed. I started off high (all the way in) and worked my way down. You can also create a block off plate and simplify your intake.  General Vacuum Line Advice I've had a few PMs asking about what I deleted and kept. This is what I typically send:"all of the stock vacuum switching valves I've deleted including boost solenoid. I actually removed every line and only ran what was necessary: Brake booster boost gauge FPR BOV Wastegate I even removed the IACV and just bumped up my idle using the set screw on the throttle body bracket. Idles great at 800RPM and never stalls. I ran the stock bypass valve at first but ended up finding out that it was leaking (made the car feel really slow). I ran no bov for a few months but now have an HKS. It's nice but shoots huge flames. Can be cool but I'm careful when on public roads." Electric Fan Clearance TBD. Fan placement will be tight. Chase Bays offers a cool upgrade that places your radiator forward in the rad support...but most people like me want to avoid that. Whatever set up you may choose, make sure to have a shroud. Straight-six 240s will always run hot, most are able to fit pullers but there's a good chance you'll have to run pushers. I am picking up Flex-a-Lite 420. It's shrouded, dual fan setup and have my engine pushed back as far as possible in the engine bay (thanks to the Xcessive mounts!). How VVTI Works & Advantages: http://www.kaizenmotorsports.com/blo...te-vvti-system VVTI Issues/Symptoms: I actually haven't had issues yet but here's a great tutorial I would advise doing while maintaining the engine before installation http://www.2jzgarage.com/2013/08/cle...rol-valve-ocv/ And here's symptoms of bad VVTI solenoid: Quote:
VVTI OCV Notes I replaced my oil control valve (OCV) aka solenoid as well but noted that they changed part number from Toyota 15330-46010 to Toyota 15330-46011. You'll notice the ends of them are slightly different but they will function identically (they removed the snap ring and made it integral to the casting). The new part model seals better as well. Here's a nice diagram showing the system 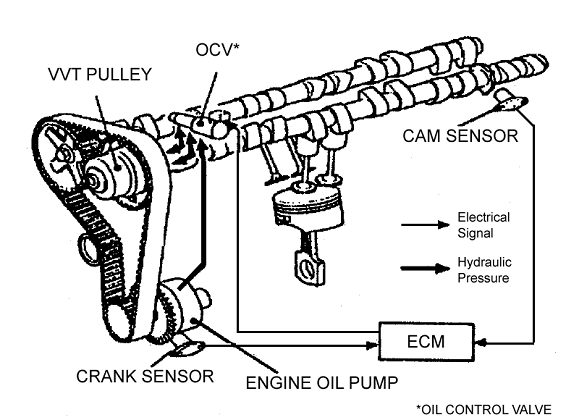 Oil Pump Modifications: From what I've gathered this is largely for high HP, high RPM builds. For a relatively stock setup as mine is, I just did some light porting to prevent any chance of cavitation and called it a day. Quote:
http://www.onecamonly.com/threads/mo...ance-use.1872/ http://www.motoiq.com/MagazineArticl...eprinting.aspx Also note the differences in 1JZ and 2JZ oil pumps. If the links die, basically 2JZ pump >> 1JZ pump. Smoother radii and bigger volume. Quote:
http://www.driftworks.com/blog/2011/...i-inspiration/ http://jp-carparts.com/lexus/figlist...1A0&cartype=13 https://www.youtube.com/watch?v=d9ZV-6PdUvU http://mkiv.supras.org.nz/articles/engine_1.htm Non-Nissan Acronyms that confused me: JZX100: Toyota Mark II, Chaser JZZ30: Toyota Soarer (SC300) JZX110: Toyota Crown, Verossa TRC: old school Toyota traction control ETCS: newer Toyota traction control ETCS-I: drive-by-wire traction control BPU: basic power upgrade (front mount, intake, 3” exhaust, boost controller) \\\\\\\\\\\\\\\\\\\bmaddock's Full Parts List//////////////////// You do not need all of these parts but if you want to know exactly what I used and what parts I ordered...here ya go!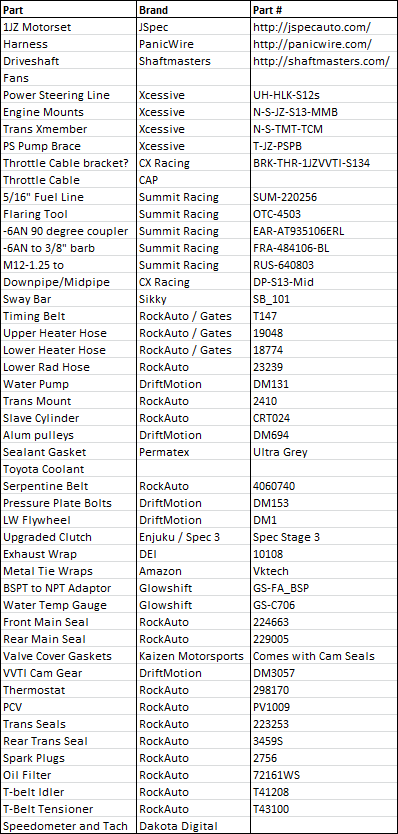 JZZ30 1JZ VVTI Wiring I didn't wire the engine myself because finding the Soarer VVTI body harness pinouts was tough. JZZ30 and JZX100 ECU wiring is identical though. Further information will be posted here.https://drive.google.com/file/d/0By-...ew?usp=sharing Things that get power: Injectors Igniter Coils Iacv o2 1JZGTE VVTi Computer Plugs C88 (34P) C84 (22P) C85 (16P) C86 (28P) Plug C84 - 22pin Throttle Position Sensor C50-4 VC C84 1 BL-YPlug C85 - 16pin Traction Control Computer NEO C85 1 P-BLPlug C86 - 28 pin TDCL via CI1-5 TT C86 1 Gr-RPlug C88 - 34 pins ECT TDCL SLT+ C88 1 W-Gr  1 = charge warning lamp = yellow/gray 2 = switched live = black/yellow or just black 3 = voltage sense = white More wiring threads that halped me: http://jzxproject.com/bbs/index.php?showtopic=9960 https://docs.google.com/spreadsheets...gid=1826312247 Quote:
\\\\\\\\\\\\\\\\\\\Problems & Troubleshooting/////////////////// Since I've created this thread, I've had multiple PMs through many outlets and helped a ton of people with small problems that I thought would be good to capture here. Misfire in boost/lack of power Anyone that's ever owned a 1JZ swapped car knows about misfires. A common problem for many turbo cars, the 1J and other imported motors are prone to issues because sit for long periods of time at importers, been mistreated while in Japan or PO, and have components that are ~20 years old. Search on google for full diagnosis but a few things to check out would be: 1. Boost/Vacuum leaks: Most of the time it is due to this. I had a leak where the 1J VVTI top feed injectors met the intake manifold. Very tricky to find without a boost leak test. See some of the subjects below as well. 2. Weak ignition: Very common for the coilpacks to have cracks in them that expand and contract from heat causing erratic misfire conditions that can be tough to find. Check the coil for any signs of a crack. A good test is to use liquid tape around them to see if it improves. This is not a permanent solution but can help if at the track. Also check the coil pack connectors are very brittle and need to be fully seated. Make sure the coilpack is grounded to the head with a hold down bolt and not stripped out or missing. Ensure none of the spark plug wires (VVTI only) are cracked or frayed. Also could be bad spark plugs, not a bad idea to change out such a cheap part. If you're having to close the gap anywhere tighter than 0.022" or so on stock/BPU power levels...you probably have other issues (stuck injector, bad FPR, worn coilpacks/igniter, etc) 3. Fuel Issues. Make sure your fuel pump is correctly running at 12V (look up 12V relay mod), injectors are good (resistance test), no fuel leaks, new fuel filter. I had a leaking injector that was easily tested for. Pull out all your spark plugs and key on the fuel pump to pressurize the system. I had fuel mist steaming out of cylinder 5's spark plug hole so knew immediately there was a leak. Unlike Nissan KA sidefeed, there is no oring that is likely pinched but rather the injector should be replaced. Try calling your local importer as these VVTI stock topfeed don't have a US-equivalent. 4. Bad ECU. Common in many 90's ECUs, capacitors are prone to oozing out onto the circuit and causing all sorts of erratic problems. Although forums make it seem like this is to be expected, from my experiences I haven't seen this to always be true. It's not hard to pop the cover off and look around for any obvious signs of failure. There are services that provide replacement/repair but it might be easier to track down a known good ECU and test that out before doing so. Leaky/Broken IACV When I first started my swap it sounded like it was idling at 3000rpm. I thought it might be a leak but never could get the IACV to do it's job because the valve itself was leaking. Instead of chasing down another known good IACV, i opted for something I did back on my KA-T, removing the IACV. To do so: 1. Unplug and remove valve 2. Loop coolant lines 3. Block spot on intake manifold 4. Block hole on Jpipe side 5. Block small vacuum line from IACV pipe 6. Locate throttle set screw and screw all the way in 7. Refine idle speed by slowly unscrewing the set screw Leaky/Broken Bypass Valve The stock bypass valve is a recirculated blow off valve that takes its cue from the boost solenoid next to it (blue plug). Criticism, corrections, comments, etc welcome! Oh and the videos aren't super helpful in terms of explaining how to do it, just a nice visual representation of the experience. Enjoy. Last edited by bmaddock; 11-30-2017 at 11:17 AM.. |
|||||
|
|

|
|
|
#4 |
|
Zilvia Junkie
 |
wow this is really good, sticky worthy for sure!
__________________
Juan Vargas - Motorsports Specialist Fontana Nissan/Nissanraceshop.com
email: [email protected] Scott's Personal Website/Blog: http://www.scottandkerryann.com |
|
|

|
|
|
#12 |
|
Zilvia Junkie
 |
Thanks guys, I'm glad to hear other people appreciate this thread. If you want any more information or further clarification please let me know to update the thread. Adding wiring info now because it's looking like I'll be tackling this as well now and not paying someone.
Again, thread's still in progress as of now. Hoping to get the engine and transmission in this weekend after I route the fuel lines up and over. |
|
|

|
|
|
#14 |
|
Zilvia Member
 |
ill add on to this aswell since i just got done with the whole swap!
heres what i used: trans- got from lswans garage and is a late soarer trans. *MAKE SURE YOU GET SHIFTER IF ITS 2ND GEN SOARER R154 BECAUSE THEY ARE EXTINCT. i had to search 3 months until i found a remote r154 shifter in new Zealand. clutch line from enjuku gear oil- redline rad- KA VS SR. IF YOU go ka then you have to cut waterneck some. if you go sr (i did) then you have to make a custom hose due to length or just have a welder change the neck for the radiator over. fans- just went with two 12 inch i believe ebay fans and they barely fit (one is unlevel since i didnt want hitting the pulley. drive shaft- shaft masters aswell and fits perfect MOTOR- 1JZGTE VVTI chaser from lswans garage. Harness is shorter on these so expect a bit more pay when getting harness done from someone experienced since they must be extended quite abit. fuel lines- just got some rubber hose from sjop in town along with all my bolts and stuff. IMPORTANT ** throttle body may have to be cut to fit ic coupler as it was for me, which is ok. (in picture cut black and weld the pink together) heater hoses- you will have to get creative. GOOD LUCK getting the back one (behind the head) off as mine has to have been on there for 20 years it seems. downpipe- i got a cx racing one off my buddy and it fits good. as far as new parts i ordered a gasket kit from champion toyota in texas (researched) and was the cheapest as it was about 300 i think. YOU WILL NEED PART NUMBER and then i got a water pump, new timing stuff, and obviously gaskets and seals. mounts- ebay mounts...they fit ok but we had to dill new holes as the ones made were stupid. ***trans mount wont work with regular r154 2nd gen mount. YOU MUST get the 1jzgte mark 3 supra r154 mount to work. 1jzgte engine mounts- mine sucked....they broke midway on transfer so i had to use hockey pucks...buy good ones. harness- i searched and searched and went with justin collins over at qfab...and so far its been ok. i got the harness back and havent got it diagnosed but it wont start so as soon as i get that figured out then ill decide how it went. ILL ADD AS I GO. engine rubber mounts broke in this pic |
|
|

|
|
|
#18 |
|
Zilvia Member
 |
i just ziptied my fuel filter and fuel lines to run above the head....im on budget.
And as far as going map...you can and the best/cheapest way would be going with POWER FC d jetro made for 1jzgte vvti. you must go stand alone to achieve map. |
|
|

|
|
|
#20 |
|
Nissanaholic!
 Join Date: Dec 2008
Location: Upstate NY
Age: 41
Posts: 1,700
Trader Rating: (15)
 Feedback Score: 15 reviews
|
Anybody who wants to check their 1j vvti oil pump before replacing it I made a video on how to check everything.
I used the specs for the usdm 2j and my 1j pump checked out to all of the specs. I tried like hell to get a hold of a chaser factory service manual with no luck.
__________________
Last edited by Otto347; 08-31-2016 at 03:44 PM.. |
|
|

|
|
|
#21 |
|
Zilvia Junkie
 |
Word! I referenced your video in the first post...or at least intended to. Was literally pulling my oil pump off today to finally do this before putting it all back together.
|
|
|

|
|
|
#22 | |
|
Nissanaholic!
 Join Date: Dec 2008
Location: Upstate NY
Age: 41
Posts: 1,700
Trader Rating: (15)
 Feedback Score: 15 reviews
|
Quote:
  |
|
|
|

|
|
|
#24 |
|
Zilvia Junkie
 Join Date: Apr 2009
Location: Gainesville, FL
Age: 33
Posts: 354
Trader Rating: (5)
 Feedback Score: 5 reviews
|
Great thread for reference. Going to check my 1jz oil pump when I get home, hoping it's in spec! $200 less I have to spend to get going lol
As for the front & rear main seals it's the 'NATIONAL' part numbers right? These should fit a 1jz non-vvti correct?
__________________
Never Due |
|
|

|
|
|
#25 |
|
Nissanaholic!
 Join Date: Dec 2008
Location: Upstate NY
Age: 41
Posts: 1,700
Trader Rating: (15)
 Feedback Score: 15 reviews
|
Have you checked your coil pigtails and the 3 plug wire clips that hold them to the coil? Most of mine were broken or broke upon trying to remove them.
You can get new coil pigtails from driftmotion The plug wire caps you can get from lexus, the 1st gen is300 used the same coil and wire setup as the 1j. There are 3 different part numbers though, I would suggest replacing all 3. The reason for the different part numbers is the way the plug wire goes around the coils to get to the plug. One is straight on, and the other two come in at an angle which is built into the clips. I almost just ordered the cheapest one 3 times but glad I didnt. It was about $26 for all 3 and lexus had them there the next day. |
|
|

|
|
|
#27 | ||
|
Zilvia Junkie
 |
Quote:
Basically steer away from 1JZ VVTI's with the ETCS-I stamped on the throttle body. It can work just fine but I would prefer the mechanical one. Good luck! Quote:
 Nice dude, post a video! Nice dude, post a video!Giving David video for two more videos this weekend. Got all my shit in finally and have had some time to make progress this week. Should be started and running this weekend.. driveshaft comes in next week and driving not too long after. |
||
|
|

|
|
|
#28 |
|
Leaky Injector
Join Date: Jan 2010
Location: Tampa, FL
Age: 29
Posts: 52
Trader Rating: (0)
 Feedback Score: 0 reviews
|
Sick! I have a 1j vvti in my s14. It runs awesome, only I'm having an issue with it running rich when it warms up. It happens right when it gets into boost. I've replaced the TPS, ECU temp sensor, MAF. I have a custom downpipe with open dump from the fabricator mentioned in the OP. Then straight pipe on back. My a/f pins out at 10 when I hit boost. =[ I wish I knew what the issue was! Other than that it runs really well.
|
|
|

|
|
|
#30 |
|
Zilvia Junkie
 |
So I bought an awesome product last week that I'm hoping to install soon. Future Fabrication's turbo elbow for the 1JZ VVTI specifically. It's been dyno proven to give an additional 26whp on a completely stock engine, stock tune, stock injectors. It's also compatible with the Tomei ARMS M8280 upgrade and Driftmotion upgraded CT15B. Quality appears to be top notch, I opted for the rerouted wastegate but they do also offer external dump for those who want the screamer pipe. More info here: http://futurefabrication.com/future-...turbine-elbow/
 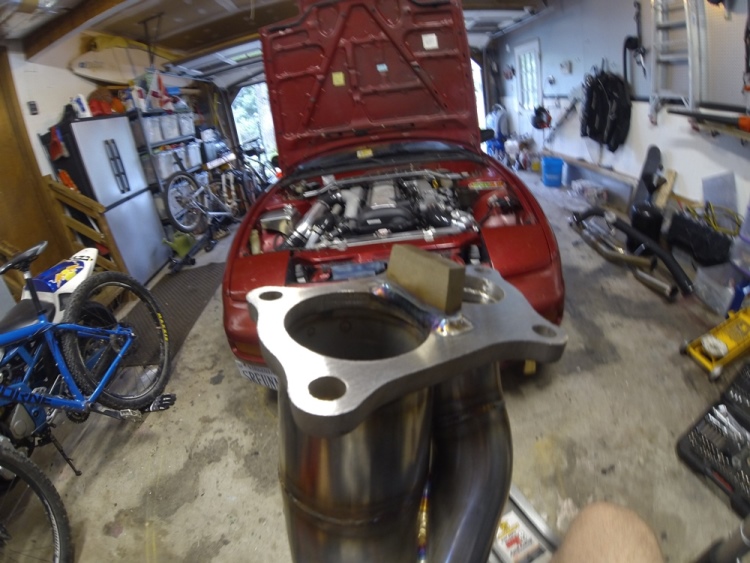 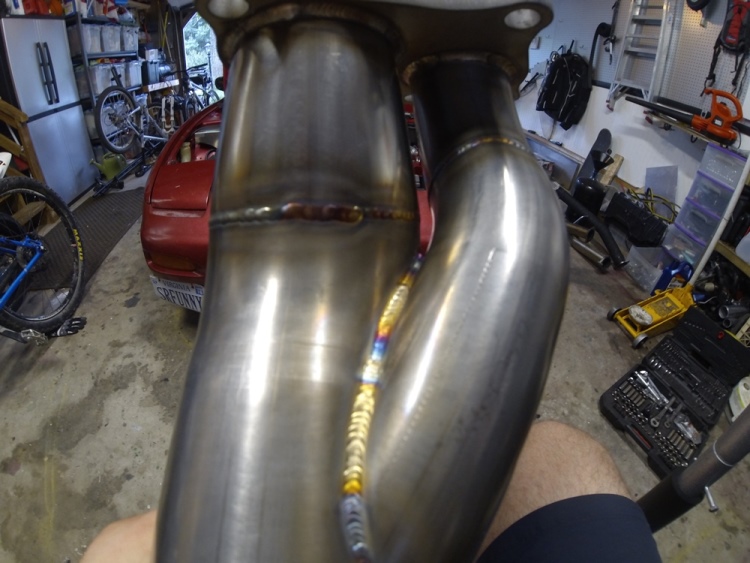 Last edited by bmaddock; 07-02-2015 at 11:56 AM.. |
|
|

|
 |
| Bookmarks |
| Thread Tools | |
| Display Modes | |
|
|