 |
|
|||||||
| Home | Rules & Guidelines | Register | Member Rides | FAQ | Members List | Social Groups | Calendar | Mark Forums Read |
| Builds (and builds only) Got a build thread? It goes here, build threads anywhere else on the forum will be locked and never moved. |
 |
|
|
Thread Tools | Display Modes |
|
|
|
|
#1 |
|
Zilvia Junkie
 Join Date: Sep 2012
Location: LongBeach, CA
Age: 28
Posts: 371
Trader Rating: (4)
     Feedback Score: 4 reviews
|
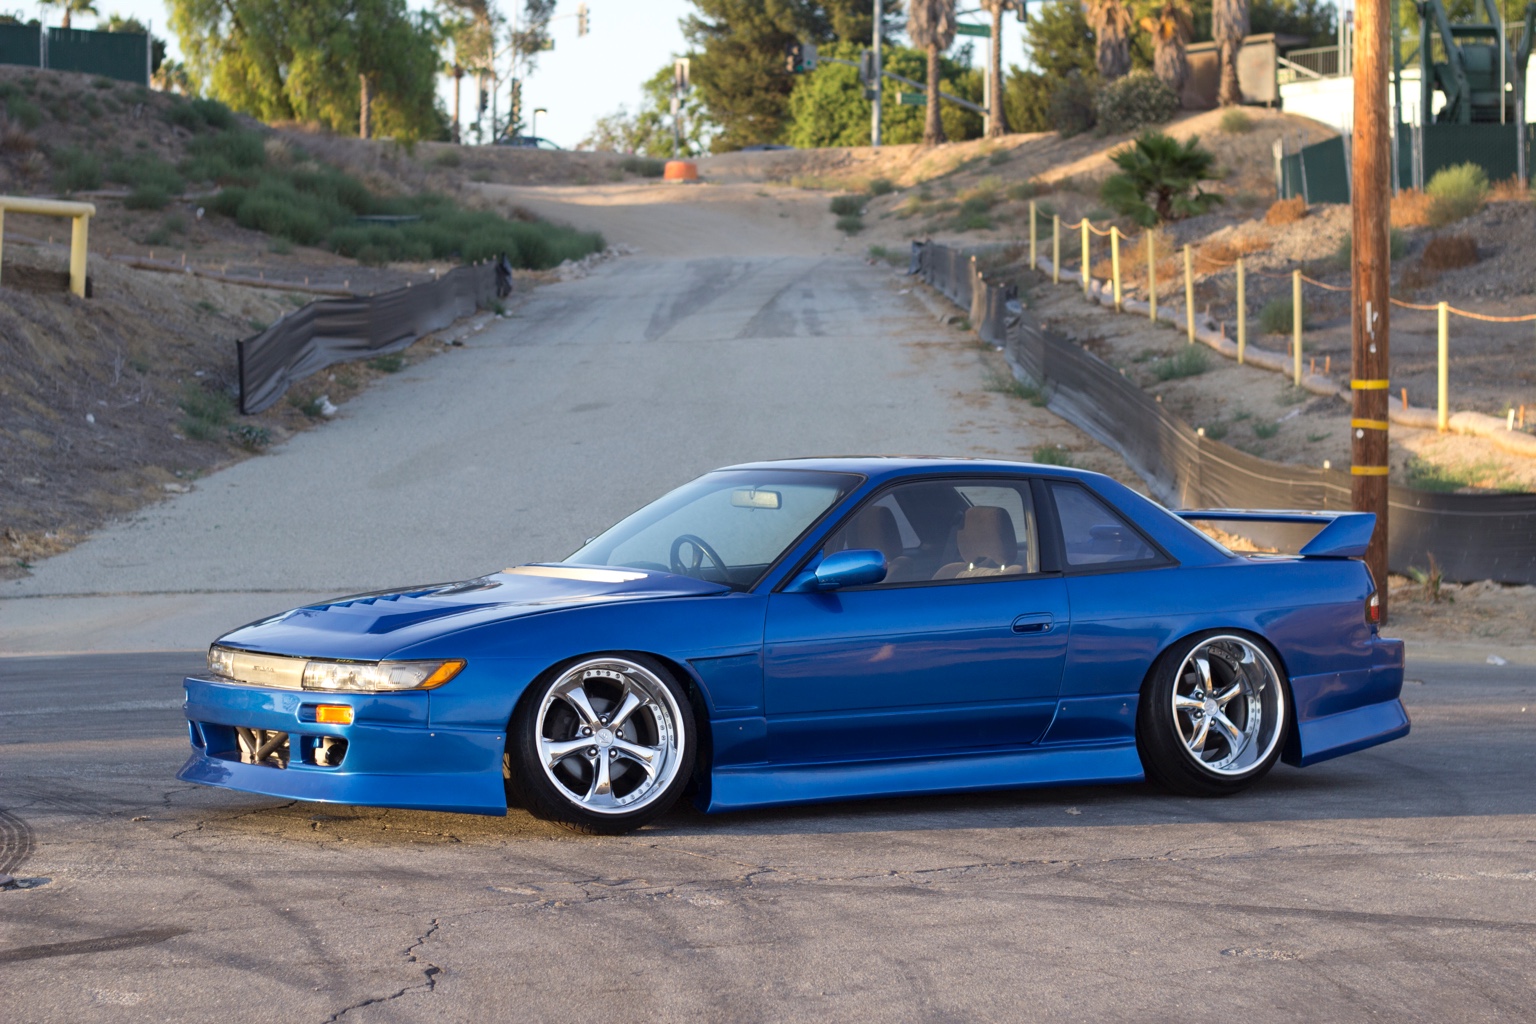
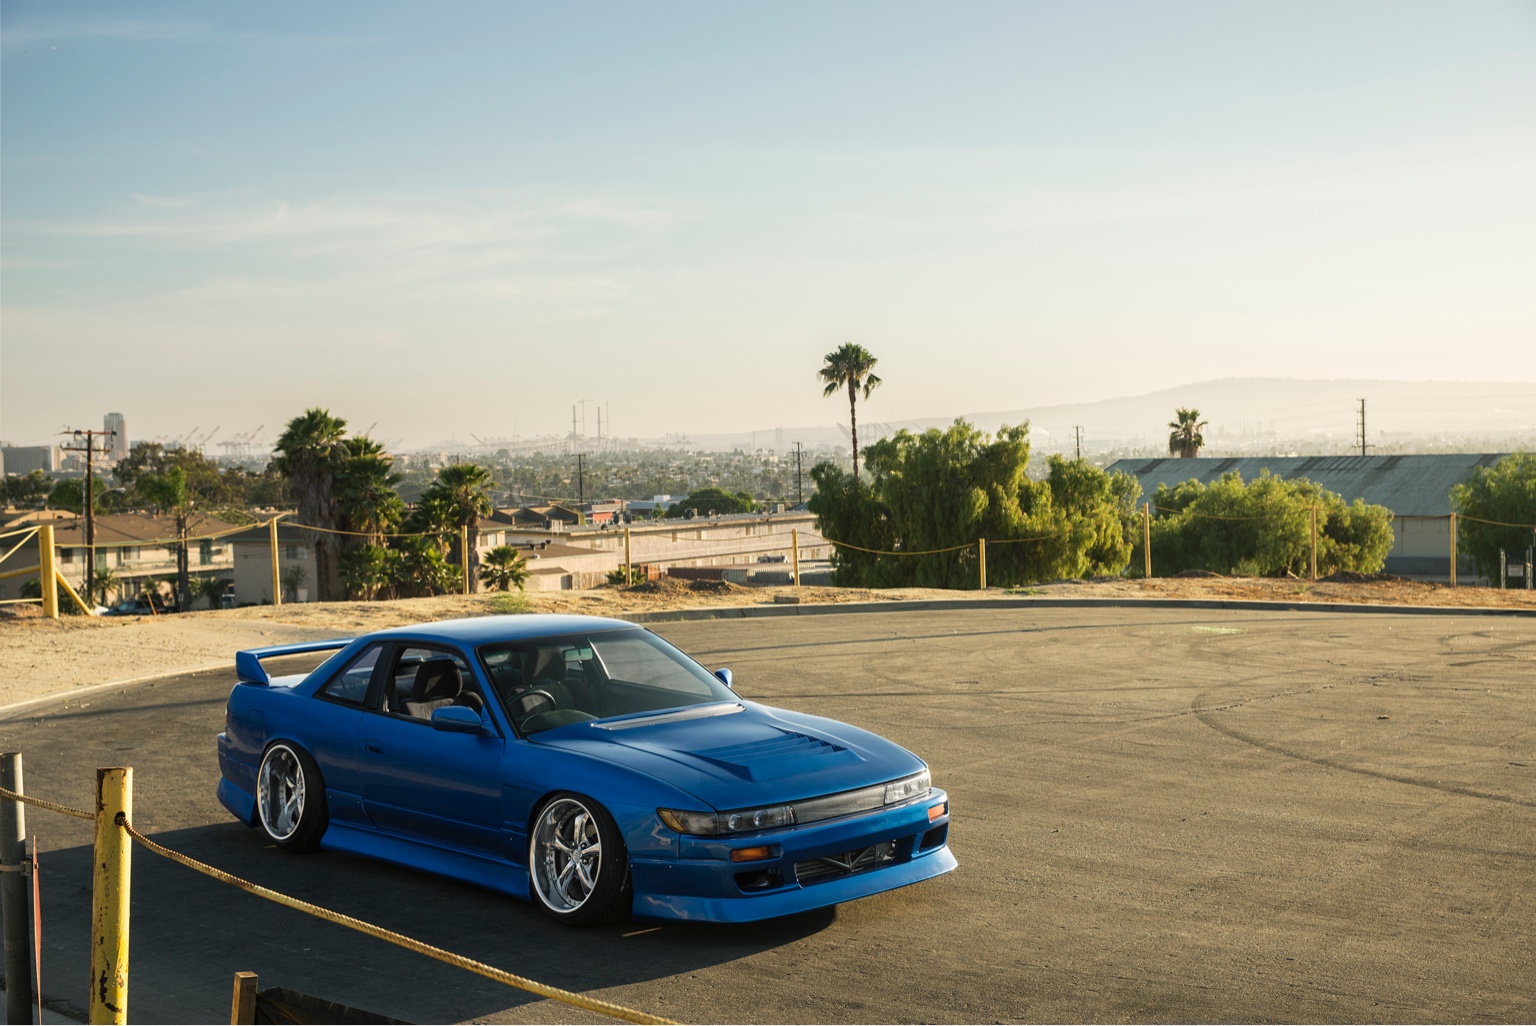
Suprareal's Proper Silvia Conversion Build
This thread will Showcase progress photos of my 2nd current S13 build.
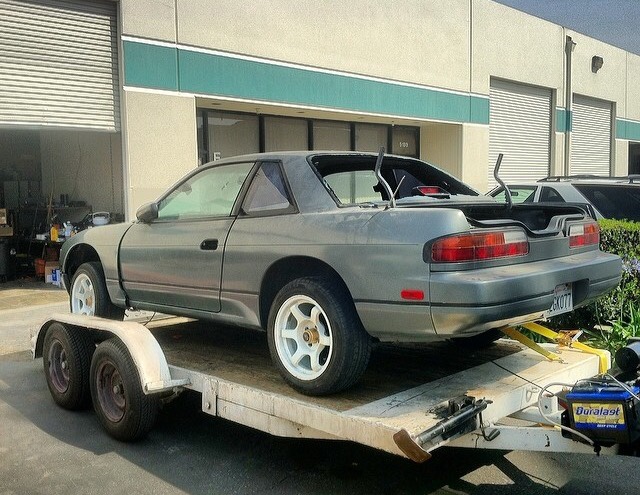
93' 240sx converted to a "true" Silvia, meaning RHD, Front end swap, and SR. And will include tips on how to successfully convert for people who might need the help. This build is Visual oriented VS my track hatch build found here : http://zilvia.net/f/showthread.php?t=487054 Current as of 2/1/20    Let’s start this off When I first bought the car as a shell for 200$. With no real intentions of what I’d do with it.  Started the Firewall swap first. I did this the most "legit" way you can possibly do a firewall swap. I say this because there's no real way to be completely proper about this. Every single spot weld was drilled out and welded back up. This includes the JDM wiper/cowl section that people often dont bother doing while swapping. If you choose to include the cowl in your swap you will loose your original stamped vin number so make sure you keep the old firewall piece if you plan to make in legal. Make sure to seam seal your welds and creases making sure they wont leak. I through on some paint for rust. Keep in mind the e brake bracket will need to be removed and retrofitted if you did not have the JDM one like me. I was able to cut the old one up and use it with the USDM handle. Here is a mockup making sure everything still fits good For wiring I am using the JDM body harness from a RPS13 so I needed to rip some wires out that i would not be using and connect to my tail light harness. This can vary from what car your clip was cut from and what shell you are converting. If you plan to keep the auto seat belts you will have to wire them in yourself as the JDM s13 never came with them but a airbag instead. As for me i ditched the auto belts for s14 belts. Since this is a visual build i did a tuck and threw all the wiring under the dash. The vent housings are not compromised by this, everything still sits where it should. The fuse boxes sit in the glove box via a tab welded to the dash bar. The glovebox has to be cut in order for it to close as you can see. I welded 2 bolts to the dash bar to connect my grounds to. I cant finish the wire tuck completely until i have the motor in place so i can cut to fit the engine harness so I started on the tubs. This is my second time doing tubs and was done in less than 3 days work by myself with essentially just a angle grinder and welder. If this is your first time don't be scared to jump on this project. I used 1 10'' trailer fender cut in half with sheets of 16GA scrap. Cardboard templates are all you need to get started. If this is your first time doing this or new to welding... take the time to make all your ends sit as flush as possible in order to get the best weld. If your OCD like me you can level out your car on jack stands so you are able to keep your tubs level and identical on both sides. You can run small tacks around all of the seams and it will probably be strong enough but my preference is to run short beads around. Unlike my tubs in my Hatch these will be seam sealed for a cleaner look. If your tubbing your going to end up stitching the towers, again I don't like the looks of small tacks running around so i did small beads again. I decided to plate off the front of the frame wells as well as they will later be used for bash bar supports. Last edited by Suprareal; 02-10-2020 at 08:11 PM.. |
|
|

|
| Sponsored Links |
|
|
#2 |
|
The Architect.
 Join Date: May 2006
Location: Los Angeles, CA
Posts: 11,580
Trader Rating: (392)
           Feedback Score: 392 reviews
|
I like where this is headed.
|
|
|

|
|
|
#4 |
|
Leaky Injector
 |
very interesting. totally forgot the jdm harnesses didn't have auto seatbelts, i gotta keep that in mind before i put mine in. looking forward to your future progress.
|
|
|

|
|
|
#5 |
|
Zilvia Junkie
 Join Date: Sep 2012
Location: LongBeach, CA
Age: 28
Posts: 371
Trader Rating: (4)
     Feedback Score: 4 reviews
|
Ill be running a front mount and decided against doing anything extraordinary with the piping routing even though i wanted to. So i just went the traditional way and cut out the holes. Later I will be tigging my own piping.
If you have a 3" hole saw or the money to buy a nice one I highly recommend it. I don't have one big enough so i just drilled a hole and used a reamer bit until it was big enough. My front clip was original to the digital climate control so it was all plug and play for me essentially. For those who are thinking about putting one in your s13, do it especially if you have working A/C you will love it. A/C on this car is still an idea im not sure if i want to go through with yet, well see. My plans motor wise were constantly changing before i finally decided to go SR. I even thought about throwing in the viper V10 while working on Dean Kearney's new Viper. After research and measuring it was not a good choice for me. It is much longer than a JZ motor and does not add up in performance VS a LS swap while also thinking about finance. And a pic of Robbie's car after the crash at Long Beach ! Last edited by Suprareal; 08-13-2015 at 05:55 PM.. |
|
|

|
|
|
#6 |
|
Zilvia Junkie
 Join Date: Sep 2012
Location: LongBeach, CA
Age: 28
Posts: 371
Trader Rating: (4)
     Feedback Score: 4 reviews
|
Its great having a girlfriend who actually supports the hobby. She bought me this 20ft long canopy that serves as my constant work space and will also serve as the paint booth.
Next was something i contemplated for a while but came out better than expected. After seam sealing ( which was is difficult to make a neat seam ) i decided to try making some areas completely seamless. I used fiberglass bondo for this, only enough to flush out the edges. If your doing this try not to build it up to high anywhere because it will have more of a chance cracking later. Went through the works with this. Wet sanding, priming, spot putty, repeat. Next was to sand down the firewall and rear tubs to prime the whole bay. Fully primed P/S reservoir will be here in the corner not interfering with the wiper motor. I had done this in my hatch when it used to be SR and was very happy with it. Interior seats are still being decided. Leaning towards using matching S14 kouki's. |
|
|

|
|
|
#8 |
|
Zilvia Junkie
 Join Date: Apr 2009
Location: Gainesville, FL
Age: 33
Posts: 354
Trader Rating: (5)
 Feedback Score: 5 reviews
|
This is looking really good so far. I was thinking of doing something similar with my PS reservoir, definitely have to now that I've seen yours.
__________________
Never Due |
|
|

|
|
|
#9 |
|
Premium Member
 Join Date: Jun 2003
Location: torrance, ca
Age: 39
Posts: 12,407
Trader Rating: (129)
           Feedback Score: 129 reviews
|
Very cool shit. Really digging it.
|
|
|

|
|
|
#10 |
|
Zilvia Junkie
 Join Date: Sep 2012
Location: LongBeach, CA
Age: 28
Posts: 371
Trader Rating: (4)
     Feedback Score: 4 reviews
|
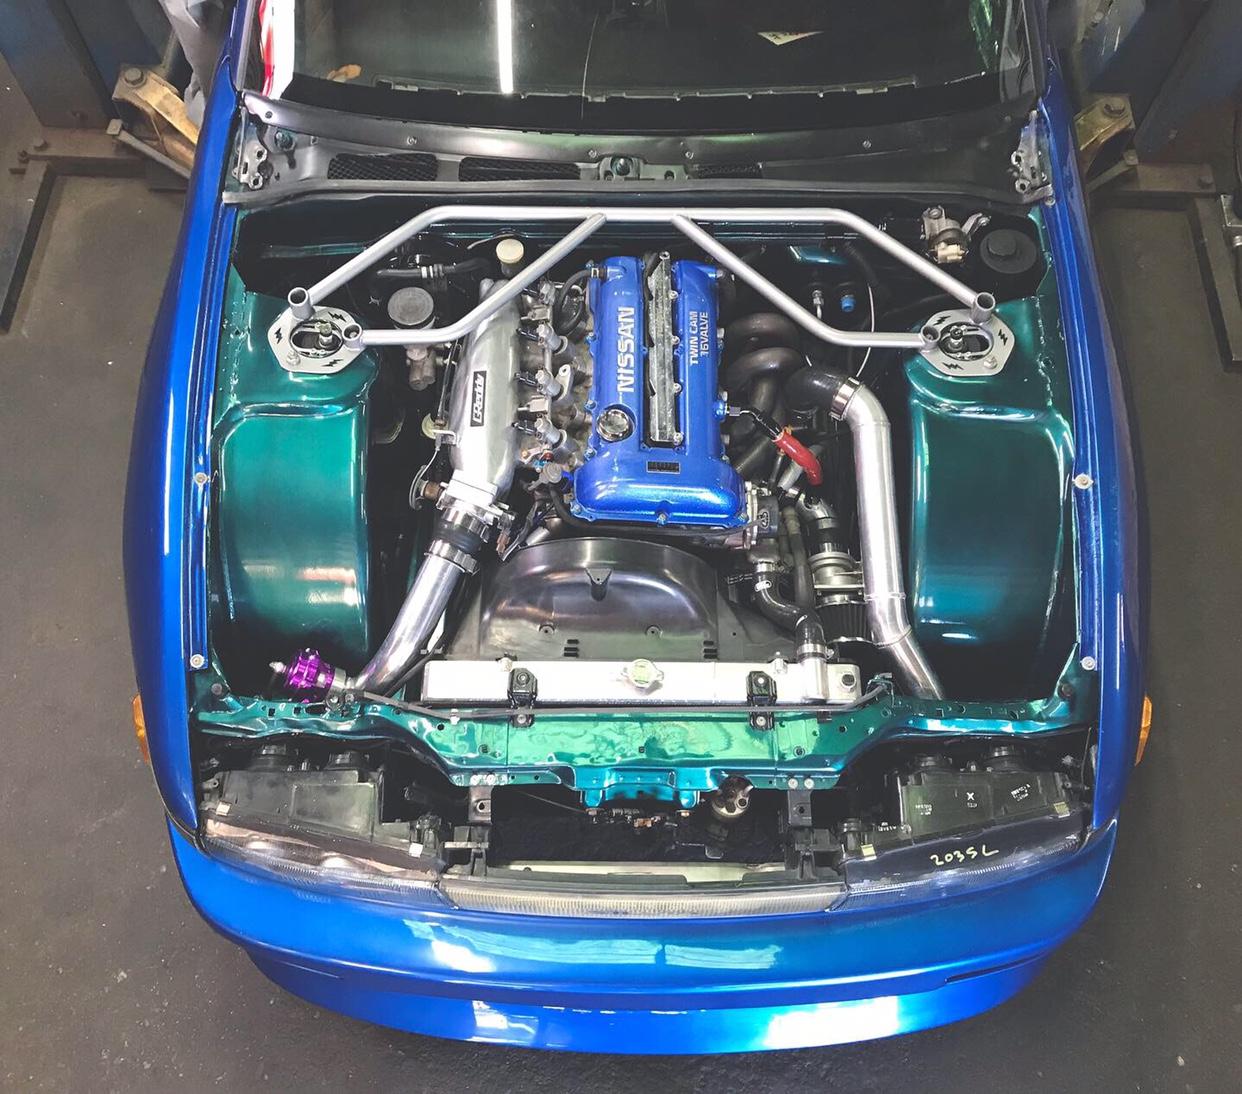
I made a power brace, this is the 3rd ive made for an s13. I don't have a dimple die or else i would have done the bottom plates.
Finally was ready to paint the bay. I chose a dark teal metallic. P/S reservoir was also painted to match. Base before clear was applied. Don't worry about the over spray on windshield, its cracked and just sitting in place not stuck down for now. I wont be using this one. Final spray Last edited by Suprareal; 09-02-2015 at 02:27 AM.. |
|
|

|
|
|
#11 | |
|
Zilvia Junkie
 Join Date: Jul 2008
Location: SoCal and Hawaii
Posts: 557
Trader Rating: (2)
           Feedback Score: 2 reviews
|
dope stuff man. keep up that hard work.
on another note, ive used that same canopy to paint before. just get some plastic sheets on the side and set up 2 square fans w/filter for intake and exhaust.
__________________
Quote:
|
|
|
|

|
|
|
#12 |
|
Post Whore!
 Join Date: Feb 2006
Location: Hightened State of Emergency
Posts: 6,051
Trader Rating: (9)
           Feedback Score: 9 reviews
|
I enjoy your silvia immensely.
however it is no match for My Skyline. Perhaps photo's of Robbie's suspension setup are in order? My Skyline and I thank you in advance. |
|
|

|
|
|
#13 |
|
Leaky Injector
 Join Date: Feb 2014
Location: Dacula, Ga
Age: 30
Posts: 106
Trader Rating: (2)
 Feedback Score: 2 reviews
|
You sir have excellent taste. This has got to be one of the most top notch, attention to detail builds i have ever seen. Also your welds look extremely great for just mig, id hate to see your tig skills.
|
|
|

|
|
|
#16 |
|
Zilvia Member
 |
Seen you driving your hatch around long beach a few times ( I'm from long beach also)
 ... Both cars looking good ! ... Both cars looking good ! |
|
|

|
|
|
#18 |
|
Zilvia Junkie
 Join Date: Sep 2012
Location: LongBeach, CA
Age: 28
Posts: 371
Trader Rating: (4)
     Feedback Score: 4 reviews
|
Everything metal that is removable that goes in the engine bay will be painted. Everything that needs to be painted black will have a slight purple flake! Its hard to get good pics of the reflection of the flake but im very happy with the outcome.
Every nut and bolt used will be either new or close to it. Nothing stripped or rusted. These brand new headlight brackets came with the shell, i think i will paint them black with flake as well. Front end being mocked up for wiring to lights cut to length Last edited by Suprareal; 09-02-2015 at 02:25 AM.. |
|
|

|
|
|
#22 |
|
Zilvia Junkie
 Join Date: Sep 2012
Location: LongBeach, CA
Age: 28
Posts: 371
Trader Rating: (4)
     Feedback Score: 4 reviews
|
The booster got a pretty big run on the clear coat. To big to just let it slide so i re sanded it down and did a respray
How often do you still see these yellow rubber pieces that keep the crash bar level still on the car? Here's a few shots of the painted parts being put back onto the car The SR has been in pieces since i started this whole project and i finally have the time to start putting it back together. Im doing a full stock rebuild since i don't plan on making and more power than stock. These pictures are taken after taking all the appropriate measurements of course. Everything as clean as can be before install. Freeze plugs were also replaced. Last edited by Suprareal; 09-10-2015 at 01:34 AM.. |
|
|

|
|
|
#24 |
|
Zilvia Junkie
 Join Date: Sep 2012
Location: LongBeach, CA
Age: 28
Posts: 371
Trader Rating: (4)
     Feedback Score: 4 reviews
|
Came across this vert for 30 Bucks so I brought it home (without the silvia front pieces). And the tail lights for the Silvia from the same guy. These lights were always in my plans but just got them much sooner than anticipated.
Vert Will a full on KA missile with just a seat and steering wheel being done under 700$ just to have a little fun with. Partial cage will be added onto as well. Fresh new Energy suspension steering rack bushings came in and i was able to install the freshly painted rack. Night picture kinda shows the sparkle of the purple flake on the subframe. Don't think i mentioned this but the rack is HICAS. For those who dont know the HICAS rack reaches full steering lock quicker that a ordinary rack. Even though this wont be a drift car it will still be a compliment. I'm currently working on a small angle upgrade for the car for fun. Last edited by Suprareal; 09-18-2015 at 02:02 AM.. |
|
|

|
|
|
#26 |
|
Zilvia Junkie
 |
love the color choices.
is there any paint code to that black with purple flake? or is that flake added by hand?
__________________
89 S13/2JZ Silvia(Project Phoenix) IG @awrperformance FB awrperformance |
|
|

|
|
|
#27 |
|
Zilvia Junkie
 Join Date: Sep 2012
Location: LongBeach, CA
Age: 28
Posts: 371
Trader Rating: (4)
     Feedback Score: 4 reviews
|
The flake is added into the clear mix right before shooting. You can add as much as you like to make more or less dramatic look. Also laying multiple coats will give different looks. Everything I've done so far was one thick coat.
|
|
|

|
|
|
#28 |
|
Zilvia Junkie
 Join Date: Sep 2012
Location: LongBeach, CA
Age: 28
Posts: 371
Trader Rating: (4)
     Feedback Score: 4 reviews
|
Due to the plans of this car being a show car I will be paying alot of attention to wheel fitment. lower control arms extended by 50mm (2'') will give me loads of camber which will work perfect for my setup because i am using stock tension rods and will be adjusting caster with the coil camber plates. Fitment idea will be similar to Justin Shreeves car.
|
|
|

|
|
|
#30 |
|
Zilvia Junkie
 Join Date: Sep 2012
Location: LongBeach, CA
Age: 28
Posts: 371
Trader Rating: (4)
     Feedback Score: 4 reviews
|
Stock tension rods for now. Ill adjust caster with the camber plates on the coils if needed. The car wont be driven much at all so i don't think aftermarket tension rods are necessary for now.
|
|
|

|
 |
| Bookmarks |
| Thread Tools | |
| Display Modes | |
|
|