 |
|
|||||||
| Home | Rules & Guidelines | Register | Member Rides | FAQ | Members List | Social Groups | Calendar | Mark Forums Read |
| Builds (and builds only) Got a build thread? It goes here, build threads anywhere else on the forum will be locked and never moved. |
 |
|
|
Thread Tools | Display Modes |
|
|
#31 | |
|
Zilvia FREAK!
 |
Thank you good sir! I'm sure I'll need all the luck I can get.
 Quote:
Right on, so the standard 10mm ARP head studs correct? I know some guys go the 11mm route LM19's or something along those lines. |
|
|
|

|
| Sponsored Links |
|
|
#32 |
|
Zilvia FREAK!
 |
Was able to get some free time today to do a little bit more on the build. Felpro head gasket went on today along with the ARP head studs.
I ran into a little problem when installing the ARP KA24DE head studs. The very front stud on intake side didn't want to sit as flush as all the others. I have removed whatever I thought could be blocking the threads and have verified that there is nothing in the hole blocking the stud from going all the way in. Has anyone else had this problem? I wasn't able to torque down the head as the 12mm 12-point socket I have works on all nuts/bolts EXCEPT the one which sticks up further. This requires a deep socket 12mm 12-point. Also, just to confirm, the felpro head gasket DOES fit w/ .040 OVER (90mm) pistons. The gasket does NOT have any overhang into the cylinders; it fits it perfectly! |
|
|

|
|
|
#33 |
|
Zilvia FREAK!
 |
Had some time to get the timing chain on today. I went with the OSK timing chain kit. It's actually pretty heavy duty and OEM feel. Also in the process, one of my cam bearing caps' bolts snapped when I was torquing it to 8ft-lbs. FSM calls for 6.7-8.7ft-lbs TQ. I'll have to see about removing the snapped off part of the bolt from inside of the head another time.
Don't mind the timing marks |
|
|

|
|
|
#35 |
|
Zilvia FREAK!
 |
Nice rebuild.
I'm following this build as a guideline because I'm about to do the same thing, so keep the pictures and updates coming.... (Side note and a little derailment) Yo SoundBoy, Trini 2 De Bone!!!!! lol...
__________________

|
|
|

|
|
|
#36 |
|
Zilvia FREAK!
 |
|
|
|

|
|
|
#37 |
|
Zilvia FREAK!
 |
|
|
|

|
|
|
#38 |
|
Zilvia FREAK!
 |
Got a few more things done today. I was able to remove the snapped off section of the cam cap bolt from the head today, got the camshafts in, and was able to get the upper timing chain on. What I did to get the snapped off par was to drill a hole down the center of it, got a torx bit slightly larger than the hole I drilled socket with an extension, and was able to hammer the torx bit in carefully through the hole I drilled causing the teeth on the torx bit to grab the bolt. I was then able to loosen the bolt until it came right out.
|
|
|

|
|
|
#42 |
|
Zilvia FREAK!
 |
No I did not purchase from frsport. I actually bought them from a local guy unused unopened for $70 for both main and rod bearings. The Clevite thrust bearings come oversized .015mm thicker than should be even with their standard bearing size. What I did was sand the outter sides of the girdle side thrust bearing first with 400grit then finished with 1000 grit.
|
|
|

|
|
|
#43 |
|
Zilvia Junkie
 Join Date: Jun 2015
Location: Miami, FL
Age: 29
Posts: 349
Trader Rating: (2)
 Feedback Score: 2 reviews
|
Quote:
Nice method for removing broken bolt. I will remember that! |
|
|

|
|
|
#44 |
|
Zilvia FREAK!
 |
Totally! I'm glad it honestly worked out as I thought I would have to spend more $ at the machine shop having someone remove it. Looks like I'll be back in this position with a different car LOL. Wife's motor mount bolts just snapped (yes both), which in turn, caused the passenger side axle/half shaft to rest against the chassis which basically ripped the CV boot making the axle useless lol.... FUN STUFF I gotta do within the next couple of days. Oh, and to top it off, I can only work on it at night.
 |
|
|

|
|
|
#46 | |
|
Zilvia FREAK!
 |
Quote:
Instead of sourcing those M12x1.75 studs, I just purchased hex bolts in that same thread pitch with about 40mm in length. So this is what it looked like once I was able to remove the old beat up motor mount. Both studs had snapped off inside of the block. Again, I was able to resolve this issue with the good ol' drill through the center and hammer a torx bit socket into it and loosen  New OEM FORD motor mount installed today with the hex head bolts instead of studs. The OEM mount was about $100 more than the cheap vatozone one, however I was willing to spend the extra $100 for piece of mind as I've read the cheap vatozone brand blows out in about a month or less LOL! |
|
|
|

|
|
|
#47 |
|
Zilvia FREAK!
 |
Front crank oil seal came in along with the clutch pedal spacer I was fortunate to find! I'm using the s13 clutch pedal which doesn't have the spacer spot-welded to it like the s14 clutch pedal, as its spot-welded to the firewall on s13. In order to use the s13 clutch pedal on an s14 chassis you either need to make 30mm spacers or find the OEM spacer lol.
OH! And I may have purchased my coilovers  . I went with Fortune-Auto 500 series coilovers with 7/6kg spring rates as this is my daily driver. Paid $1150 shipped to my door. These coilovers do have an estimated 3-4 week wait/build time as they are built-to-order. . I went with Fortune-Auto 500 series coilovers with 7/6kg spring rates as this is my daily driver. Paid $1150 shipped to my door. These coilovers do have an estimated 3-4 week wait/build time as they are built-to-order. |
|
|

|
|
|
#49 |
|
Zilvia FREAK!
 |
|
|
|

|
|
|
#50 |
|
Zilvia FREAK!
 |
|
|
|

|
|
|
#51 |
|
Nissanaholic!
 |
Just curious what did the pump rebuild run you for the gears and pressure relief stuff?
__________________
MRP Manufacturing |
|
|

|
|
|
#52 | |
|
Zilvia FREAK!
 |
Quote:
http://www.courtesyparts.com/oe-nissan/1502053f25 New OEM Regulator (15132-77A25) - $14 http://www.courtesyparts.com/oe-nissan/1513277a25 So about $46 + shipping. Not bad for peace of mind.  |
|
|
|

|
|
|
#53 |
|
Zilvia FREAK!
 |
Removed headlights, corner lights, front bumper, and bumper cover. Managed to drain the auto tranny fluid and get the heart transplant started!
And I thought it was pretty darn funny so had to share. Buddy came over for me to take a look at his bov for him as he claims it hasn't been opening or working properly lately. So of course the first thing we do is check the shims inside of the bov as well as the spring to make sure everything is still good. Well, the shims were there of course, ALL $0.75 worth |
|
|

|
|
|
#56 |
|
Zilvia FREAK!
 |
|
|
|

|
|
|
#57 |
|
Zilvia FREAK!
 |
Got a good amount of stuff done today. On a side note, does anyone have or know the part# for the oil pickup/strainer o-ring? I actually picked up an OEM Nissan oil pickup/strainer gasket as most the nissan motors use the same ID" pickup and center to center hole distance. Not sure if anyone has used this type of gasket here or not ? I'm just hoping it's air tight because if not, my oil pressure is going to suck :mrgreen: (no pun intended). It'll basically be like drinking out of a straw with a hole in it LOL. I'm thinking i'll be fine just thought I'd ask you guys.
New rear main seal was installed today as well. Oil pan also went on today! This is the NA oil pan as I like to call it. I have a spare that I will be tapping/bunging for the turbo. That will go on once I'm ready to install the turbo AFTER the motor/clutch have both been broken in properly. |
|
|

|
|
|
#60 |
|
Zilvia FREAK!
 |
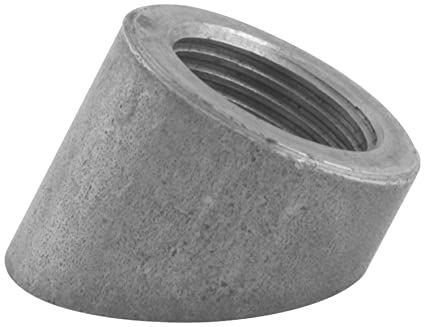
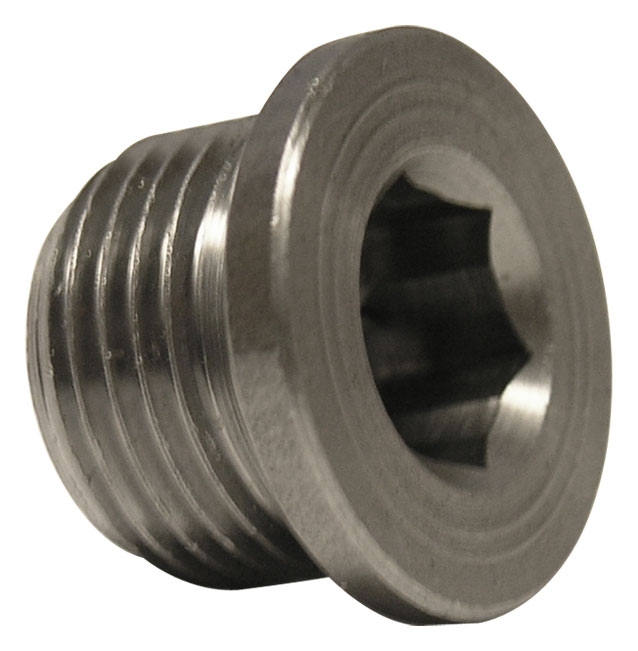
What I went with was a 45* mild steel bung so when I weld it on it will be at the perfect angle I need so I don't get oil buildup from a low spot in the return line; Wouldn't want to starve the motor of its precious oil! Also, mild steel M18x1.5 (mm) o2 plug (bung plug) and M18x1.5 to -10AN fitting. This all but cost me $18.
  btTBP%2b-7jhsqg__60_35.jpg) |
|
|

|
 |
| Bookmarks |
| Thread Tools | |
| Display Modes | |
|
|