|
|||||||
| Home | Rules & Guidelines | Register | Member Rides | FAQ | Members List | Social Groups | Calendar | Mark Forums Read |
| Chat General Discussion About The Nissan 240SX and Nissan Z Cars |
 |
|
|
Thread Tools | Display Modes |
 08-27-2017, 07:32 PM
|
#841 |
|
Premium Member
 Join Date: Jun 2012
Location: Lancaster county, PA
Age: 30
Posts: 465
Trader Rating: (4)
  Feedback Score: 4 reviews
|
Installed the Circuit Sports clear lens but kept the stock bulbs. Big mistake. The low beam output is so terrible I no longer even bother driving the S14 after dark. Looks like I'll be taking the headlights apart again to install something that won't have me driving blind. For those of you who keep up the latest HID retrofits, can you recommend some quality parts that I might be satisfied with? I've been browsing the HID projector retrofits at theretrofitsource.com but I don't know if a specific product would have an advantage or end up not working in an Schassis.
The 9003/H4 Morimoto Elite is being recommended as an option per the website. https://www.theretrofitsource.com/hi...ect_restrict=1 It appears to plug right into the stock S14 reflector; no need to disassemble the headlight and install projectors. Anyone have experience with this particular product?  |

|

|
| Sponsored Links |
|
08-27-2017, 08:06 PM
|
#842 |
|
Zilvia Addict
 
|
I don't have any experience with that kit, I used their mini hid projector kit. Definitely wasn't plug & play but totally worth it cruising at night. I've never been able to see when driving a S-chassis at night till now.
From what i can gather is you really need a projector lens to "harness" the light output of HID. A standard halogen style reflector isn't going to control the light output properly. Google search "Zenki Retrofit" and you'll get plenty of ideas on what is takes to build projectors. |
|
|
|
|
08-27-2017, 10:28 PM
|
#843 |
|
Nissanaholic!
 |
The biggest obstacle with a zenki retrofit is that the original bulb hole is not centered in the reflector, but offset very low to the bottom. This takes the retrofit from maybe a 2 or 3 on a 1-10 scale to a 7-8. So the treaded type aftermarket projectors fo not simply thread in. The reflector has to be trimmed and the back housing has to be modified to add a new flanged extension with a new rubber boot as well.
__________________
'98 240sx 5spd |
|
|
|
|
08-28-2017, 11:22 PM
|
#844 |
|
Nissanaholic!

|
^I only ran into that problem with the JDM S14 Zenki headlights which has the two separated housings for high/low beams. I had to cut into the bottom to get the projector to fit. but on my stock USDM S14 Zenki headlights, very minimal work was done to get them to work from what I remember.
__________________

|
|
|
|
|
08-29-2017, 09:09 AM
|
#845 |
|
Nissanaholic!
|
The usdm low beam bulb hole is offset to the bottom so the same problem exists. If you mount it so the projector lens is centered in the reflector but the rear of the projector is down low in the bulb hole area the projector will be tilted up probably 20 degrees. This means the projector low beam is not aligned with the reflector high beam and it's unlikely you're able to aim the projector low enough using the original aiming system. Then you run into ballast connector clearance issues with the original rear housing and boot. It really just has to be done the hard way in order for everything to look good and work in unison.
__________________
'98 240sx 5spd |
|
|
|
|
08-29-2017, 11:29 AM
|
#847 |
|
Nissanaholic!
|
D2s projectors allow you to use OEM d2s bulbs and ballasts. It's a total crap shoot with performance and reliability from any projector that uses a re based bulb components (e.g. h1).
__________________
'98 240sx 5spd |
|
|
|
|
11-05-2017, 07:04 PM
|
#848 |
|
Zilvia Addict
Join Date: Nov 2015
Location: Where the bad guys are
Posts: 887
Trader Rating: (6)
Feedback Score: 6 reviews
|
For those gangstas that have done LED swaps on taillights, what proto boards did you use? I finally got my tail lights split up and I wanna start planning on the LED layout.
Also, anyone got any idea on where to buy turn light diffusers? Much like the ones that Audis and BMWs use nowadays.
__________________
Skurr  Skurr Skurr
|
|
|
|
|
11-18-2017, 11:54 AM
|
#849 | |
|
Premium Member
Join Date: Jun 2012
Location: Lancaster county, PA
Age: 30
Posts: 465
Trader Rating: (4)
Feedback Score: 4 reviews
|
As the days get shorter, the Zenki gets driven less and less. Something needs to be done about these head lights. The company cars I daily usually have HID lights; when I hop into the Zenki and turn on the head lights it makes me laugh and cringe at the same time. Time to fix these unbearable lights. I've been browsing theretrofitsource.com and have it narrowed down to 3 options.
Mini H1 https://www.theretrofitsource.com/pr...1-stage-3.html 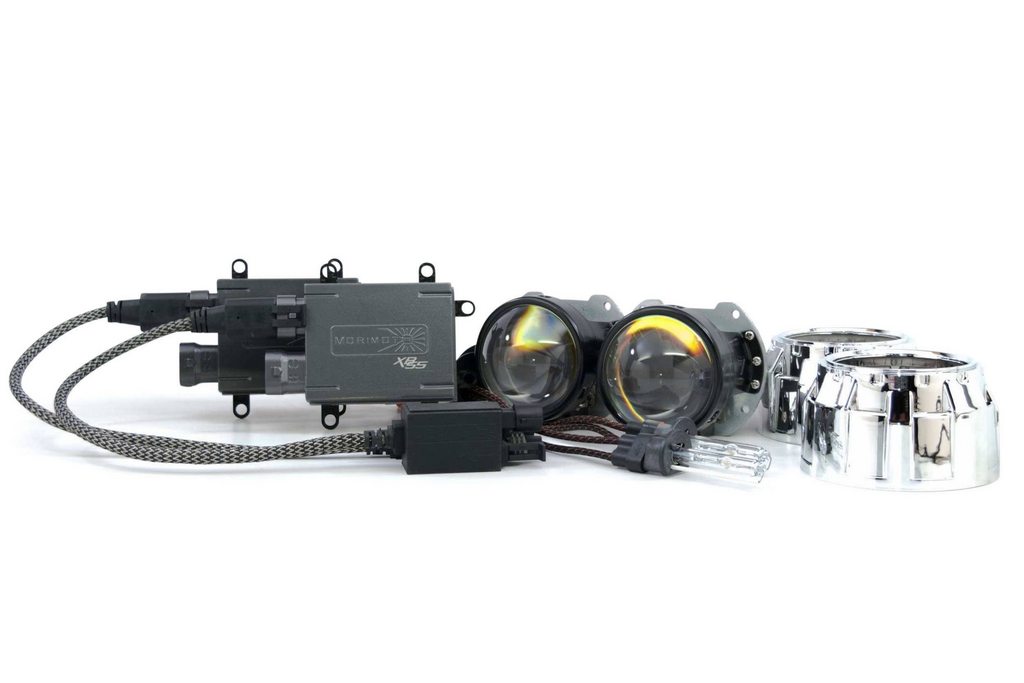 Mini D2S https://www.theretrofitsource.com/pr...s-stage-3.html 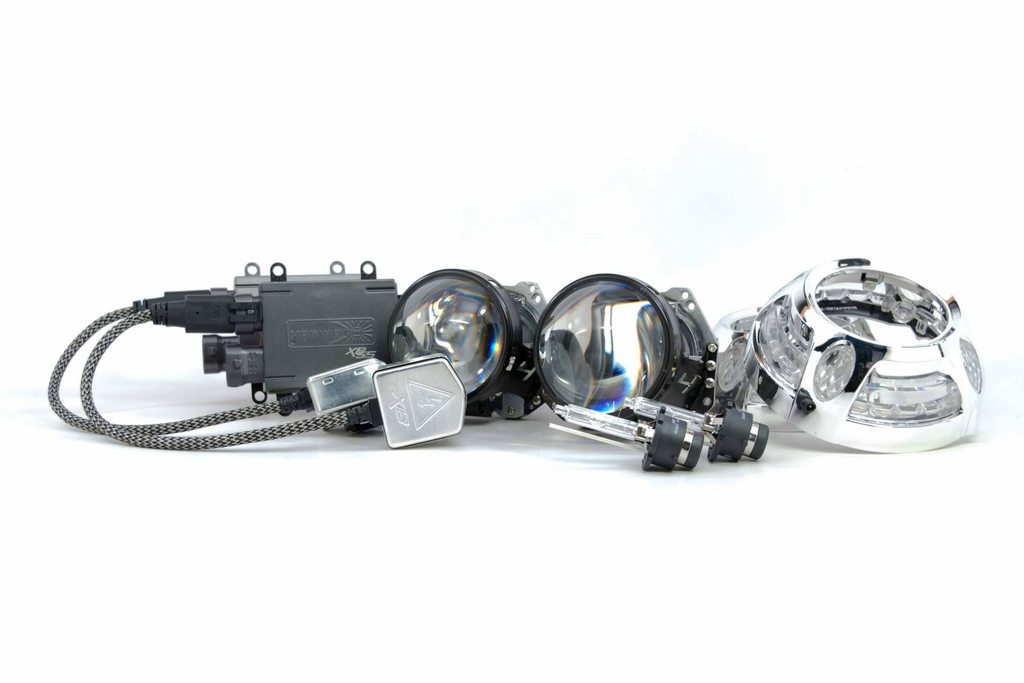 M LED https://www.theretrofitsource.com/pr...ctors-kit.html 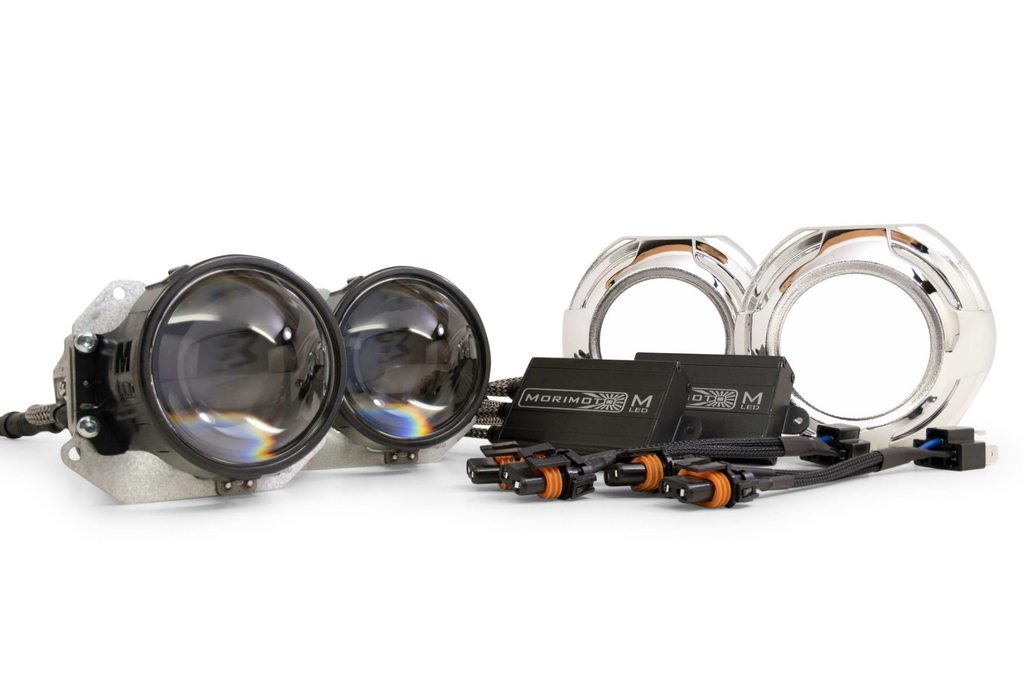 Quote:
From my understanding, I'll need to cut the reflector on the red line to be able to level the headlight correctly. Then I'll need to cut the headlight housing on the blue line to provide enough room for the bulb connector. How on earth can I reseal the cut areas? It won't matter when the car is sitting in the rain but driving in rain will force water to run down the back of the headlight housing. 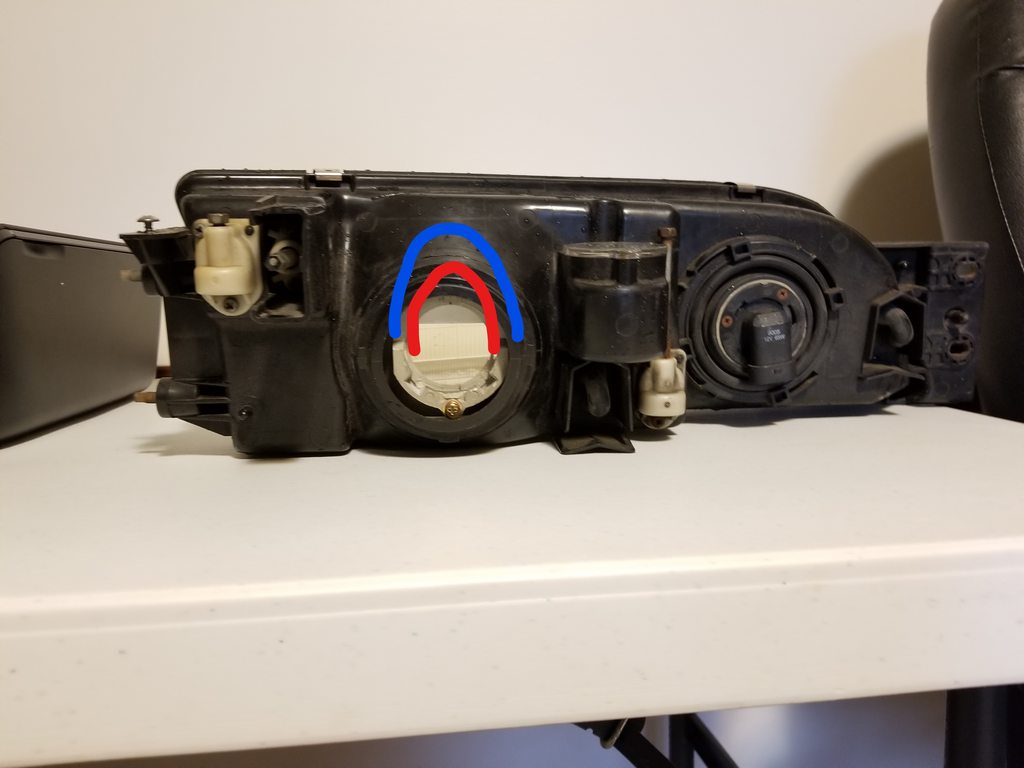 |
|
|
|
|
|
11-18-2017, 01:03 PM
|
#850 |
|
Nissanaholic!
|
I must be getting old, because never before had the lights of the oncoming traffic bother me while driving a low car like it does now.
Do you guys have any recommendations for brighter drop-in bulbs for my kouki? I think the ones I have on right now are too dim, and being dazzled doesn't help.
__________________
Tuners are big bullies 
|
|
|
|
|
11-18-2017, 01:25 PM
|
#851 |
|
Nissanaholic!
Join Date: Oct 2013
Location: Western Mass.
Posts: 2,254
Trader Rating: (3)
  Feedback Score: 3 reviews
|
dbeiler:
For what its worth, I have the morimoto mini h1's in my s13 bricks and I couldn't be happier. They're fucking fantastic (to the point where I was going to retrofit my truck which is a 2009 so i'd have equally stout output) I had a legacy with d2s' in it that I parted out. I wasn't overly impressed with them. Personally, for an entry level projector the mini h1's seem like a good choice. Although someone else might be able to provide some info if the d2s' are actually better. |
|
|
|
|
11-21-2017, 03:16 PM
|
#852 | |
|
Super Moderator
 
Join Date: Jun 2004
Location: SF Bay Area
Posts: 16,761
Trader Rating: (73)
Feedback Score: 73 reviews
|
Quote:
__________________
 Best way to do business with me? Make your best offer FIRST. |
|
|
|
|
|
03-01-2018, 06:42 PM
|
#853 |
|
Premium Member
Join Date: Jun 2012
Location: Lancaster county, PA
Age: 30
Posts: 465
Trader Rating: (4)
Feedback Score: 4 reviews
|
I've finally made my decision and started working on the Zenki lights. I choose the Mini H1 7.0 kit mostly because it was the only projector small enough to fit into the S14 light assembly while keeping some decent projector shroud options. The Zenki reflector assembly is only 4" high. Using a larger projector would require most of the projector shroud to be hacked off for clearance. I want switchback halos so hacking up the projector shrouds must be kept to a minimum.
List is as follows: Morimoto Mini H1 7.0 stage3 kit SP122 precision bulb holders 35amp ballasts 5500K bulbs H4/9003 Motocontrol wire harness And my favorite part: Mini X5-R white/amber LED switchback projector shrouds I'm thinking of wiring the halos as daytime running lights. A parking brake trigger would turn on the halos whenever the brake is released. 99.9% of the cars I see on the road lately use LED DRLs. It just makes sense to use the halos for that. 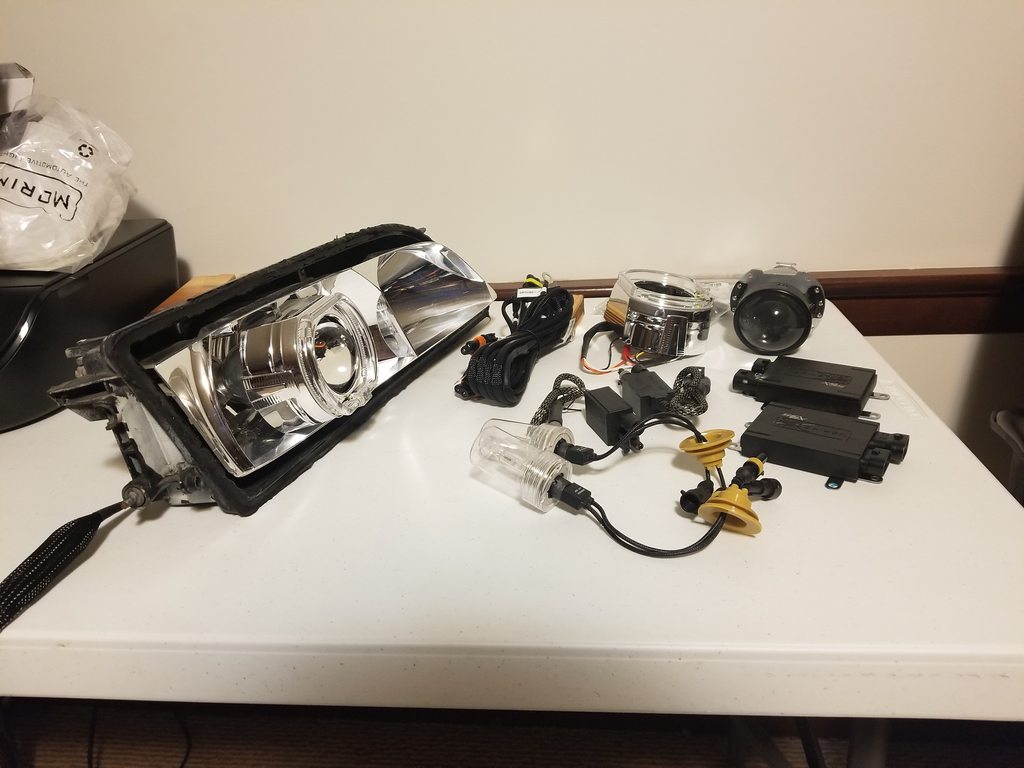 |
|
|
|
|
03-01-2018, 07:39 PM
|
#854 | |
|
Super Moderator
Join Date: Jun 2004
Location: SF Bay Area
Posts: 16,761
Trader Rating: (73)
Feedback Score: 73 reviews
|
Quote:
__________________
Best way to do business with me? Make your best offer FIRST. |
|
|
|
|
|
03-02-2018, 02:44 AM
|
#855 | |
|
Post Whore!

|
Quote:

__________________
The mark of a true sucka: 'RARE JDM' & 'OLD LOGO NISMO'
|
|
|
|
|
|
03-02-2018, 06:58 AM
|
#856 | |
|
Post Whore!
 
Join Date: May 2006
Location: where waldo is
Age: 39
Posts: 3,256
Trader Rating: (16)
Feedback Score: 16 reviews
|
Quote:
__________________
18g and 20g turbo users click on me http://zilvia.net/f/tech-talk/261219-18g-20g-turbo-users.html 
|
|
|
|
|
|
03-02-2018, 08:18 AM
|
#857 | ||
|
Nissanaholic!
Join Date: Oct 2013
Location: Western Mass.
Posts: 2,254
Trader Rating: (3)
Feedback Score: 3 reviews
|
Quote:
Quote:
|
||
|
|
|
|
03-02-2018, 08:37 AM
|
#858 | |
|
Post Whore!
Join Date: May 2006
Location: where waldo is
Age: 39
Posts: 3,256
Trader Rating: (16)
Feedback Score: 16 reviews
|
Quote:
__________________
18g and 20g turbo users click on me http://zilvia.net/f/tech-talk/261219-18g-20g-turbo-users.html
|
|
|
|
|
|
03-02-2018, 10:06 AM
|
#859 | |
|
Nissanaholic!
Join Date: Oct 2013
Location: Western Mass.
Posts: 2,254
Trader Rating: (3)
Feedback Score: 3 reviews
|
Quote:
|
|
|
|
|
|
03-02-2018, 02:23 PM
|
#860 | ||
|
Super Moderator

Join Date: Jun 2007
Location: Places
Age: 33
Posts: 12,712
Trader Rating: (17)
Feedback Score: 17 reviews
   |
Quote:
Post up the build.
__________________
Quote:
|
||
|
|
|
|
03-11-2018, 07:15 PM
|
#861 | |
|
Premium Member
Join Date: Jun 2012
Location: Lancaster county, PA
Age: 30
Posts: 465
Trader Rating: (4)
Feedback Score: 4 reviews
|
Quote:
|
|
|
|
|
|
03-11-2018, 08:01 PM
|
#862 |
|
Premium Member
Join Date: Jun 2012
Location: Lancaster county, PA
Age: 30
Posts: 465
Trader Rating: (4)
Feedback Score: 4 reviews
|
I used 3M windo-weld when I initially installed my circuit sports clear covers. Disappointed to see how it held up. One headlight cover was barely hanging on. The other one needed only moderate hand pressure to separate from the headlight housing. I don't understand why the adhesion was failing. The tube of windo-weld I used had never been subjected to freezing temperatures while it was in my possession. I kept the headlight assemblies at room temperature for two weeks following initial application so the windo-weld could cure properly. The windo-weld must have been frozen at some point before I bought it. Maybe it was just a bad batch. Who knows.
Retrofit time. First, I removed the little metal low-beam cutoff plate.  I chopped 1/2" off each of the cutoff plate brackets in the reflector housing. This is to make room for the new projector housing. 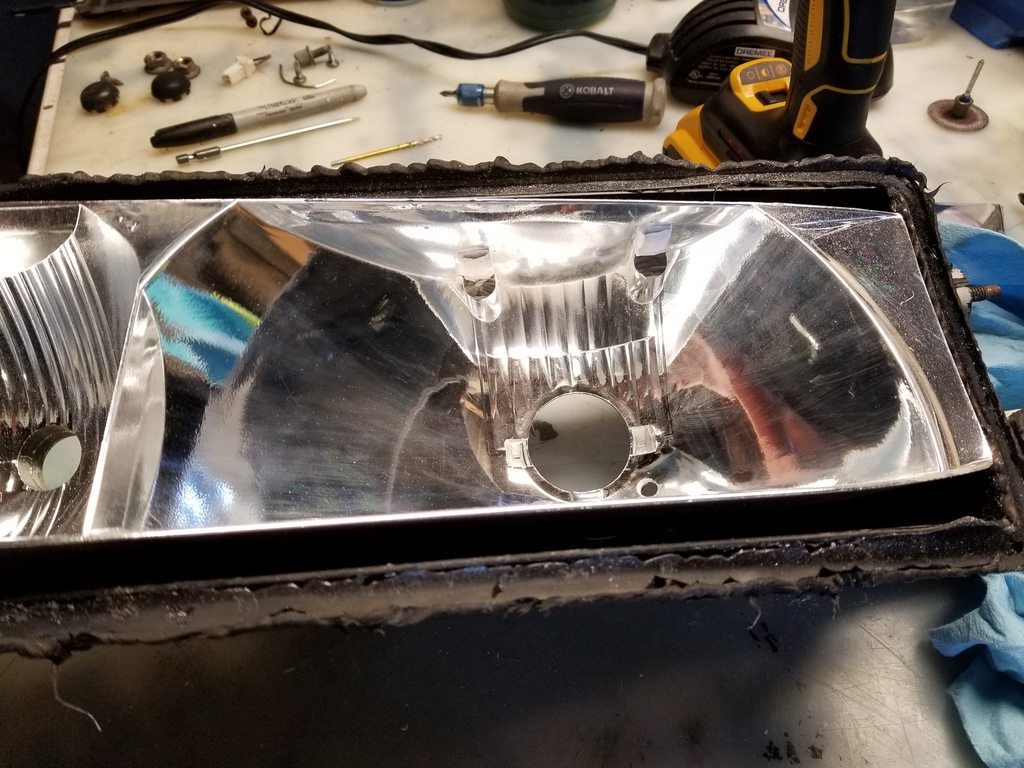 Drilled a 1/4" hole in the rear lower section of the reflector housing to route the switchback halo light wiring. 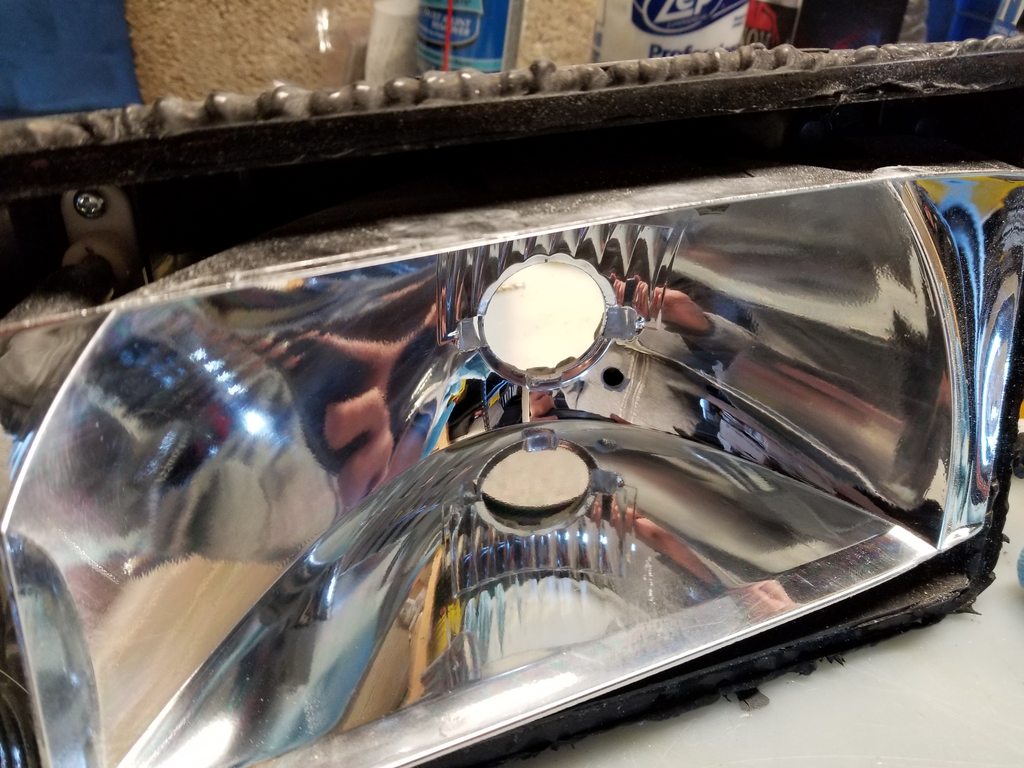 The projector shroud needed to be trimmed a little on the bottom to allow the front of the projector to sit lower in the reflector housing. I marked then trimmed the bottom and sides. 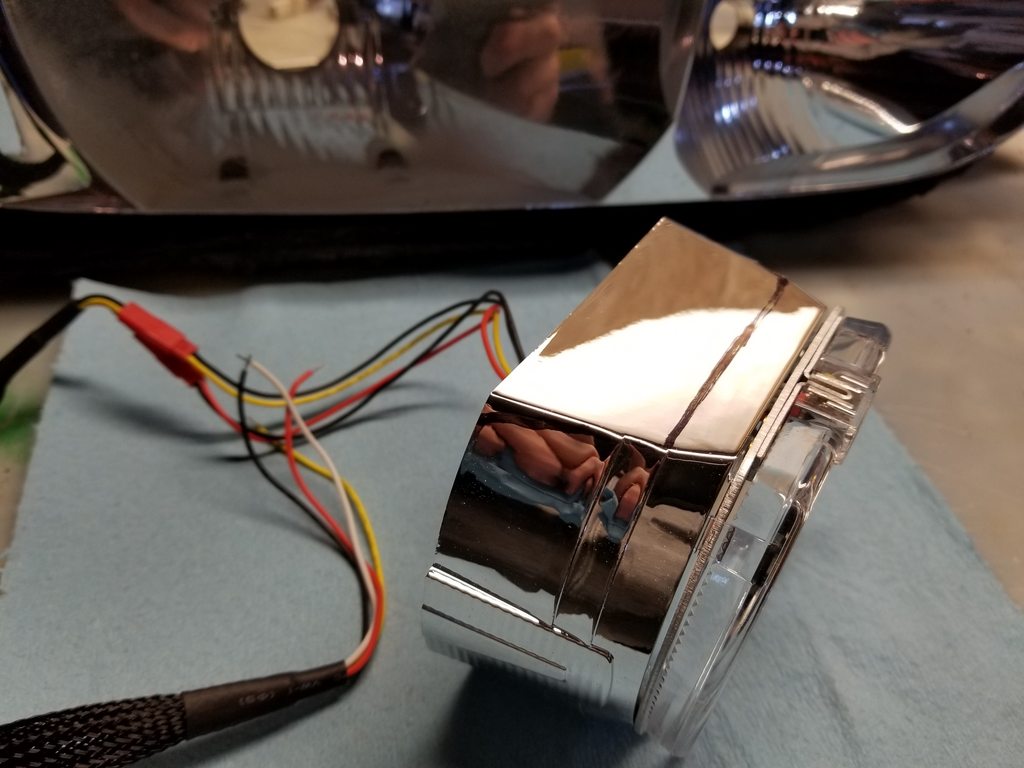 Fastened the projector to the projector shroud with screws. Screws are not included. Nice. You can see how the shroud is trimmed on the bottom and sides. 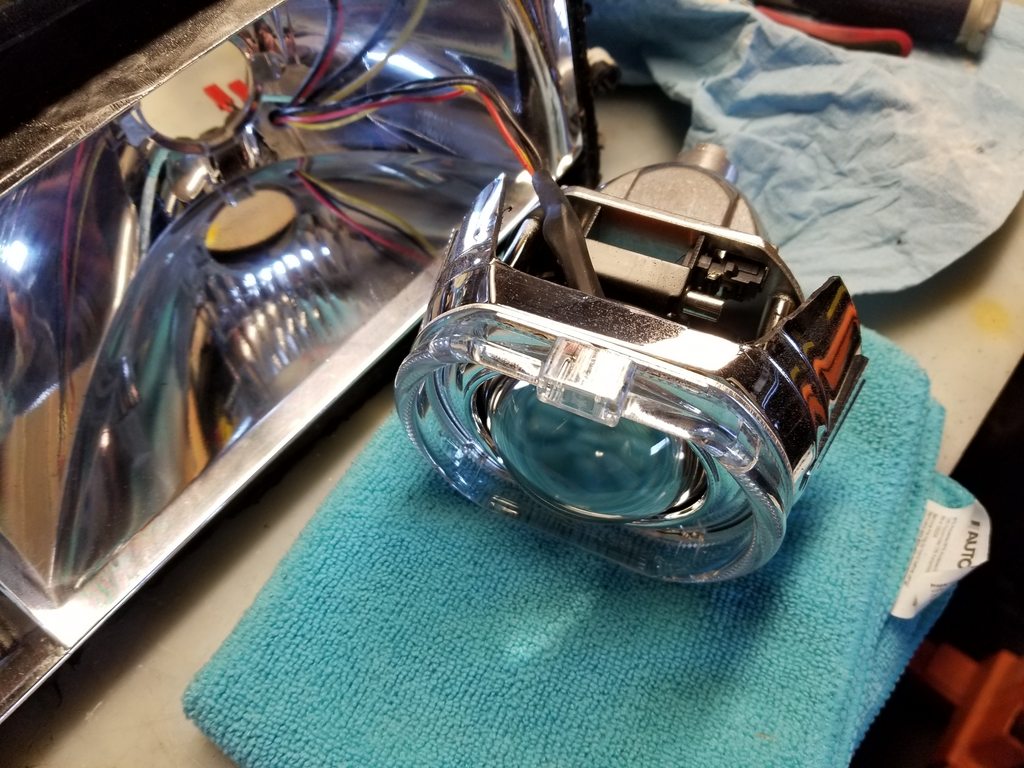 Fed the halo wiring through the drilled hole. 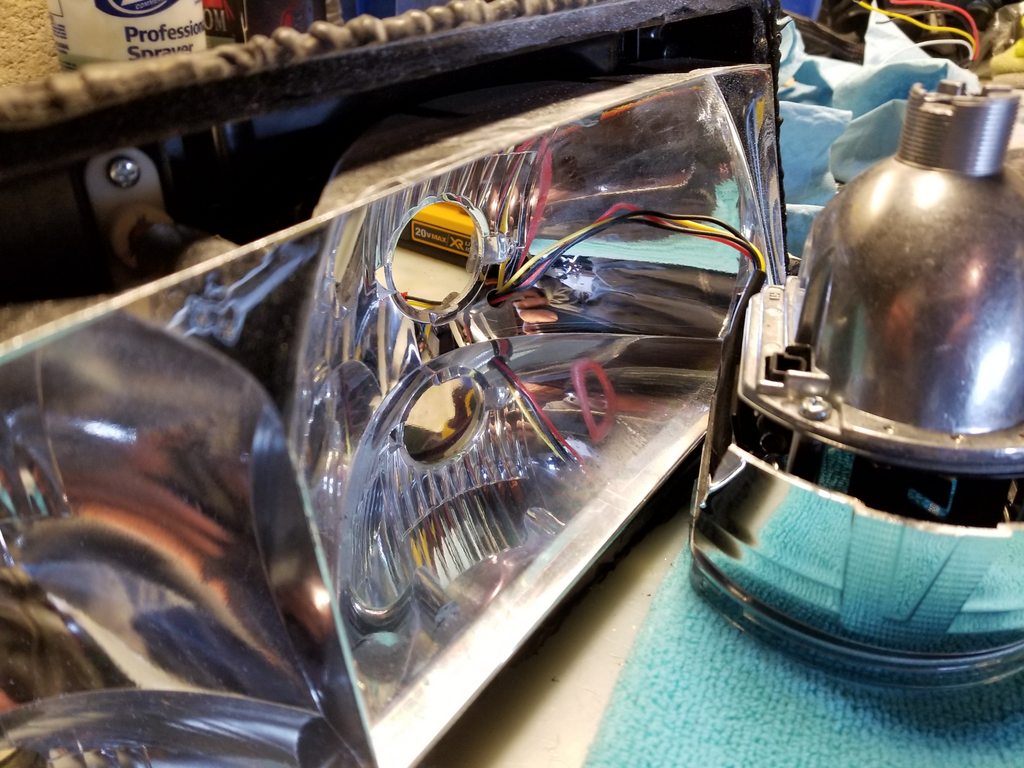 Installed the rubber sealing grommet onto the projector shaft. 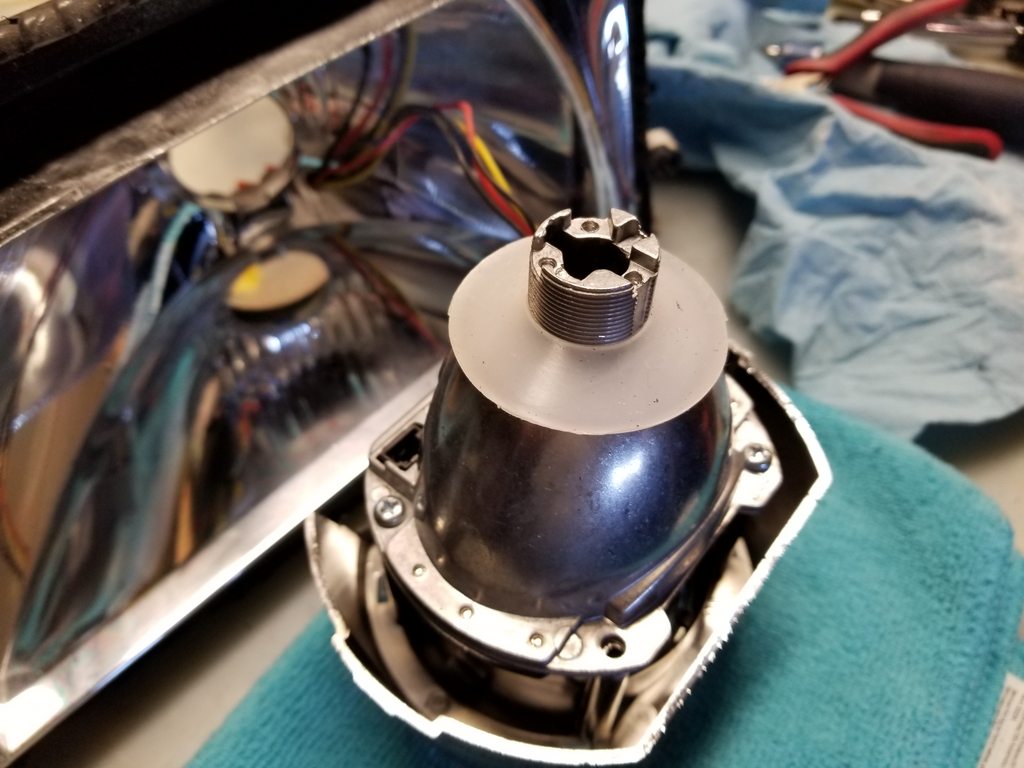 Shoved the projector shaft into the reflector housing, installed the metal retaining plate, and installed the shaft nut. 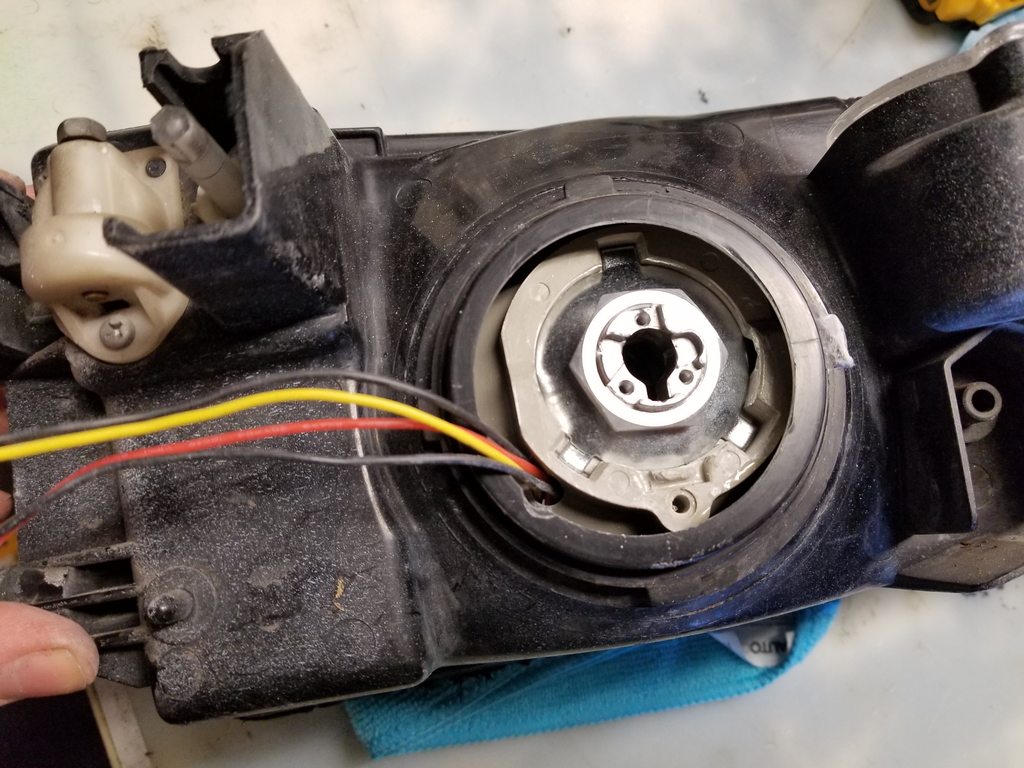 Installed the bulb clip retainer with the three small provided screws. Installed the HID bulb. The included bulb holder spring clip must be some kind of joke. It's nowhere close to fitting or holding anything. I cut a piece of steel wire and bent it into place to hold the bulb. 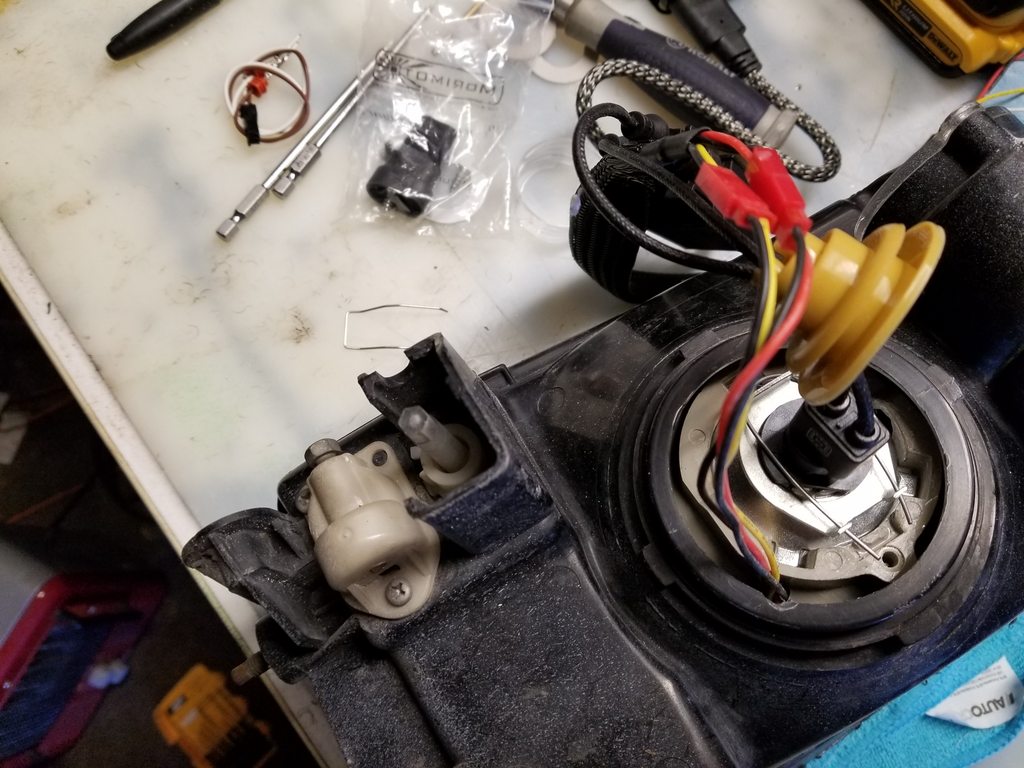 While adjusting the reflector housing up and down, I cracked the adjustor gear. Good job dummy. I pulled an adjustor gear and screw off my spare set of lights. 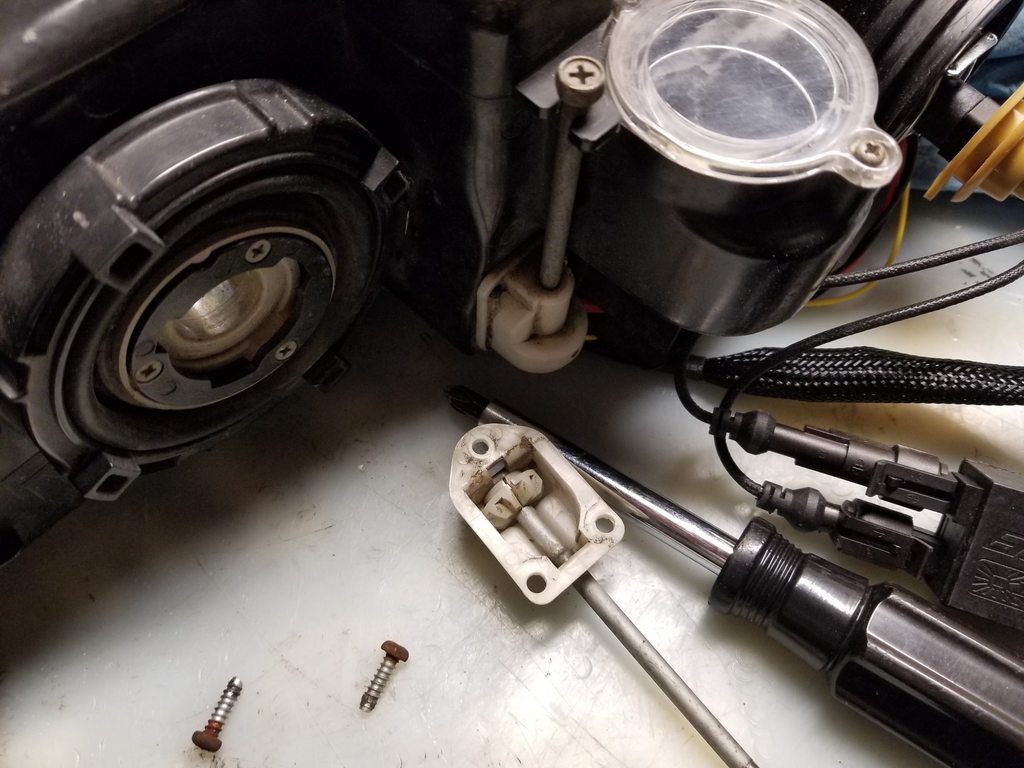 Here's something interesting. The '96 headlight housing has a bracket to support the top end of the adjusting screw. The '95 headlight housing has no support bracket. Screw is just chillin. 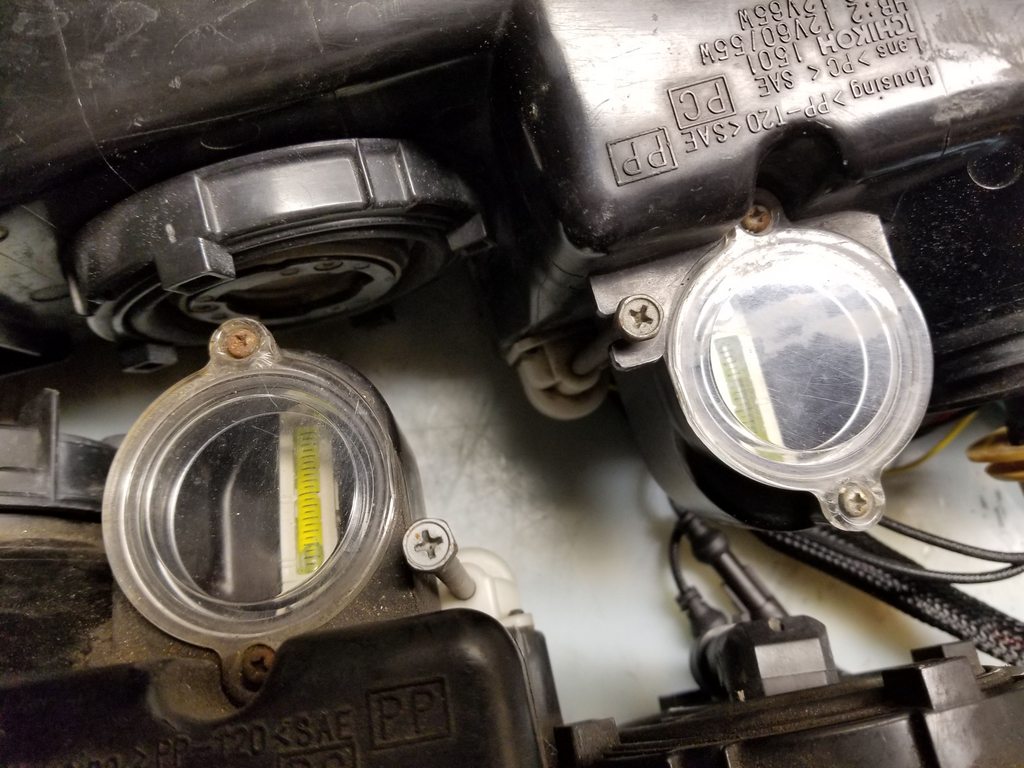 Headlight in semi-finished, temporary fitment state. 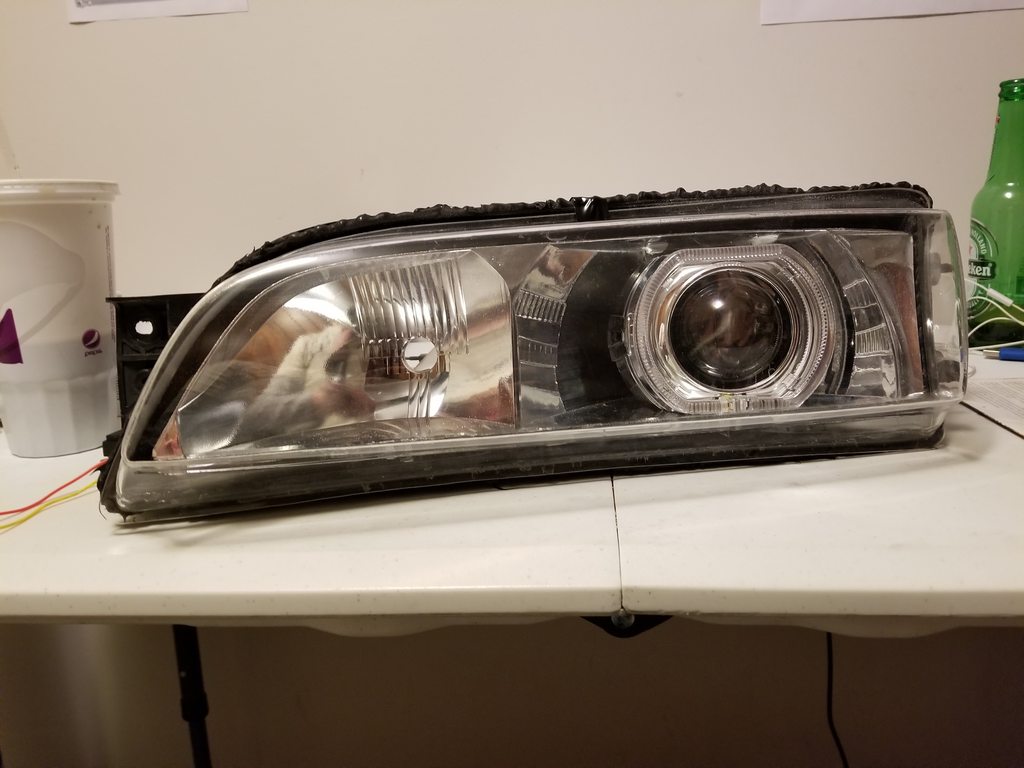  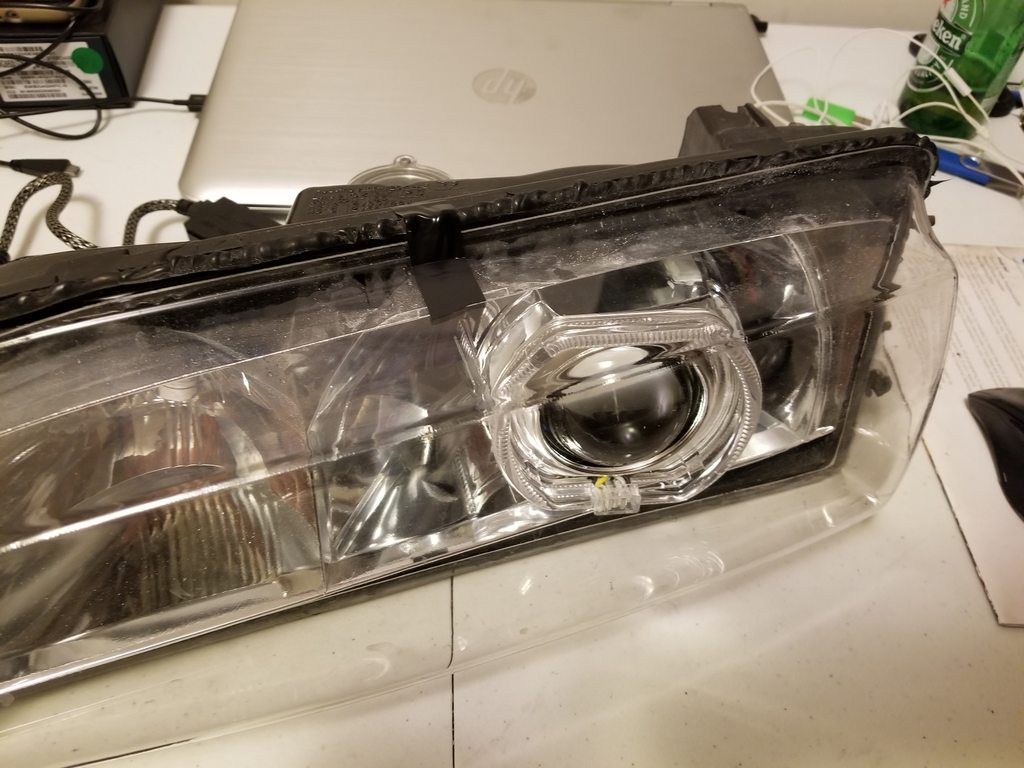 |
|
|
|
|
03-11-2018, 08:20 PM
|
#863 |
|
Premium Member
Join Date: Jun 2012
Location: Lancaster county, PA
Age: 30
Posts: 465
Trader Rating: (4)
Feedback Score: 4 reviews
|
I'm always excited to see how a modification will affect the vehicle. In the case of the lights, I wanted to see which system draws more power. The new HID system does draw slightly more current than the original low beam system. The good news; it's only 2 amps more total! Very impressive considering the substantial increase in useable light output.
One switchback halo draws 0.2 amps. 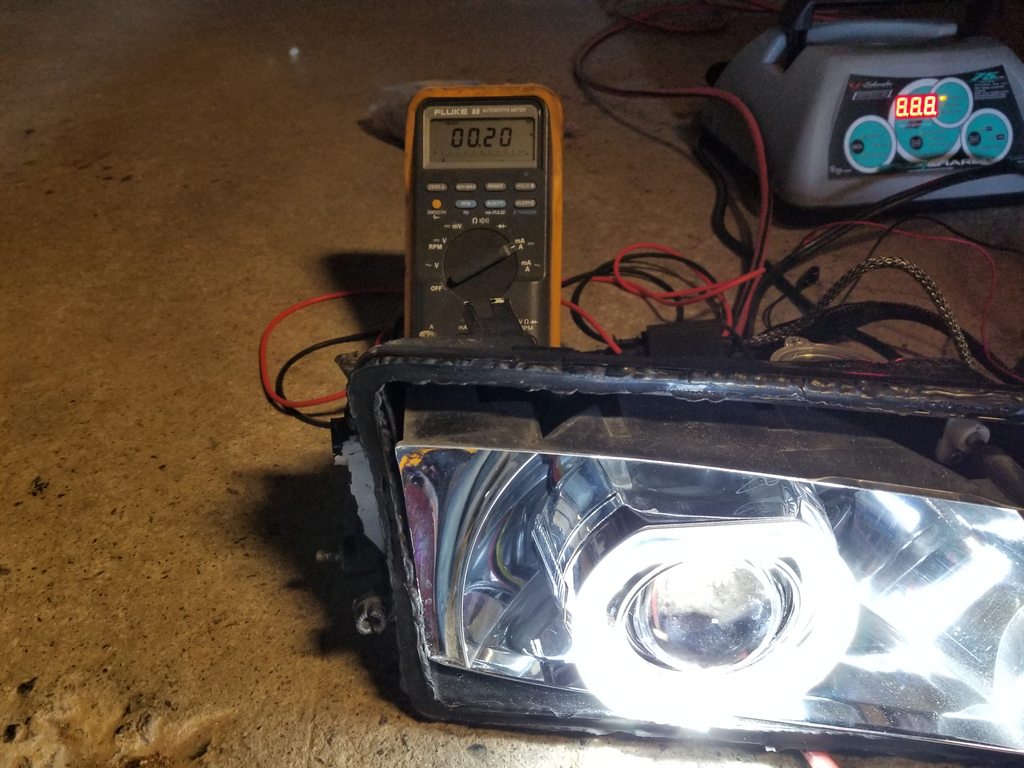 One HID bulb draws about 7 amps on cold start-up. Within about a minute, it settles down and remains at 4.1 amps. 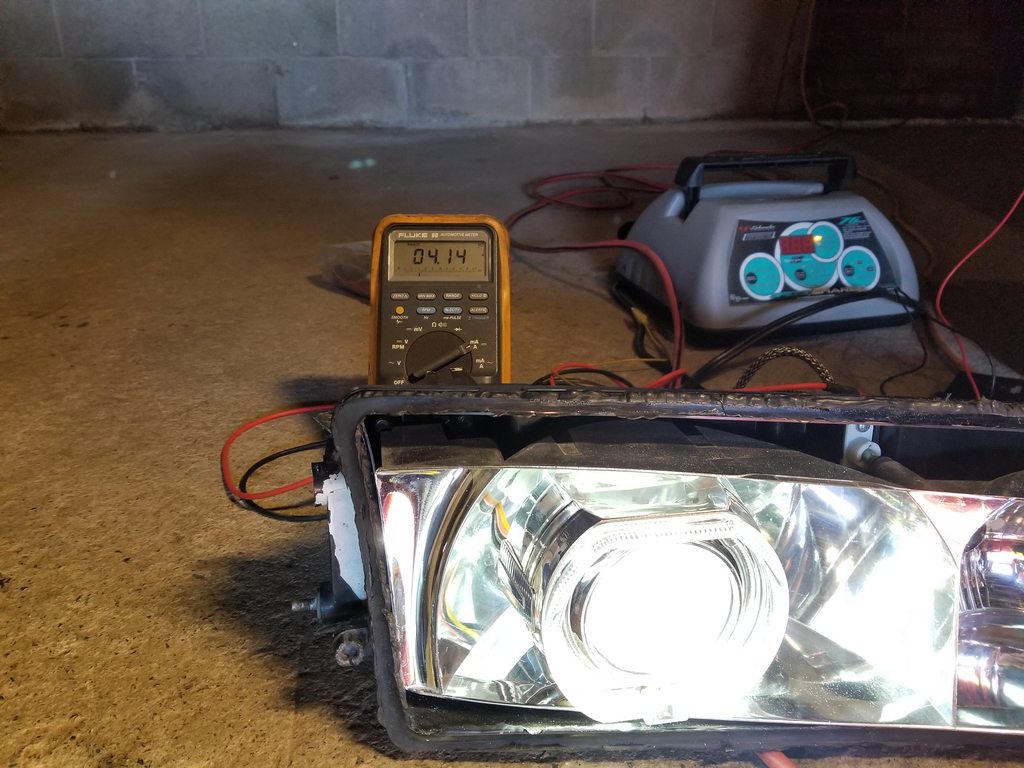 The original halogen low beam bulb draws 3.1 amps on the low beam filament. 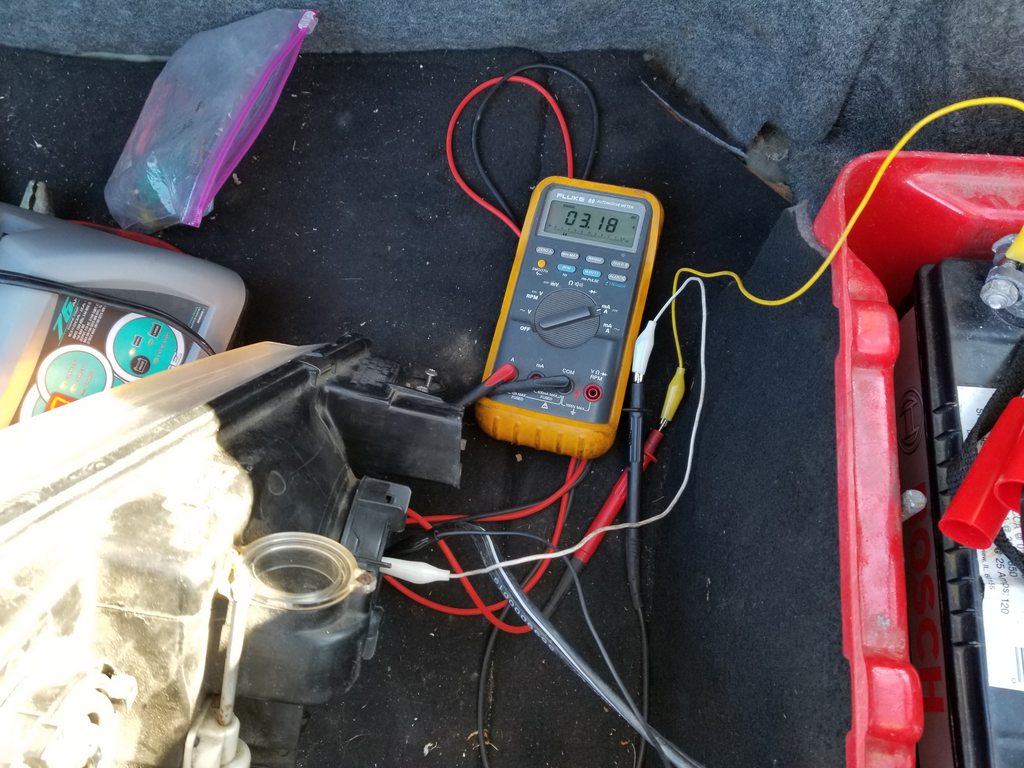 The original halogen low beam bulb draws 4.8 amps on the high beam filament. 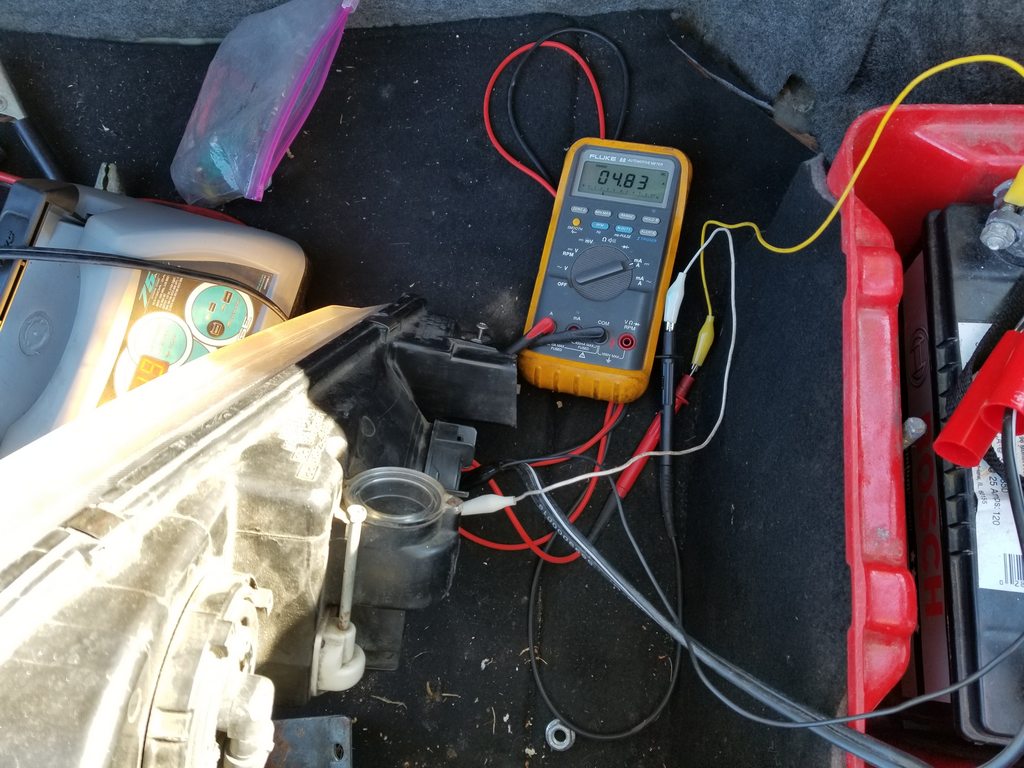 The original halogen high beam bulb (which will still be used) draws 5.5 amps. 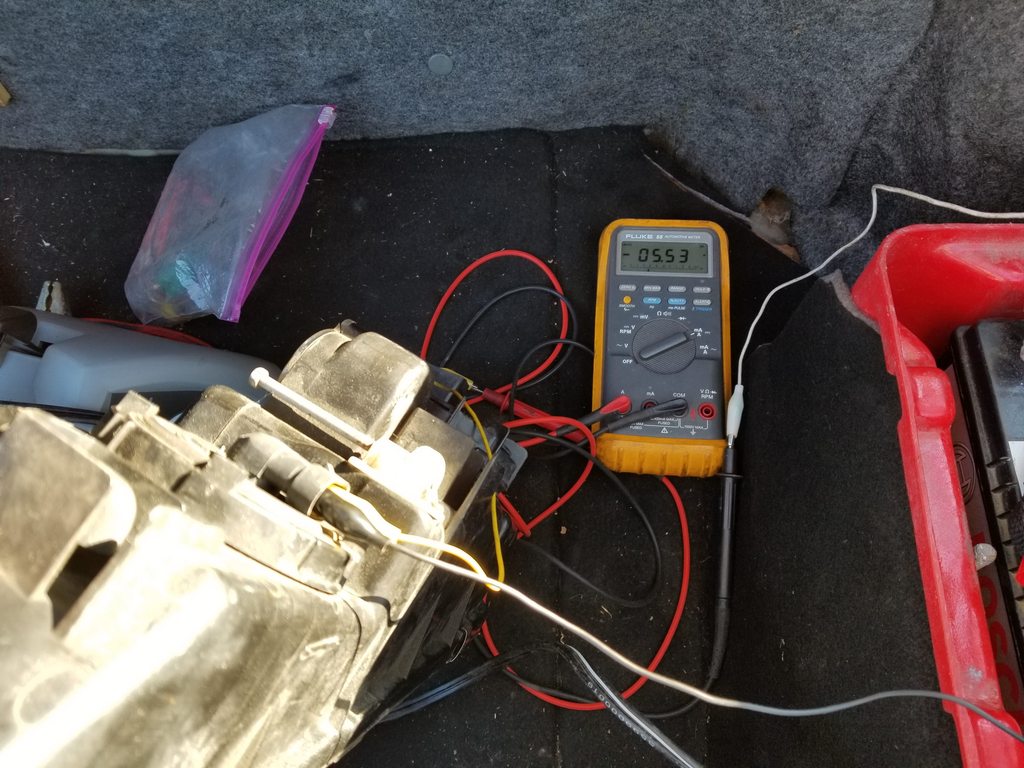 |
|
|
|
|
03-11-2018, 08:38 PM
|
#864 |
|
Premium Member
Join Date: Jun 2012
Location: Lancaster county, PA
Age: 30
Posts: 465
Trader Rating: (4)
Feedback Score: 4 reviews
|
Now the part that really matters. How do the lights perform? Quite well.
Here's something cool. The Zenki high beam bulb connector fits quite well onto the ballast power input. That made my temporary test fit and testing very easy. Just turn on the high beams and voila, the HID powers up. 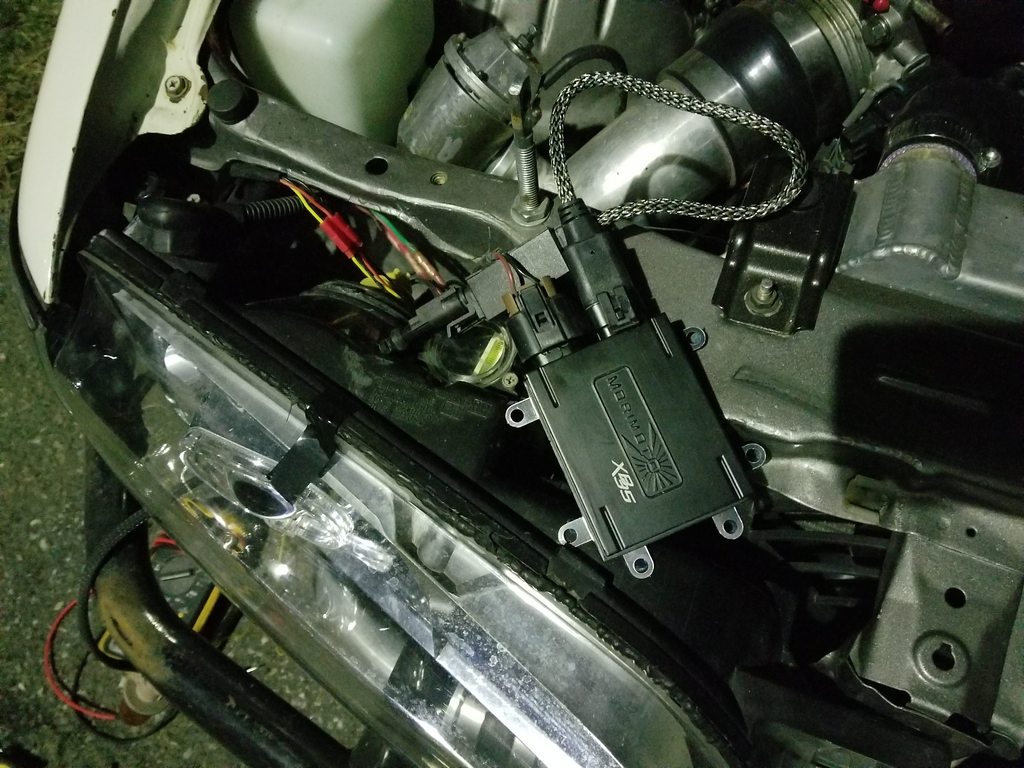 Halos are jumpered to the parking light wires. This is the view with only parking lights and halos on. 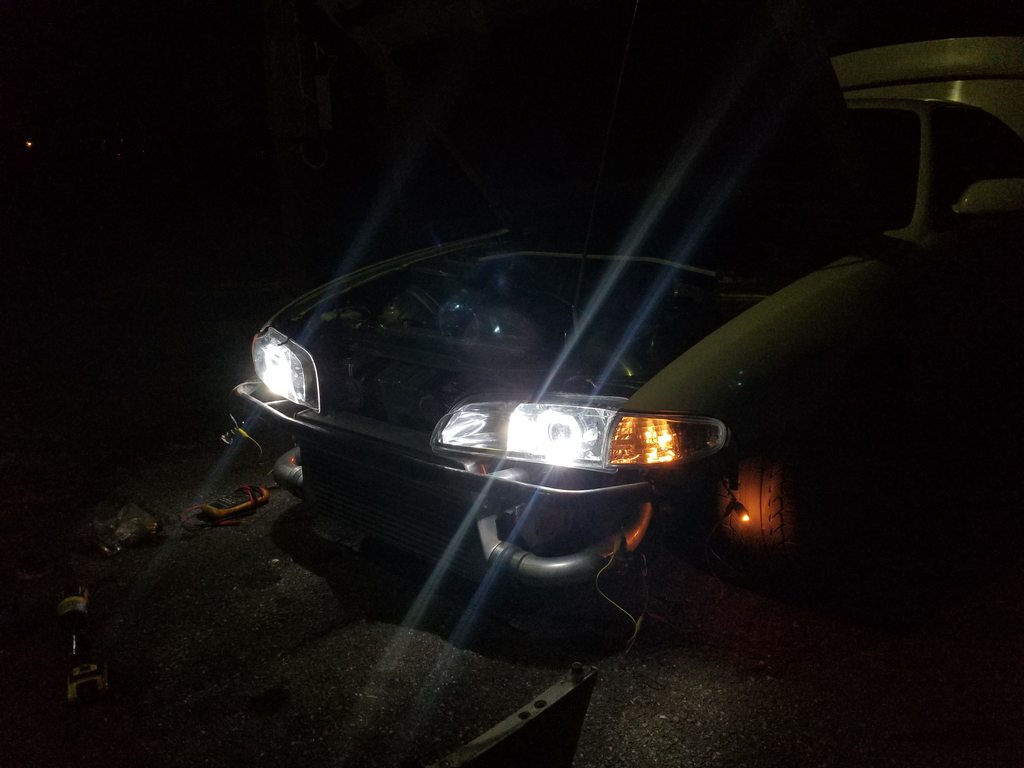 HIDs, halos, and parking lights on.  I can't remember if the HIDs are on or off in this one. Probably off.  BAM! Light cutoff came out damn near perfect. Very, very minimal up/down adjustment from the original position required. On my car, the headlight bulb center height is 21" from the ground. Car is lowered roughly 2.5". The light cutoff is at exactly 21". Test fit is 100% success. 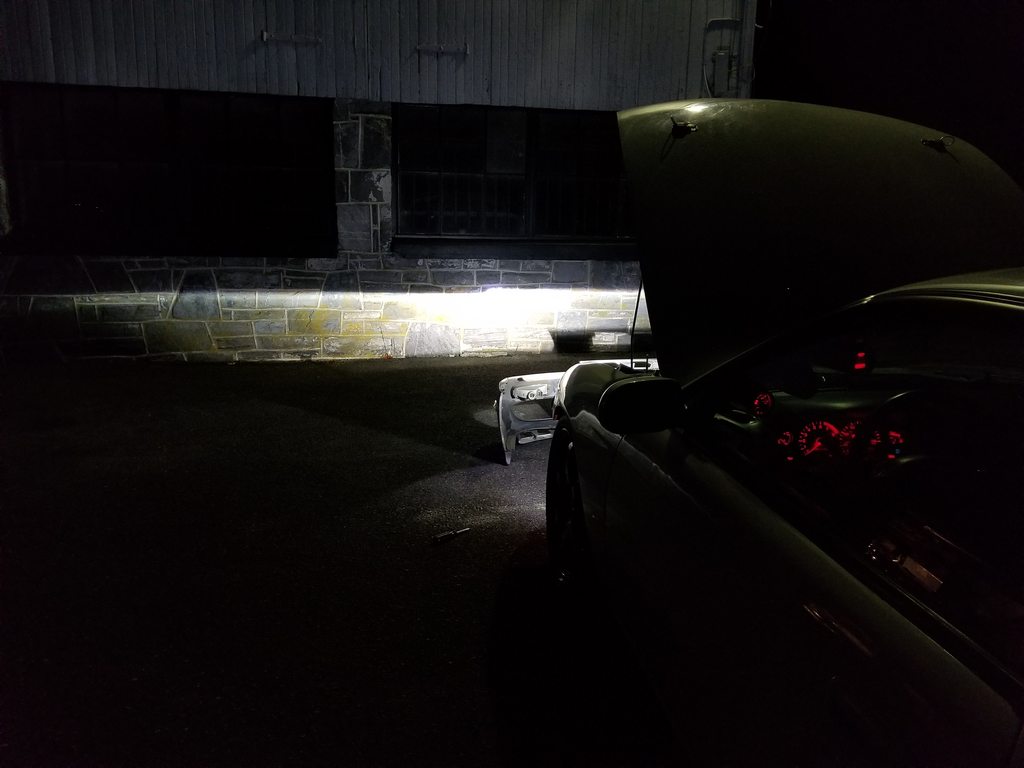 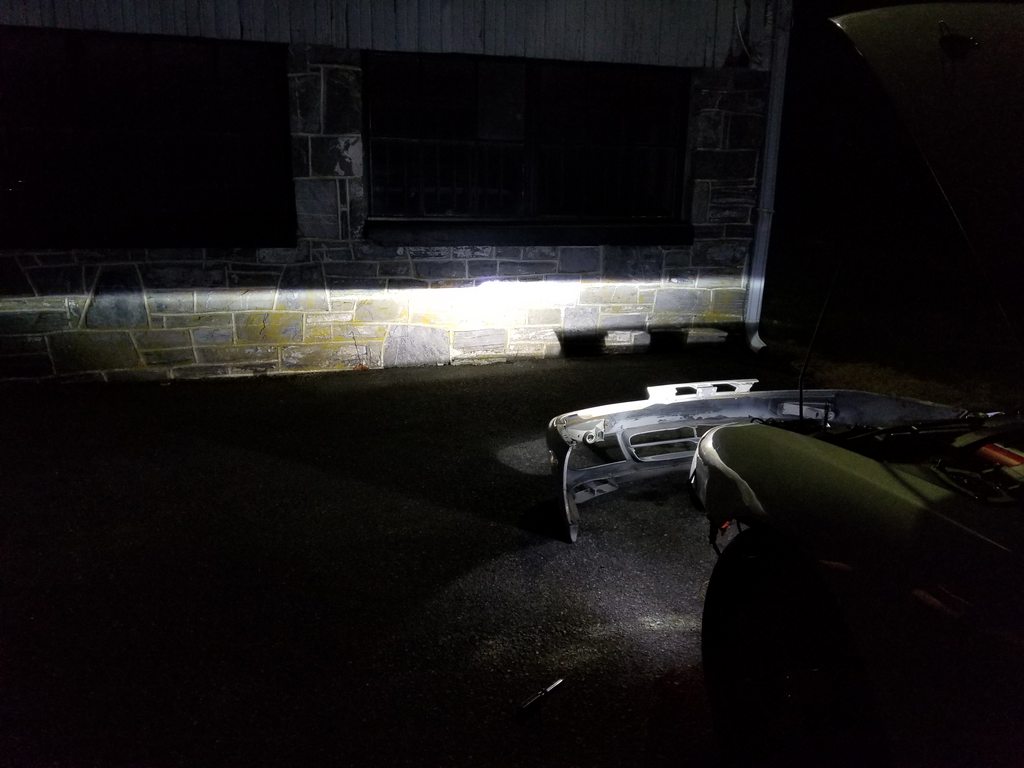 |
|
|
|
|
03-12-2018, 11:12 AM
|
#865 | |
|
Super Moderator
Join Date: Jun 2004
Location: SF Bay Area
Posts: 16,761
Trader Rating: (73)
Feedback Score: 73 reviews
|
Quote:
__________________
Best way to do business with me? Make your best offer FIRST. |
|
|
|
|
|
03-12-2018, 02:13 PM
|
#866 | |
|
Premium Member
Join Date: Mar 2009
Location: Maricopa, AZ
Age: 30
Posts: 7,679
Trader Rating: (10)
Feedback Score: 10 reviews
|
Wow I didn't know there were projectors that could just be installed into the stock housing like that and properly secured without some mish mash of silicone lol.
__________________
Quote:
|
|
|
|
|
|
04-14-2018, 06:53 PM
|
#867 |
|
Zilvia Addict
Join Date: Nov 2015
Location: Where the bad guys are
Posts: 887
Trader Rating: (6)
Feedback Score: 6 reviews
|
Has anyone worked with illumaesthetics stuff? Im really curious about where I can get my hands on some of that black molding cutout that they use for their led arrays.
__________________
Skurr Skurr
|
|
|
|
|
06-21-2018, 04:41 PM
|
#870 | |
|
Premium Member
Join Date: Mar 2009
Location: Maricopa, AZ
Age: 30
Posts: 7,679
Trader Rating: (10)
Feedback Score: 10 reviews
|
I'm probably blind but... Are there drop in upgrades for Silvia S13 dual or triple headlights?
__________________
Quote:
|
|
|
|
|
|
| Bookmarks |
| Thread Tools | |
| Display Modes | |
|
|


 Linear Mode

